Shutter priority is the best...

Joined
Feb 3, 2018
Messages
1,100
Reaction score
837
Age
60
Location
Albuquerque, New Mexico
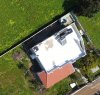
When mapping I use Map Pilot v2.9.2. I like the fact that I can use Shutter Priority to "hard code" shutter and ISO values. In v2.9.2, these settings are "etched in stone" and are NOT changed by the software. And though Map Pilot doesn't allow the user to change the ISO on the fly, one CAN change Shutter on the fly. The aperture adjusts automatically for a total EV of 0.0. This perfect system was "updated" (Read: screwed up) in subsequent versions. So for now, I'm sticking with v2.9.2.

The kewl thing about this work flow is that even on cloudy days I can push the shutter to 1/1600 (ISO 200). This, combined with the mechanical shutter of the P4P nets really great photos. Because there's almost zero motion blur (.01" Blur, according to the software), the drone flies quickly, in the 26-29 mph range.

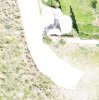
Check out this photo. The truck on the side of the road is me and my business partner and our equipment. The truck on the right is traveling approximately 60-70 mph in the same direction as the drone. The trucks on the left are traveling the opposite direction at the same velocity, but AGAINST the travel of the drone.

1587223097524.png


Even when digitally zoomed, everything looks pretty darn sharp:

1587223200790.png


It's disappointing that subsequent version of Map Pilot screwed around with this arguably perfect camera control. The latest version (v4.1.8 as of this writing), allows the user to change all settings on the fly, but is flawed because, despite changing ISO SETTING to 200, the last time I used the software the software REPORTED ISO as 100. So...for now, v2.9.2 it is.

Discuss.

D
 
Last edited:
Only one question where do I get version 2.9.2 looks like a winner
 
Only one question where do I get version 2.9.2 looks like a winner

Because neither Apple nor Map Pilot want you to have ANY control over your software or your device, it's a big ol' hack to get legacy app versions installed. Unfortunately, it's way too much to get into here. But here are some words that may help you search the internet:

* legacy apps
* Charles Proxy
* ipa files

D
 
Last edited:
Looks very good. This has me wanting to experiment with the settings some more. I wish I was more attune with the camera settings and what effects they have. What altitude were you flying? And you're sure of the speeds you were flying?
 
Looks very good. This has me wanting to experiment with the settings some more. I wish I was more attune with the camera settings and what effects they have.

Funny...I tell friends that "aerial photography" is 80% photography. I think this is why I do well. I'm not so much a drone pilot with a camera. I'm more a photographer/cinematographer with a drone.


What altitude were you flying?

249' AGL (terrain aware)


And you're sure of the speeds you were flying?

Absolutely. Speed DOES fluctuate, but not by much. The speed remained constant across all missions throughout the day between 26 and 27 mph. Pre-mission and post-mission (RTH) velocity was closer to 34 mph.

D
 
  • Like
Reactions: Bigriver
For me the best is manual mode not shutter or aperture priority. Only in manual mode the camera has constant light and exposure.
I tested the same flight in auto, shutter and aperture priority and in all modes I had overexposed images due to the change of the surface (grass, sea, buildings).
The tricky in manual mode is to determine the best settings for your project. This video explains the concept and is a good start
To view this content we will need your consent to set third party cookies.
For more detailed information, see our cookies page.
I am still learning and I wish I had more time to test the various settings.
 
For me the best is manual mode not shutter or aperture priority. Only in manual mode the camera has constant light and exposure.

With all due respect, I couldn't disagree more. Try mapping on a partly cloudy day if you don't believe me. Keep in mind that some of my jobs are large enough that conditions change from beginning to end. After years of doing this, I can tell you unequivocally that "Shutter Priority" is the perfect compromise between "fully manual" and "fully automatic." In fully manual mode if conditions darken and then lighten and darken and lighten, you better be Johnny-on-the-spot with your settings! If not, instead of consistent exposure, your photo exposures will follow lighting conditions. In Shutter Priority mode the aperture adjusts dynamically keeping Exposure Value consistent @ 0.0. If I find that conditions are becoming too dark for the aperture to compensate, I can dynamically, manually slow down the shutter without affecting the mission.

I have also found it useful to shoot native ISO of 200 (instead of non-native 100 ISO), because even on the darkest, cloudiest afternoon, I can keep the shutter as fast as 1/1600, which nets a motion blur of .2 inches, which allows the drone to fly full speed. And while I do MONITOR exposure on partly cloudy days (and perhaps make 1 adjustment during flight), I don't have to BABYSIT it.

And worth noting, I always "hard code" white balance to either "cloudy" or "sunny." "Auto WB" is horrible about changing WB back and forth 50 times per job. The manifests itself as some cool photos and some warm photos. This color inconsistency makes the mosaic look horrid. I don't need color accuracy. I DO need color consistency.


I tested the same flight in auto, shutter and aperture priority and in all modes I had overexposed images due to the change of the surface (grass, sea, buildings).

Well then this may be a software discrepancy. I use Map Pilot exclusively, which offers only 3 camera modes:

* Auto
* Manual
* Shutter priority

Map Pilot doesn't offer Aperture Priority. So perhaps your software handles exposure differently. I can tell you that I HAVE experienced different exposure curves not just between different apps, but between different VERSIONS of the SAME app.


The tricky in manual mode is to determine the best settings for your project.

What if the lighting changes? What happens when you go from say a concrete slab (white) to an asphalt slab (black)? I have found that "EV = 0.0" is pretty much flawless.


This video explains the concept and is a good start
To view this content we will need your consent to set third party cookies.
For more detailed information, see our cookies page.
I am still learning and I wish I had more time to test the various settings.

Take my word for it, my friend. I have dozens of mapping jobs under my belt...some as much as 2,500 acres. I have this down to a science. That said...

It's worth reiterating that different software DOES handle exposure differently. One version of Map Pilot adjusted the ISO up while closing the aperture. It makes zero sense to fly ISO 800 with an aperture f/8. This after "hard coding" the ISO to 200. Maddening! Yet that's what that version was doing...all the while underexposing the crap out of the photos. I literally had to stop the project and restart it using my old, trusty v2.9.2.

D
 
Last edited:
Me too use Map Pilot exclusively. I am sure there are four modes (auto,manual,aperture and shutter priority) at least in the 4.xx version.
I don't remeber using version 2.9.2 but it looks that you have found your sweet spot settings. I am still looking for the best settings because I just hate overexposed photos and also they are bad for photogrammetry.
Bad example (DJI_0026) and good example (DJI_0389).
 

Attachments

  • DJI_0026.jpg
    DJI_0026.jpg
    410.6 KB · Views: 362
  • DJI_0389.jpg
    DJI_0389.jpg
    1.7 MB · Views: 386
Me too use Map Pilot exclusively. I am sure there are four modes (auto,manual,aperture and shutter priority) at least in the 4.xx version.

Yes, perhaps in the later versions. In the version I use, there's no aperture priority.


I don't remeber using version 2.9.2 but it looks that you have found your sweet spot settings. I am still looking for the best settings because I just hate overexposed photos and also they are bad for photogrammetry.

Yep. Over or UNDER exposed are both bad for photogrammetry. Check out this contact sheet. Notice the exposure consistency:

1587968253942.png


Bad example (DJI_0026) and good example (DJI_0389).

Yep. Sans 1 shoot about 3 months ago using a 3.1.5 version of Map Pilot, I haven't had exposure issues for years.

D
 
Harleydude, do you recommend using a filter. I have the ND4, 8 & 16 filters. I’ve been using the auto settings with the 4 or 8 filter on cloudy days and 16 on sunny days. In high school & college I really got into photography and understood f-stops, exposure time & shutter speed. Unfortunately, 20 years later after not using it since (life got in the way) I’ve forgotten a lot. Time for a refresher course!

I’ve been flying aerial survey for about 6 months and about 15 flights, so I’m still relatively new and haven’t really experimented with the camera settings, just using auto. I recently flew a 280 acre project which started out as sunny but high clouds were coming and going over the site. I left the 16 filter on because the sun was rather intense when not covered by the clouds. My results in my processing software (Pix4D) weren’t the best and your post explains why. I have the P4 RTK which came with an android-attached controller and uses DJI’s GS RTK app. I’ll have to play with the settings.

Thanks for the tips!
 
Harleydude, do you recommend using a filter. I have the ND4, 8 & 16 filters. I’ve been using the auto settings with the 4 or 8 filter on cloudy days and 16 on sunny days. In high school & college I really got into photography and understood f-stops, exposure time & shutter speed. Unfortunately, 20 years later after not using it since (life got in the way) I’ve forgotten a lot. Time for a refresher course!

Since this is a mapping thread, I'm going to assume your question is, "Do you recommend an ND filter FOR MAPPING photography?"

The answer is, "No."

You have to hearken back to your college daze to remember WHY you used an ND filter. I'm sure you remember the exposure triangle. So what is our photographic objective for mapping photos?? Very easy:

* Sharp
* Clean
* Consistent color and exposure
* Properly exposed

That's about it. So how do we get "sharp?" High shutter speeds. How do we get "clean?" Low ISO. How do we insure consistency? Adjust the aperture. How do we get properly exposed? Again, adjust the aperture. So it seems to our great advantage to:

* Lock down the ISO
* Lock down the shutter
* Allow the aperture to adjust automatically to compensate for varying lighting conditions

How do we achieve this?

* ISO 200 (native ISO for most cameras)
* Shutter 1/1600 (good starting point for cloudy days) to 1/3200 (good starting point in direct sunlight)
* Allow the aperture to automatically compensate via Shutter Priority

With all this in mind, why would we use the ND filter? Are we trying to change depth of field? No. Are we trying to induce motion blur? HECK NO. Do we want to add a grainy texture to our photos? No.

Save the ND filters for video.


I’ve been flying aerial survey for about 6 months and about 15 flights, so I’m still relatively new and haven’t really experimented with the camera settings, just using auto.

I find that Auto Mode does a couple things I absolutely hate:

* Compensates exposure via shutter speed
* Compensates exposure via ISO
* White balance is all over the map

I don't want my shutter changing during a mapping job unless *I* change it. I never want my ISO changing ever. And unless you're mapping at night, ISO 200 will cover ALL lighting situations.


I recently flew a 280 acre project which started out as sunny but high clouds were coming and going over the site. I left the 16 filter on because the sun was rather intense when not covered by the clouds. My results in my processing software (Pix4D) weren’t the best and your post explains why.

You stopped down FOUR stops. For mapping, that was your worst enemy. As I'm sure you're now aware, you totally shot yourself in the foot on that one.


I have the P4 RTK which came with an android-attached controller and uses DJI’s GS RTK app. I’ll have to play with the settings.

Follow my settings above and you will achieve very sharp, very usable, very "map-friendly" photos.


Thanks for the tips!

You bet. Map Pilot allows me to adjust shutter on the fly during the shoot. So if I see the aperture "struggling" (f/2.8), I'll slow down the shutter. Keep a sharp eye on the exposure value, which should remain consistently 0.0.

Photography is a creative endeavor. But not for mapping. So everything we normally do for "creativity" gets tossed to the wayside.

Shoot the same property using the settings I recommended. Please share your results when you're done.

D
 
Last edited:
  • Like
Reactions: ARMeyer
do you recommend using a filter.
I recently flew a 280 acre project which started out as sunny but high clouds were coming and going over the site.
I left the 16 filter on because the sun was rather intense when not covered by the clouds.
Unless you have a particular reason to want to force your camera to use a slower shutter speed, there is no reason to use ND filters for shooting stills with a drone.

Your ND16 filter cuts 94% of the light, allowing only 6% to get through to the sensor.
To achieve proper exposure your camera has to use a much slower shutter speed (1/30th instead of 1/500th) or higher (noisier) ISO or both.

A sunny day is not a reason to put an ND filter on the drone.
The shuter speed goes all the way to 1/8000th and that will cope with brighter light than you'll ever encounter.
 
  • Like
Reactions: ARMeyer
Thank you Harleydude & Meta4 for your responses. Just to confirm your question Harley, I am talking about mapping.

I went with the filter based on a recommendation from another surveyor who’s been flying much longer than I have because it cuts down on the reflectance from the ground (I do a lot of surveying in the river and recharge areas, which are either dry or wet when I fly them and the sand, and of course water, can be quite reflective). It does take really nice photography and video with the filter, but like you said I shot myself in the foot using it for mapping. After the disappointment I experienced in the processing results, I’m excited to get out again and fly with your recommendations.

Thank you Harleydude for posting the pictures of the trucks. I happened to have a similar picture and the vehicle was very blurry, which, like you both said, would indicate a slower shutter speed. I’ll just chalk it up to “live and learn”.

I’m hoping to reshoot the area within the next couple of months for this project and I will be sure to post the pics.

Thanks again!

Aaron
 
I went with the filter based on a recommendation from another surveyor who’s been flying much longer than I have because it cuts down on the reflectance from the ground (I do a lot of surveying in the river and recharge areas, which are either dry or wet when I fly them and the sand, and of course water, can be quite reflective).
An ND filter won't change anything about how the image looks, it will just reduce the amount of light.
A polarising filter will reduce glare reflecting off water ... but they are a pain to use on a drone because they must be aligned relative to the sun to work properly.
If your drone turns to fly a different angle, the alignment changes and the filter won't work properly.
 
Can you explain this a little bit? What is the advantage of "native" ISO. What is "native ISO"?

Without diving too deep down the rabbit hole, there are basically three notable ISO spec's in any given camera. There's Base ISO, Native ISO and Extended ISO. Base ISO is almost always 100. Native ISO is usually a RANGE of numbers. And as the latter term implies, Extended ISO uses the cameras software to "push" the camera's sensor beyond its Native capabilities. The latter will induce noise into your image.

ISO spec's...a best guess....

Regarding Base ISO or Native ISO, DJI doesn't publish ANY information. One can only make best guesses based on the assumption that the 1" CMOS sensor is manufactured by Sony. But honestly, even the crappiest sensor has a native ISO that reaches far beyond anything you would use for mapping. For instance, Native ISO for the Sony A7 is 100 - 51,200. Now, I seriously doubt the P4P sensor has Native ISO range that wide, but surely we can assume the Native ISO to be in the 100 - 800 ISO range. But that is a complete assumption, albeit, a safe one.

So why shoot 200? Why not shoot 100?

I shoot 200 because I have been bitten by cloud cover and/or shadows that forced me to pull back the shutter to a speed I was uncomfortable with on a camera flying 26 mph. You can't adjust ISO on the fly. The mission has to be stopped, scrapped, bird brought home, ISO changed in Go 4, and restart the mission. Conversely, Shutter speed CAN be adjusted on the fly. I personally don't want my shutter under 1/1000. I like to keep motion blur down to .2". So....I simply set the ISO to 200 and leave it there. This allows me to keep the shutter @ 1/1600 in 99% of lighting conditions. Only during the deepest, darkest cloud cover have I had to dip below 1/1600. And honestly, if it's that dark, you're probably on the precipice of rain.

If it's sunny and bright as heck, I can stop down via the shutter. And as we've learned, a faster shutter is much better for a flying camera.

D
 
  • Like
Reactions: vgo195
I went with the filter based on a recommendation from another surveyor who’s been flying much longer than I have because it cuts down on the reflectance from the ground (I do a lot of surveying in the river and recharge areas, which are either dry or wet when I fly them and the sand, and of course water, can be quite reflective).

Meta4 already addressed this. I'll just agree with what he said. With all due respect to your surveyor friend, he is wrong. When it comes to ground reflections (due to water), the ND filter isn't going to help. And, as Meta4 pointed out, while a polarizing filter WILL help, it only helps if it's oriented correctly, which is impossible to do accurately from the ground.


I’m hoping to reshoot the area within the next couple of months for this project and I will be sure to post the pics.

Thanks again!

Aaron

You're welcome. Good luck.

D
 
  • Like
Reactions: ARMeyer
Without diving too deep down the rabbit hole, there are basically three notable ISO spec's in any given camera. There's Base ISO, Native ISO and Extended ISO. Base ISO is almost always 100. Native ISO is usually a RANGE of numbers. And as the latter term implies, Extended ISO uses the cameras software to "push" the camera's sensor beyond its Native capabilities. The latter will induce noise into your image.

ISO spec's...a best guess....

Regarding Base ISO or Native ISO, DJI doesn't publish ANY information. One can only make best guesses based on the assumption that the 1" CMOS sensor is manufactured by Sony. But honestly, even the crappiest sensor has a native ISO that reaches far beyond anything you would use for mapping. For instance, Native ISO for the Sony A7 is 100 - 51,200. Now, I seriously doubt the P4P sensor has Native ISO range that wide, but surely we can assume the Native ISO to be in the 100 - 800 ISO range. But that is a complete assumption, albeit, a safe one.

So why shoot 200? Why not shoot 100?

I shoot 200 because I have been bitten by cloud cover and/or shadows that forced me to pull back the shutter to a speed I was uncomfortable with on a camera flying 26 mph. You can't adjust ISO on the fly. The mission has to be stopped, scrapped, bird brought home, ISO changed in Go 4, and restart the mission. Conversely, Shutter speed CAN be adjusted on the fly. I personally don't want my shutter under 1/1000. I like to keep motion blur down to .2". So....I simply set the ISO to 200 and leave it there. This allows me to keep the shutter @ 1/1600 in 99% of lighting conditions. Only during the deepest, darkest cloud cover have I had to dip below 1/1600. And honestly, if it's that dark, you're probably on the precipice of rain.

If it's sunny and bright as heck, I can stop down via the shutter. And as we've learned, a faster shutter is much better for a flying camera.

D
One last q. Do you thing aperture is irrelevant of the accuracy of the map? Is it proper for aperture to change throughout the mission?
In my last mission the best photos were taken at ISO100 f1/2.8 and shutter 1/2000 on a fully sunny day.
Map Pilot 4.1.8 kept the initial settings of the mission. Previous versions had problem keeping the camera settings as set initially. The app was doing its thing and changed ISO,aperture,shutter speed **** it was very annoying.
Also the camera settings can change while in flight with the right clickwheel of the controller. See here but it is not optimal (see comments).
 

Recent Posts

Members online

Forum statistics

Threads
143,066
Messages
1,467,352
Members
104,933
Latest member
mactechnic