Phantom 3 Standard range mod , let's do it together...

I deff want to hear the results ! I tried to have mine done but finally I messed it up bad lol but I did order a new motherboard board and it’s perfect now like it was when I got it
 
Got P3S yesterday. Not happy with range. Considering I also live in dense residential area with hundreds of wifi networks around.
So I tried to hack(?) in to it to see what can be done.
I was so far successful getting inside via FTP :
...
Hi,
you've been doing some scripting on the drone. I would like to make the mod switchable by checking the state of the front LEDs(thy are remotely switchable).
Perhaps you know how to get the state of the LEDs by script? Or the state of the s1 switch.
i learned that back LEDs can be read out by "cat /sys/devices/platform/leds-gpio/leds/tp-link:green:system/brightness".
Thanks for any help!
Rhino
 
Rhino.de - please let me know if you find out how to check the switch state from a script, as I'm trying to do something similar. I have a set of amplifiers that I sometimes connect, and sometimes don't, depending on the flight. Without the amplifiers FCC mode (I am in the US) at 27 dBm is fine, but the amplifier input is max 23 dBm and so when using them I need to reduce the TX power of the remote. Right now I have to do this manually via telnet each time, so it would be very nice if I could hold down a button while powering up the RC to select between the two modes.

I have explored /sys/devices a little and wasn't able to find any obvious way to get the button state, but I am sure there is a way - after all apsrv does it!

-Adrian
ok, I will do so and post everything that I find out.
Perhaps you can do that too in case you find something. Thanks.
 
Rhino.de - will do - I will keep exploring and let you know if I find something useful.

Right now I am using a great iPhone terminal app with scripting called Termius - I have set it up so I press a button in the app to telnet into the RC and run a script. I've found this to be the most convenient way to change AP settings on the RC straight from my phone without manually having to telnet in from a laptop. Not as good as pressing a button on the RC, but it's a reasonable workaround till we find out how to do it properly.

-Adrian
 
Confirmed to work properly :)

But to make the mod easier as this is very small, then I made it a bit easier.
Rather than soldering the very short wire on the very very tiny dots for the chip
I soldered the wire on the end of the SMD capacitor close to the chip and then to only one of the antenna capacitors.
The soldering area is larger and easier to solder to than the tiny dot.
Also the wire is longer, so it does stick on one end even the other is being soldered.
That is not the case if you have 2mm long wire as the original mod.
Just solder small/wire-wrap-wire on the points shown as #1 in red or as #2 in blue.

I know it might affect the RF part, but it for sure did improve the range dramatically.

upload_2018-4-8_23-1-31.png
 
Last edited:
This is an update to the repair, as it is very difficult to do due to very small soldering dots.
This change makes it workable using almost normal sized soldering iron, making it possible to do by more people.
 
  • Like
Reactions: RodPad
Confirmed to work properly :)

But to make the mod easier as this is very small, then I made it a bit easier.
Rather than soldering the very short wire on the very very tiny dots for the chip
I soldered the wire on the end of the SMD capacitor close to the chip and then to only one of the antenna capacitors.
The soldering area is larger and easier to solder to than the tiny dot.
Also the wire is longer, so it does stick on one end even the other is being soldered.
That is not the case if you have 2mm wire as the original mod.
Just solder small/wire-wrap-wire on the points shown as #1 in red or as #2 in blue.

I know it might affect the RF part, but it for sure did improve the range dramatically.

View attachment 97369
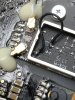
So the wire attaches to the centre point just left of that chip and then to either one of those points at the top or bottom right of the board?
 
Yes exactly :)
Bigger soldering points so it is workable for humans.

I dont know, but would guess the antennas are for 2 and 5 Ghz meaning the switching in the chip is to select the proper antenna for the frequency in use.
But the antennas are good (enough) for either frequency.
 
Yes exactly :)
Bigger soldering points so it is workable for humans.

I dont know, but would guess the antennas are for 2 and 5 Ghz meaning the switching in the chip is to select the proper antenna for the frequency in use.
But the antennas are good (enough) for either frequency.
Excellent, thank you
 
Yes exactly :)
Bigger soldering points so it is workable for humans.

I dont know, but would guess the antennas are for 2 and 5 Ghz meaning the switching in the chip is to select the proper antenna for the frequency in use.
But the antennas are good (enough) for either frequency.
I think I got her
 

Attachments

  • 2FF0E564-3538-4930-B108-CDDFEC0A8AEA.jpeg
    2FF0E564-3538-4930-B108-CDDFEC0A8AEA.jpeg
    1.3 MB · Views: 748
Yes exactly :)
Bigger soldering points so it is workable for humans.

I dont know, but would guess the antennas are for 2 and 5 Ghz meaning the switching in the chip is to select the proper antenna for the frequency in use.
But the antennas are good (enough) for either frequency.
IT WORKED, IT FRIGEN WORKED!!
It’s not exactly the range I used to get 1000-2000 meters.
However I feel this is a start, my distance was reduced to 150-300 meters, and after this mod I got 800 meters.
I’m wondering if I should solder to both of those antenna points,
Not sure if it’s ok to do, I don’t want to short,burn out something.
Any ideas or experience with this would be great
Thanks
 
  • Like
Reactions: Greybush
Great news no side effects ??... I will try over the weekend with the mod ... .I was thinking of changing 1 of the 5.8 antenna while the bird is open
 
FINALLY found this thread. Describes everything that’s been happening to my P3S. After the firmware update (1.9.20), my drone went from over 5000 Ft without losing signal to intermittently losing it anywhere from 200 to 1800. After reading this entire thread, I took it out this morning and kept a close eye on signal strength. It would jump from 98 to 40 to 0 to 95 etc. If it stayed at 0 for more than a couple seconds, RTH. When signal strength increased, I could again take control. I’m gonna try agteigarnet’s mod (because it looks easier). Has anyone discovered whether one antenna or the other works best?
 
You should remove the chip, at least the one pin in center to the capacitor.
And shorter and thinner wire would be better for the signal strength.
 
  • Like
Reactions: Mtn Boy

Recent Posts

Members online

Forum statistics

Threads
143,090
Messages
1,467,564
Members
104,973
Latest member
Dosserdd