The cable is attached with a sticky adhesive. A new cable just has a paper backing that you remove, exposing the adhesive.
There really is only one way to get it off, which would be to use a thin plastic tool to try and get under the old one, and hopefully not damage the cable (if it's not damaged already).
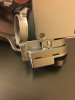
You will also be needing to tear the whole roll arm/pitch motor/camera down.
Be careful, and don't just pull the flex cable out of any connectors. There are tiny clasps (I've seen the clasps referred to as switches) that have to be very carefully lifted so as to release the flex cable.
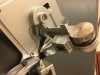
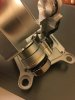
The piece that I have marked with the red arrow will come off of the roll motor.
It's held in place magnetically. You should be able to pull it off carefully with some pliers, but be sure to put the pliers jaw force mostly near the rear, where the flat back part is, to avoid bending the cup around the edge.
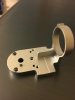
Once apart, clean the out side edge of all the old adhesive. I used a razor knife and it came off pretty easy, as the adhesive was brittle and pretty much popped off as I put pressure on it with the blade tip.
Next, carefully press the silver cup into the new roll arm ring. I placed my roll arm on a block of wood, and using another small piece of wood and a hammer, carefully tapped the cup in place. After that, I took the advise of FSTOP-LABS and put a few drops of super glue around the perimeter to secure the cup into the ring.
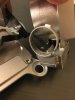
When you get to the point where it's time to press the (now one piece) roll arm/silver cup back on to the roll motor, there is a proper alignment, so that the camera has a level horizon. I'd say that you want to get that alignment close, and any small adjustment gets made from behind the roll motor.
Sent from my SM-N910V using Tapatalk