Check with multimeter whether the paths are not still shorted.
If they're not, short the path temporarily to GND.
If they're not, short the path temporarily to GND.


Has anybody replaced the NAND chip for another one that doesn't get corrupted so easily?
 phantompilots.com
hello, gaucho thanks for your great post. I wanted to know if it is possible to flash the air unit in a different way? since the TX pin broken on the circuitThis thread is becomed a little bit too long to be read.
for anyone interested just in the solution, I pasted here directly the conclusions. If you have any problem with the procedure or if you want to go deep in how I found the solution, just read the entire thread. Don't ask a question if you didn't read the entire thread.
This post describes the problem (and the solution) for the ground unit and also for the air unit, cause the problem may occour to one of the two components.
PROBLEM SYMPTOMS FOR GROUND UNIT
1)Connecting upgrade port on the ground unit to a pc with the DJI assistant by means of a usb cable, you are able to see the firmware version of the "ground system main controller" but not the firmware version of the other 2 firmware components.
2)Connecting an android device to the lightbridge ground unit and opening the lightbridge app, you will not be able to estabilish a connection, like if the ground unit was powered OFF.
you will also find the problem symtoms here: Lightbridge firmware
PROBLEM SYMPTOMS FOR AIR UNIT
Connecting upgrade port on the air unit to a pc with the DJI assistant by means of a usb cable, you are able to see the firmware version of the "air system main controller" but not the firmware version of the other 2 firmware components.
View attachment 72882
PROBLEM DESCRIPTION
This is a problem of the "nand flash". This problem is common to a lot of modules from Dji (p3p no signal, rc transmitter inspire no signal, vision plus live view not working, etc. etc.).
The problem appears when people use LB ( and other devices from Dji) few times during the year, leaving long period where they don't use the device.
Bad blocks in the memory grows up continuously, but if you once a month start the device, Linux marks bad blocks, and it changes the system parameters, "repairing" the memory.
But if you don't use it for 3-4-5 month (in my case 1 month), bad blocks corrupt the flash in the UBL component area or in the U-BOOT component area, and you will no more be able to boot it.
In Phantom4 Dji removed this memory and this kind of problem should not appear.
The solution is to flash again the firmware on the internal memory of the LB.
PROBLEM SOLUTION:
(PROCEDURE TO FLASH BOOTLOADER AND U-BOOT ON DJI LIGHTBRIDGE)
1)solder 3 wires on the serial TX,RX,GND pins and connect it to a PC by means of a level adapter like the FT232RL 3.3V-5.5V FTDI USB to TTL Serial Adapter (or equivalent one).
View attachment 72889
You can find it on amazon for 8€.
Note: set the ft232rl jumper on 3,3V cause the Lightbridge serial is a 3,3Volt serial.
2)solder 2 wires on the pins BSEL and 3V3 pins in order to let you short the 2 wires when needed
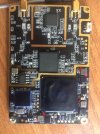
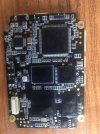
Image showing where to solder the wires on the PCB:
GROUND UNIT
View attachment 63426
View attachment 63000
AIR UNIT
View attachment 72886
View attachment 115913
Note: TX is the pin where LB receives data from the PC and RX is the pin where LB sends data to our PC.
3) make the shortcircuit between BSEL and 3V3.
4) download and extract the folder annexed to this post
5) open a dos command prompt and go in the extracted folder
6) run the following command:Note1: replace COM21 with the serial port that you are using.Code:sfh_DM36x.exe -nandflash -v -p "COM21" ubl1_editedByGaucho.img u-boot_modifiedByGaucho.img
Note2: some users reported that the exe doesn't correctly flash the unit using windows 10 64 bits and windows seven 64 bits while it correctly works on windows xp professional sp3 32 bit and windows vista family 32 bit
7) power on the LB and wait that the flasher tool scrolls while writing data to flash.
8) usually the procedure never completes at the first step and the tool continues to print BOOTME BOOTME... so you have to press CTRL+C on the keyboard to stop the tool, then relaunch again the same command of step 6.
If the CTRL+C "method" don’t allow the complete firmware upload (this usually happens on the air unit), leave the sfh_DM36x.exe running, remove the power from the unit and then power it back
You will see, at the end, that the components are completely written and the tool automatically exits with success.
NOTE: On Air Unit, if the procedure fails, poweroff the unit, maintain all the previously connected wires, add a connection from the RESET pin to ground pin, then repeat steps from 5 to 8.
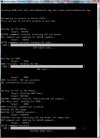
During the flash you should see this kind of log (this was saved while flashing an air unit):
Code:----------------------------------------------------- TI Serial Flasher Host Program for DM36x (C) 2009, Texas Instruments, Inc. Ver. 1.50 ----------------------------------------------------- Flashing NAND with ubl1_editedByGaucho.img and u-boot_modifiedByGaucho.img. Attempting to connect to device COM5... Press any key to end this program at any time. Waiting for the DM36x... Target: BOOTME BOOTME commmand received. Returning ACK and header... ACK command sent. Waiting for BEGIN command... Target: BEGIN BEGIN commmand received. Sending CRC table... 100% [ ] CRC table sent.... Waiting for DONE... Target: DONE DONE received. Sending the UBL... 100% [ ] UBL sent.... Target: DONE DONE received. UBL was accepted. UBL transmitted successfully. Waiting for SFT on the DM36x... Target: Starting UART Boot... Target: BOOTUBL BOOTUBL commmand received. Returning CMD and command... CMD value sent. Waiting for DONE... Target: DONE DONE received. Command was accepted. Sending the UBL image Waiting for SENDIMG sequence... Target: SENDIMG SENDIMG received. Returning ACK and header for image data... ACK command sent. Waiting for BEGIN command... Target: BEGIN BEGIN commmand received. 100% [ ] Image data sent... Waiting for DONE... Target: DONE DONE received. All bytes of image data received... Target: Writing UBL to NAND flash Target: Unprotecting blocks 0x00000001 through 0x00000018. Target: Number of blocks needed for header and data: 0x0x00000001 Target: Attempting to start in block number 0x0x00000001. Target: Erasing block 0x00000001 through 0x00000001. Target: Writing header and image data to Block 0x00000001, Page 0x00000000 Target: Erasing block 0x00000002 through 0x00000002. Target: Writing header and image data to Block 0x00000002, Page 0x00000000 Target: Erasing block 0x00000003 through 0x00000003. Target: Writing header and image data to Block 0x00000003, Page 0x00000000 Target: Erasing block 0x00000004 through 0x00000004. Target: Writing header and image data to Block 0x00000004, Page 0x00000000 Target: Erasing block 0x00000005 through 0x00000005. Target: Writing header and image data to Block 0x00000005, Page 0x00000000 Target: Erasing block 0x00000006 through 0x00000006. Target: Writing header and image data to Block 0x00000006, Page 0x00000000 Target: Erasing block 0x00000007 through 0x00000007. Target: Writing header and image data to Block 0x00000007, Page 0x00000000 Target: Erasing block 0x00000008 through 0x00000008. Target: Writing header and image data to Block 0x00000008, Page 0x00000000 Target: Erasing block 0x00000009 through 0x00000009. Target: Writing header and image data to Block 0x00000009, Page 0x00000000 Target: Erasing block 0x0000000A through 0x0000000A. Target: Writing header and image data to Block 0x0000000A, Page 0x00000000 Target: Erasing block 0x0000000B through 0x0000000B. Target: Writing header and image data to Block 0x0000000B, Page 0x00000000 Target: Erasing block 0x0000000C through 0x0000000C. Target: Writing header and image data to Block 0x0000000C, Page 0x00000000 Target: Erasing block 0x0000000D through 0x0000000D. Target: Writing header and image data to Block 0x0000000D, Page 0x00000000 Target: Erasing block 0x0000000E through 0x0000000E. Target: Writing header and image data to Block 0x0000000E, Page 0x00000000 Target: Erasing block 0x0000000F through 0x0000000F. Target: Writing header and image data to Block 0x0000000F, Page 0x00000000 Target: Erasing block 0x00000010 through 0x00000010. Target: Writing header and image data to Block 0x00000010, Page 0x00000000 Target: Erasing block 0x00000011 through 0x00000011. Target: Writing header and image data to Block 0x00000011, Page 0x00000000 Target: Erasing block 0x00000012 through 0x00000012. Target: Writing header and image data to Block 0x00000012, Page 0x00000000 Target: Erasing block 0x00000013 through 0x00000013. Target: Writing header and image data to Block 0x00000013, Page 0x00000000 Target: Erasing block 0x00000014 through 0x00000014. Target: Writing header and image data to Block 0x00000014, Page 0x00000000 Target: Erasing block 0x00000015 through 0x00000015. Target: Writing header and image data to Block 0x00000015, Page 0x00000000 Target: Erasing block 0x00000016 through 0x00000016. Target: Writing header and image data to Block 0x00000016, Page 0x00000000 Target: Erasing block 0x00000017 through 0x00000017. Target: Writing header and image data to Block 0x00000017, Page 0x00000000 Target: Erasing block 0x00000018 through 0x00000018. Target: Writing header and image data to Block 0x00000018, Page 0x00000000 Target: Protecting the entire NAND flash. Target: DONE Sending the Application image Waiting for SENDIMG sequence... Target: SENDIMG SENDIMG received. Returning ACK and header for image data... ACK command sent. Waiting for BEGIN command... Target: BEGIN BEGIN commmand received. 100% [ ] Image data sent... Waiting for DONE... Target: DONE DONE received. All bytes of image data received... Target: Writing APP to NAND flash Target: Unprotecting blocks 0x00000019 through 0x00000032. Target: Number of blocks needed for header and data: 0x0x00000003 Target: Attempting to start in block number 0x0x00000019. Target: Erasing block 0x00000019 through 0x0000001B. Target: Writing header and image data to Block 0x00000019, Page 0x00000000 Target: Erasing block 0x0000001C through 0x0000001E. Target: Writing header and image data to Block 0x0000001C, Page 0x00000000 Target: Erasing block 0x0000001F through 0x00000021. Target: Writing header and image data to Block 0x0000001F, Page 0x00000000 Target: Erasing block 0x00000022 through 0x00000024. Target: Writing header and image data to Block 0x00000022, Page 0x00000000 Target: Erasing block 0x00000025 through 0x00000027. Target: Writing header and image data to Block 0x00000025, Page 0x00000000 Target: Erasing block 0x00000028 through 0x0000002A. Target: Writing header and image data to Block 0x00000028, Page 0x00000000 Target: Erasing block 0x0000002B through 0x0000002D. Target: Writing header and image data to Block 0x0000002B, Page 0x00000000 Target: Erasing block 0x0000002E through 0x00000030. Target: Writing header and image data to Block 0x0000002E, Page 0x00000000 Target: Protecting the entire NAND flash. Target: DONE Target: DONE Operation completed successfully.
9) power off the LB
10) open the wires between BSEL and 3V3 (if you had to use also RESET pin, open also RESET pin).
11) open a terminal (Hyperterminal, tera term or equivalent tool) on the serial line, selecting speed 115200bps and flow control none.
12) Power on LB and look on the terminal the boot process. It should be equivalent to the following one. At the end you will be able to type commands on linux. press ENTER key to see that the linux terminal answers to you requests.
GROUND UNIT BOOT LOG
Code:DM36x initialization passed! UBL Product Vesion : DJI-GSP-UBL-1.0-rc10(2014-08-15) Dji UBL Version: 1.51(Aug 15 2014 - 17:05:12) Booting Catalog Boot Loader BootMode = NAND Starting NAND Copy... Valid magicnum, 0xA1ACED66, found in block 0x00000019. Uboot Checksum:0x7E25B44B Actua Checksum:0x7E25B44B U-Boot Product Vesion : DJI-GSP-Uboot-1.0-rc4(2014-07-23) U-Boot 2010.12-rc2-svn-Dji (Jul 23 2014 - 11:14:40) Cores: ARM 432 MHz DDR: 297 MHz I2C: ready DRAM: 128 MiB NAND: 128 MiB Bad block table found at page 65472, version 0x01 Bad block table found at page 65408, version 0x01 *** Warning - bad CRC, using default environment Net: Ethernet PHY: GENERIC @ 0xff DaVinci-EMAC Press ESC to abort autoboot in 1 seconds Loading from nand0, offset 0x4a0000 ** Unknown image type Wrong Image Format for bootm command ERROR: can't get kernel image! Loading from nand0, offset 0x900000 Image Name: Linux-2.6.32.17-davinci1 Created: 2014-05-30 6:44:26 UTC Image Type: ARM Linux Kernel Image (uncompressed) Data Size: 4034816 Bytes = 3.8 MiB Load Address: 80008000 Entry Point: 80008000 ## Booting kernel from Legacy Image at 80700000 ... Image Name: Linux-2.6.32.17-davinci1 Created: 2014-05-30 6:44:26 UTC Image Type: ARM Linux Kernel Image (uncompressed) Data Size: 4034816 Bytes = 3.8 MiB Load Address: 80008000 Entry Point: 80008000 Loading Kernel Image ... OK OK Starting kernel ... [ 0.000000] Kernel Product Vesion : DJI-GSPv2-Kernel-1.0-rc3(2014-05-30 14:45) [ 0.000000] Linux version 2.6.32.17-davinci1 (root@dji) (gcc version 4.3.3 (Sourcery G++ Lite 2009q1-203) ) #8 PREEMPT Fri May 30 14:44:25 HKT 2014 [ 0.000000] CPU: ARM926EJ-S [41069265] revision 5 (ARMv5TEJ), cr=00053177 [ 0.000000] CPU: VIVT data cache, VIVT instruction cache [ 0.000000] Machine: DaVinci DM36x EVM [ 0.000000] Memory policy: ECC disabled, Data cache writeback [ 0.000000] DaVinci dm36x_rev1.2 variant 0x8 [ 0.000000] Built 1 zonelists in Zone order, mobility grouping off. Total pages: 12192 [ 0.000000] Kernel command line: console=ttyS0,115200n8 rw dm365_imp.oper_mode=0 video=davincifb:vid0=0,10K:vid1=0,10K:osd0=1920x1080X16,8100K mem=48MB davinci_enc_mngr.ch0_output=COMPOSITE davinci_enc_mngr.ch0_mode=pal ubi.mtd=2,2048 root=ubi0:rootfs rootfstype=ubifs ip=off lpj=1077248 [ 0.000000] PID hash table entries: 256 (order: -2, 1024 bytes) [ 0.000000] Dentry cache hash table entries: 8192 (order: 3, 32768 bytes) [ 0.000000] Inode-cache hash table entries: 4096 (order: 2, 16384 bytes) [ 0.000000] Memory: 48MB = 48MB total [ 0.000000] Memory: 44456KB available (3644K code, 446K data, 116K init, 0K highmem) [ 0.000000] SLUB: Genslabs=11, HWalign=32, Order=0-3, MinObjects=0, CPUs=1, Nodes=1 [ 0.000000] Hierarchical RCU implementation. [ 0.000000] NR_IRQS:245 [ 0.000000] Console: colour dummy device 80x30 [ 0.000000] Calibrating delay loop (skipped) preset value.. 215.44 BogoMIPS (lpj=1077248) [ 0.000000] Mount-cache hash table entries: 512 [ 0.000000] CPU: Testing write buffer coherency: ok [ 0.000000] DaVinci: 8 gpio irqs [ 0.000000] NET: Registered protocol family 16 [ 0.030000] EVM: tvp5146 SD video input [ 0.110000] bio: create slab <bio-0> at 0 [ 0.110000] DM365 IPIPE initialized in Continuous mode [ 0.120000] SCSI subsystem initialized [ 0.120000] usbcore: registered new interface driver usbfs [ 0.120000] usbcore: registered new interface driver hub [ 0.120000] usbcore: registered new device driver usb [ 0.130000] vpss vpss: dm365_vpss vpss probed [ 0.130000] vpss vpss: dm365_vpss vpss probe success [ 0.130000] dm365_afew_hw_init [ 0.140000] ch0 default output "COMPOSITE", mode "PAL" [ 0.140000] VPBE Encoder Initialized [ 0.140000] cfg80211: Using static regulatory domain info [ 0.140000] cfg80211: Regulatory domain: US [ 0.140000] (start_freq - end_freq @ bandwidth), (max_antenna_gain, max_eirp) [ 0.140000] (2402000 KHz - 2472000 KHz @ 40000 KHz), (600 mBi, 2700 mBm) [ 0.140000] (5170000 KHz - 5190000 KHz @ 40000 KHz), (600 mBi, 2300 mBm) [ 0.140000] (5190000 KHz - 5210000 KHz @ 40000 KHz), (600 mBi, 2300 mBm) [ 0.140000] (5210000 KHz - 5230000 KHz @ 40000 KHz), (600 mBi, 2300 mBm) [ 0.140000] (5230000 KHz - 5330000 KHz @ 40000 KHz), (600 mBi, 2300 mBm) [ 0.140000] (5735000 KHz - 5835000 KHz @ 40000 KHz), (600 mBi, 3000 mBm) [ 0.140000] cfg80211: Calling CRDA for country: US [ 0.140000] LogicPD encoder initialized [ 0.140000] Switching to clocksource timer0_1 [ 0.150000] musb_hdrc: version 6.0, pio, host, debug=0 [ 0.170000] musb_hdrc: USB Host mode controller at fec64000 using PIO, IRQ 12 [ 0.170000] musb_hdrc musb_hdrc: MUSB HDRC host driver [ 0.170000] musb_hdrc musb_hdrc: new USB bus registered, assigned bus number 1 [ 0.170000] usb usb1: configuration #1 chosen from 1 choice [ 0.170000] hub 1-0:1.0: USB hub found [ 0.170000] hub 1-0:1.0: 1 port detected [ 0.170000] NET: Registered protocol family 2 [ 0.170000] IP route cache hash table entries: 1024 (order: 0, 4096 bytes) [ 0.170000] TCP established hash table entries: 2048 (order: 2, 16384 bytes) [ 0.170000] TCP bind hash table entries: 2048 (order: 1, 8192 bytes) [ 0.170000] TCP: Hash tables configured (established 2048 bind 2048) [ 0.170000] TCP reno registered [ 0.170000] NET: Registered protocol family 1 [ 0.170000] RPC: Registered udp transport module. [ 0.170000] RPC: Registered tcp transport module. [ 0.170000] RPC: Registered tcp NFSv4.1 backchannel transport module. [ 0.180000] kfile init [ 0.180000] JFFS2 version 2.2. (NAND) © 2001-2006 Red Hat, Inc. [ 0.180000] msgmni has been set to 86 [ 0.190000] alg: No test for stdrng (krng) [ 0.190000] io scheduler noop registered (default) [ 0.220000] davincifb davincifb.0: dm_osd0_fb: Initial window configuration is invalid. [ 0.230000] davincifb davincifb.0: dm_osd0_fb: 1920x1080x16@0,0 with framebuffer size 8100KB [ 0.230000] davincifb davincifb.0: dm_vid0_fb: 0x0x16@0,0 with framebuffer size 10KB [ 0.250000] davincifb davincifb.0: dm_osd1_fb: Initial window configuration is invalid. [ 0.250000] davincifb davincifb.0: dm_osd1_fb: 1920x1080x4@0,0 with framebuffer size 4050KB [ 0.250000] davincifb davincifb.0: dm_vid1_fb: 0x0x16@0,0 with framebuffer size 10KB [ 0.310000] venc off init [ 0.310000] hdmi status init [ 0.310000] input: gpio-keys as /devices/platform/gpio-keys/input/input0 [ 0.310000] DM365 IPIPEIF probed [ 0.320000] imp serializer initialized [ 0.320000] davinci_previewer initialized [ 0.320000] davinci_resizer initialized [ 0.320000] Serial: 8250/16550 driver, 2 ports, IRQ sharing disabled [ 0.330000] serial8250.0: ttyS0 at MMIO 0x1c20000 (irq = 40) is a 16550A [ 0.810000] console [ttyS0] enabled [ 0.810000] serial8250.0: ttyS1 at MMIO 0x1d06000 (irq = 41) is a 16550A [ 0.820000] brd: module loaded [ 0.820000] at24 1-0050: 32768 byte 24c256 EEPROM (writable) [ 0.900000] NAND device: Manufacturer ID: 0x2c, Chip ID: 0xf1 (Micron NAND 128MiB 3,3V 8-bit) [ 0.910000] Creating 4 MTD partitions on "davinci_nand.0": [ 0.920000] 0x000000000000-0x0000004a0000 : "bootloader" [ 0.920000] 0x0000004a0000-0x000000e00000 : "kernel" [ 0.930000] 0x000000e00000-0x000007f00000 : "filesystem" [ 0.940000] 0x000000000000-0x000008000000 : "all" [ 0.950000] davinci_nand davinci_nand.0: controller rev. 2.3 [ 0.960000] UBI: attaching mtd2 to ubi0 [ 0.960000] UBI: physical eraseblock size: 131072 bytes (128 KiB) [ 0.970000] UBI: logical eraseblock size: 126976 bytes [ 0.970000] UBI: smallest flash I/O unit: 2048 [ 0.980000] UBI: sub-page size: 512 [ 0.980000] UBI: VID header offset: 2048 (aligned 2048) [ 0.990000] UBI: data offset: 4096 [ 1.120000] usb 1-1: new high speed USB device using musb_hdrc and address 2 [ 1.270000] usb 1-1: configuration #1 chosen from 1 choice [ 1.270000] hub 1-1:1.0: USB hub found [ 1.280000] hub 1-1:1.0: 2 ports detected [ 1.510000] UBI: attached mtd2 to ubi0 [ 1.510000] UBI: MTD device name: "filesystem" [ 1.520000] UBI: MTD device size: 113 MiB [ 1.520000] UBI: number of good PEBs: 904 [ 1.530000] UBI: number of bad PEBs: 0 [ 1.530000] UBI: max. allowed volumes: 128 [ 1.540000] UBI: wear-leveling threshold: 4096 [ 1.540000] UBI: number of internal volumes: 1 [ 1.550000] UBI: number of user volumes: 1 [ 1.550000] UBI: available PEBs: 0 [ 1.560000] UBI: total number of reserved PEBs: 904 [ 1.560000] UBI: number of PEBs reserved for bad PEB handling: 9 [ 1.570000] UBI: max/mean erase counter: 63/1 [ 1.570000] UBI: image sequence number: 1092381712 [ 1.580000] UBI: background thread "ubi_bgt0d" started, PID 349 [ 1.590000] console [netcon0] enabled [ 1.590000] netconsole: network logging started [ 1.590000] Initializing USB Mass Storage driver... [ 1.600000] usbcore: registered new interface driver usb-storage [ 1.610000] USB Mass Storage support registered. [ 1.610000] usbcore: registered new interface driver usbtest [ 1.620000] i2c /dev entries driver [ 1.620000] Linux video capture interface: v2.00 [ 1.630000] ths7303 1-002c: chip found @ 0x58 (DaVinci I2C adapter) [ 1.640000] ths7303 1-002c: ths7303 write failed [ 1.640000] ths7303: probe of 1-002c failed with error -121 [ 1.650000] tvp5150_init [ 1.650000] vpfe_init [ 1.650000] vpfe-capture: vpss clock vpss_master enabled [ 1.660000] vpfe-capture vpfe-capture: v4l2 device registered [ 1.670000] vpfe-capture vpfe-capture: video device registered [ 1.670000] tvp5150_probe [ 1.680000] tvp5150 1-005d: tvp5150 1-005d decoder driver registered !! [ 1.680000] vpfe-capture vpfe-capture: v4l2 sub device tvp5150 registered [ 1.690000] vpfe-capture vpfe-capture: v4l2 sub device cat6023 register fails [ 1.700000] vpfe_register_ccdc_device: DM365 ISIF [ 1.700000] DM365 ISIF is registered with vpfe. [ 1.710000] Trying to register davinci display video device. [ 1.720000] layer=c17f7000,layer->video_dev=c17f7164 [ 1.720000] Trying to register davinci display video device. [ 1.730000] layer=c17f7400,layer->video_dev=c17f7564 [ 1.740000] davinci_init:DaVinci V4L2 Display Driver V1.0 loaded [ 1.740000] watchdog watchdog: heartbeat 1 sec [ 1.750000] TCP cubic registered [ 1.750000] NET: Registered protocol family 17 [ 1.760000] lib80211: common routines for IEEE802.11 drivers [ 1.760000] ksocket init [ 1.790000] Clocks: disable unused mmcsd0 [ 1.790000] Clocks: disable unused mmcsd1 [ 1.790000] Clocks: disable unused spi0 [ 1.790000] Clocks: disable unused spi1 [ 1.790000] Clocks: disable unused spi2 [ 1.790000] Clocks: disable unused spi3 [ 1.790000] Clocks: disable unused spi4 [ 1.790000] Clocks: disable unused pwm0 [ 1.790000] Clocks: disable unused pwm1 [ 1.790000] Clocks: disable unused pwm2 [ 1.790000] Clocks: disable unused pwm3 [ 1.790000] Clocks: disable unused timer1 [ 1.790000] Clocks: disable unused timer3 [ 1.790000] Clocks: disable unused emac [ 1.790000] Clocks: disable unused voice_codec [ 1.790000] Clocks: disable unused asp0 [ 1.790000] Clocks: disable unused rto [ 1.790000] Clocks: disable unused mjcp [ 1.870000] nnnn===0 [ 1.870000] davinci_emac_probe: using random MAC addr: 46:40:56:47:74:4c [ 1.880000] emac-mii: probed [ 1.920000] UBIFS: recovery needed [ 1.970000] UBIFS: recovery completed [ 1.970000] UBIFS: mounted UBI device 0, volume 0, name "rootfs" [ 1.980000] UBIFS: file system size: 110342144 bytes (107756 KiB, 105 MiB, 869 LEBs) [ 1.980000] UBIFS: journal size: 9023488 bytes (8812 KiB, 8 MiB, 72 LEBs) [ 1.990000] UBIFS: media format: w4/r0 (latest is w4/r0) [ 2.000000] UBIFS: default compressor: lzo [ 2.000000] UBIFS: reserved for root: 0 bytes (0 KiB) [ 2.010000] VFS: Mounted root (ubifs filesystem) on device 0:13. [ 2.010000] Freeing init memory: 116K >>>>>>>>>>>>>>>>>>>>>>>>>>>>>>GSPv2<<<<<<<<<<<<<<<<<<<<<<<<<<<<<<<<< Filesystem Product Vesion : DJI-GSPv2-Filesystem-1.0-rc3(2014-06-05) Runing /etc/init.d/rcS [ 3.800000] CMEMK module: built on Jan 22 2014 at 14:52:00 [ 3.820000] Reference Linux version 2.6.32 [ 3.820000] File /home/u/dm368/dvsdk_dm368_4_02_00_06/linuxutils_2_26_01_02/packages/ti/sdo/linuxutils/cmem/src/module/cmemk.c [ 3.840000] allocated heap buffer 0xc7000000 of size 0x4400000 [ 3.870000] heap fallback enabled - will try heap if pool buffer is not available [ 3.870000] CMEM Range Overlaps Kernel Physical - allowing overlap [ 3.880000] CMEM phys_start (0x1000) overlaps kernel (0x80000000 -> 0x83000000) [ 3.890000] cmemk initialized [ 3.920000] IRQK module: built on Jan 22 2014 at 14:52:01 [ 3.940000] Reference Linux version 2.6.32 [ 3.940000] File /home/u/dm368/dvsdk_dm368_4_02_00_06/linuxutils_2_26_01_02/packages/ti/sdo/linuxutils/irq/src/module/irqk.c [ 3.960000] irqk initialized [ 4.010000] EDMAK module: built on Jan 22 2014 at 14:52:02 [ 4.010000] Reference Linux version 2.6.32 [ 4.030000] File /home/u/dm368/dvsdk_dm368_4_02_00_06/linuxutils_2_26_01_02/packages/ti/sdo/linuxutils/edma/src/module/edmak.c [ 4.700000] usb 1-1.1: new high speed USB device using musb_hdrc and address 3 [ 4.830000] usb 1-1.1: configuration #1 chosen from 1 choice * daemon not running. starting it now on port 5037 * * daemon started successfully * sulogin: no password entry for root umount: can't umount /mnt/usb: No such file or directory login[491]: root login on 'ttyS0' rmdir: '/mnt/usb': No such file or directory #Process /etc/profile... root@Dji-Pro:~# USBClient version 1.0.23 ReadSize = 2048 Timeout = 90 init libusb successed!!! !!!!!!!!!!!!!!!!!!!!!!! open 68013 succeed VENDOR_ID = 0x0547 Claiming libusb_claim_interface 68013 successed usbmuxd_subscribe OK OK watchdog timeout:5 latency1:33332 latency2:33000 latency3:30000 displaybuffnum1:4 displaybuffnum2:9 start decode stream from 68013 decode init ok, main thread exit Osd_Init_Font succeed ….
AIR UNIT BOOT LOG (cutted because I reached the maximum post length on this forum)
Code:DM36x initialization passed! UBL Product Vesion : DJI-GSP-UBL-1.0-rc10(2014-08-15) Dji UBL Version: 1.51(Aug 15 2014 - 17:05:12) Booting Catalog Boot Loader BootMode = NAND Starting NAND Copy... Valid magicnum, 0xA1ACED66, found in block 0x00000019. Uboot Checksum:0x7E25B44B Actua Checksum:0x7E25B44B U-Boot Product Vesion : DJI-GSP-Uboot-1.0-rc4(2014-07-23) U-Boot 2010.12-rc2-svn-Dji (Jul 23 2014 - 11:14:40) Cores: ARM 432 MHz DDR: 297 MHz I2C: ready DRAM: 128 MiB NAND: 128 MiB Bad block table found at page 65472, version 0x01 Bad block table found at page 65408, version 0x01 nand_read_bbt: Bad block at 0x0000058c0000 *** Warning - bad CRC, using default environment Net: Ethernet PHY: GENERIC @ 0xff DaVinci-EMAC Press ESC to abort autoboot in 1 seconds Loading from nand0, offset 0x4a0000 ** Unknown image type Wrong Image Format for bootm command ERROR: can't get kernel image! Loading from nand0, offset 0x900000 Image Name: Linux-2.6.32.17-davinci1 Created: 2014-03-17 1:15:25 UTC Image Type: ARM Linux Kernel Image (uncompressed) Data Size: 3840128 Bytes = 3.7 MiB Load Address: 80008000 Entry Point: 80008000 ## Booting kernel from Legacy Image at 80700000 ... Image Name: Linux-2.6.32.17-davinci1 Created: 2014-03-17 1:15:25 UTC ....
13) connect the upgrade usb port to a pc and run the assistant software, you should be able to see that the assistant shows all the 3 components firmware version. Perform an update of the 3 firmware components, rebooting the device when requested by the assistant.
PROBLEM SOLVED!!
Note1: there is also another command to erase the flash before to write it, but it is not needed: sfh_DM36x.exe -nanderase -v -p "COM21"
Note2: inside the annexed file you will find:
-the serial flasher tool to use
-the firmware to upload on the LB
-the firmware as extracted from LB during the upgrade process via assistant
-the firmware decrypted by Andrew
-the terminal tool written by me to access the virtual serial from the upgrade port and get access to Linux interface
-the ubl firmware component found on the TI sdk, that I used to understand that the andrew decrypted firmware contains a not needed header.
Note3: the tool LightbridgeTerminal allows you to work on the linux embedded on the LB (air and ground unit). Just connect to the upgrade port via usb cable, open my tool, open the serial connection on my tool, then press "enable linux" button. then type commands there, or just open your preferred terminal tool to work (tera term in example). this tool can work only if the LB is working (if the linux OS is working).
ANNEXED FILE: http://www.tr3ma.com/Dati/LB_hack.zip
PS: in case of problems during the download of the file, try the same url with https (https://www.....)
Link is working.Hello,
the link to the bootloder does not work
Does anyone have the file for me ?
Thanks
Peter
I don't know.hello, gaucho thanks for your great post. I wanted to know if it is possible to flash the air unit in a different way? since the TX pin broken on the circuit
Did you use reset pin as detailed in the procedure?Hello Friend. I have an issue with lightbridge air unit flash. I did Lightbridge GS as you said in your thread and it worked, but when i tried to flash Air Unit, it started pretty well, but it stops in 90% when sending first .img file. I tried to do it many times (with/without reset), but its similliar problem every time i do it. Can you help me with it?
Yes, it didn't worked at all without reset pin. What am i supposed to do?Did you use reset pin as detailed in the procedure?
Apparently the NAND processor is really blocked. I have done the firmware procedure a hundred times and the result is always the same. The process stops at 90%. And what can replace it? Are there such NAND processors on sale? Any help would be greatly appreciated. I live in Kyrgyzstan, I have one such lightbridge. There is nowhere to take a worker.Hello buddy...its been a while since I last did this procedure. I remember providing step by step ways to reflash the NAND chip. just follow the instructions if it doesnt work then your NAND chip is bricked or unable to get fixed and you must find another wifi 2.4 ghz board to flash. my primary reason of inability to help with precision is due to the fact I no longer have a phantom 2 vision plus to fix. you need to have a complete bird in order to finalice a job. there is no way to corroborate if this fix worked unless you have a way to test.
Lonestar. Caesar
phantompilots.com
Thanks for the answer! How can you reprogram the NAND chip? Tell me please. I do everything according to the instructions from the first post. I have never done this. Therefore, I will be very grateful if you teach me how to reprogram the NAND chip!First try to reflow the NAND. Also try running the command while pushing a bit on it, and on the DaVinci processor - if chips need reflow, then pushing on then will have influence on the results, either the flashing will stop further or earlier.
If that won't help - just buy the NAND chip. Here's how I replaced the same chip, on a different board though:
Fixing flash in DM365 chip within Ph3 Pro gimbal
Here is a success story I wanted to share. I had a Phantom 3 Pro gimbal which didn't allowed me to see the FPV feed. Photos and movies were recorded on sd-card, there was just no live video - only grey background - in Dji Go. I explained the details, and the road to fixing the issue, here...
phantompilots.com


We use essential cookies to make this site work, and optional cookies to enhance your experience.