Yea-I'm gonna give it to the guy that's installing the new oneOI Photography said:havasuphoto said:Going to replace the Immersion RC
600mW 5.8GHz? If so, got any plans for the old one?
")
But-if he doesn't need it or want it-it's yours
")


Yea-I'm gonna give it to the guy that's installing the new oneOI Photography said:havasuphoto said:Going to replace the Immersion RC
600mW 5.8GHz? If so, got any plans for the old one?
havasuphoto said:Yea-I'm gonna give it to the guy that's installing the new oneOI Photography said:havasuphoto said:Going to replace the Immersion RC
600mW 5.8GHz? If so, got any plans for the old one?
But-if he doesn't need it or want it-it's yours
havasuphoto said:I'll let ya know.
Just an FYI on the AVL58 VTX-that I didn't know; it comes with a plug that goes into the VTX-the other end of that plug terminates in a battery connector(not XT-60), and an 1/8th "stereo" type plug. The purpose of that plug is it goes into the Mark II IOSD.
Didn't know that. I have a GCU....never even thought to look there. Doesn't matter-the cable isn't long enough anyways. it's going on the far aft end of the F800.....so I'm just having the existing wires soldered into.OI Photography said:havasuphoto said:I'll let ya know.
Just an FYI on the AVL58 VTX-that I didn't know; it comes with a plug that goes into the VTX-the other end of that plug terminates in a battery connector(not XT-60), and an 1/8th "stereo" type plug. The purpose of that plug is it goes into the Mark II IOSD.
Very close...that cable with the 1/8 phono plug and the non-XT60 battery connector is to connect to the GCU of a Zenmuse gimbal and/or a separate power supply for the transmitter. If you plug the 1/8 phono plug in to the GCU it will get power and video down that single feed and the extra battery connection is not needed.
The cable to connect the OSD mkII and the AVL58 is actually just the standard 8-pin type that's also used to connect the Zenmuse to the GCU (or mainboard in a Phantom).
Like with several of DJI's components there's more than one way to skin the cat, and as long as you got it working for you that's what matters
Another question for you(or two); does the H3-2D GCU have that "stereo in" plug? where exactly is it located.OI Photography said:havasuphoto said:I'll let ya know.
Just an FYI on the AVL58 VTX-that I didn't know; it comes with a plug that goes into the VTX-the other end of that plug terminates in a battery connector(not XT-60), and an 1/8th "stereo" type plug. The purpose of that plug is it goes into the Mark II IOSD.
Very close...that cable with the 1/8 phono plug and the non-XT60 battery connector is to connect to the GCU of a Zenmuse gimbal and/or a separate power supply for the transmitter. If you plug the 1/8 phono plug in to the GCU it will get power and video down that single feed and the extra battery connection is not needed.
The cable to connect the OSD mkII and the AVL58 is actually just the standard 8-pin type that's also used to connect the Zenmuse to the GCU (or mainboard in a Phantom).
Like with several of DJI's components there's more than one way to skin the cat, and as long as you got it working for you that's what matters
havasuphoto said:Another question for you(or two); does the H3-2D GCU have that "stereo in" plug? where exactly is it located.

If you are serious about selling it, U.M., PM me...Uncle Meat said:Anyone want to buy a slightly used Zenmuse H3-2D? I've got to get me an H3-3D now that I've seen how much better the video stabilization is... DAMMIT! More money...
Got it-it's on the back. And, it's already wired to the battery......ElGuano said:havasuphoto said:Another question for you(or two); does the H3-2D GCU have that "stereo in" plug? where exactly is it located.
I'll take the easiest one: You can see the plug schematic on the lower left of the GCU housing.
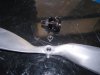
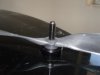
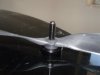
What I'm saying is if I put them on the way you told me-the nut runs out of threads even with the washer on top of the prop....maybe I just need to turn the washer upside down or add another washer? they're brand new adapters fresh out of the package.OI Photography said:No adaptor. When you put the prop on without that, the nut should screw all the way down to the washer with the washer resting on the top of the prop hub. Are you saying the nut just won't screw down that far? You might just need a new one. I use M6 Nylok nuts on mine and I usually tighten with a socket wrench (it can take a little torque to get them down the threads).
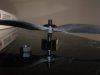
Question: have you tried balancing those gemfan 12x3.8's yet? I haven't flown with mine because they're driving me nuts trying to get them balanced. I can get the blades balanced with no problem, but I'm not getting anywhere with the hubs. I'm using a combination of adding weight on one side and shaving some on the other, and I still can't get them right. I suspect it's due to that very thick section around the hub which contains a lot of material, but I may just give up on getting the hubs balanced and try them as they are.
We use essential cookies to make this site work, and optional cookies to enhance your experience.