Stress Cracks

Hi all,
I have been using the cnc aluminum mount plates on every Phantom 3 I own for quite some time now. I put them on whether there are stress cracks or not. The ones that have cracks are not getting any worse. The ones that are crack free, are still crack free. I have flown them with and without the plates attached. In my humble opinion, there is no affect in performance by having them on. I personally like the look of them,, and they are a lot easier to install than replacing a new shell, and less money also. And, after you have replaced the shell, you eventually have another phantom with stress cracks! My opinion.
Where do you get these cnc aluminium plates please, might have a look at them.
 
Thanks KD, I'll have a look, not that I've noticed any cracking yet (after three years)! Maybe because I've got the prop guard attaching brackets fitted which take most of the motor loading. Don't often use them but sometimes demonstrate indoors where flying can be challenging!

IMG_6465.jpgIMG_6467.jpg
 
  • Like
Reactions: KachemakDiver
Further to my post on my balance adapter, I've just managed to turn off the aluminium webs that were still attached to the spindles, (I've only got a small wood turning lathe) and they look much better!

Now I just need something to polish the shaft with??? Ah! Might have some Crocus paper hidden somewhere...........
IMG_6463.jpgIMG_6464.jpg
 
  • Like
Reactions: KachemakDiver
Hi together!

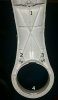
Bought a P3A recently for ~350$ and it arrived with quite long&deep stress cracks on 3 of 4 Arms.
The seller didn't notice and never crashed it according to his own words except for tipping it over a few times on the landing procedure (he said that the landing procedure/turning motors off was different in previous phantoms and that was the reason).

None the less it pissed me off quite badly and he agreed to refund me no questions asked but i came up compromising and he arranged a new shell that will arrive any day.

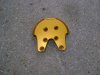
Since this seems to be a normal Problem with the Phantom 3's i really would like to enforce the new case and am thinking about laminating the arms with 25g/m² Fiberglass-Meshing + Epoxiresin.

Would anyone advice against me doing this kind of modification for whatever reason i might not be aware of?


The Epoxyresin is a 2-Part one, which you probably would call Top-Coat, it is meant for clear laminates on Boats or castings as it should have near zero shrinkage.
It is also quite clear when it is hardened as i've noticed.

Was thinking about a Carbonfibre-Mesh at the beginning (For the looks!) but my searches didn't turn up with anything lighter than 80g/m², which is why i settled on the 25g/m² for now at it's easily accessable from a local model making shop.


Excuse my Grammar if there are any Typos I'm from Germany and English isn't my native language.


P.S. Looking at the dissassembly i really am not looking forward to this, just so f-ing many different screws involved in the process, and this is coming from a tech savvy person :D

Cheers.
 
Last edited:
My Phantom 3 Advanced is now four years old and shows no cracking so to say cracking is "normal" is not true. The (stress) cracking can occur with repeated violent flying, continually doing full ups and downs, braking and direction changes. As you do these manoeuvres the arms will twist and it is this that over time will cause stress cracks.
The art is to fly smoothly, gently, what's the hurry? The P3s are brilliant drones and will give many years of reliable service if taken care of :cool:;)
 
  • Like
Reactions: dronesky
P.S. Looking at the dissassembly i really am not looking forward to this, just so f-ing many different screws involved in the process, and this is coming from a tech savvy person :D
Cheers.
It isn't that difficult, only four screws per arm, 16 altogether, one little one at the end of each arm, two short ones just inside the inner motor screws and one longer one nearer the centre. Once they are out I use the propellers to prise the shell halves apart because they have a nice taper to them. Press in the bottom shell in along the split line and carefully push the propeller into the crack as it opens up. Do this on all four arms and the shells will split. When they do split be careful as the GPS module is mounted in the top lot the top shell and there is a wire going onto the main circuit board on the bottom shell.

Here's the video.

IMG_6483.jpg
 
Last edited:
Re "P.S. Looking at the dissassembly i really am not looking forward to this, just so f-ing many different screws involved in the process, and this is coming from a tech savvy person :D"

What are you proposing to take apart?
If you are separating the shell halves then there are 4 screws per arm, Cheddarman missed the one right out on each end, which is covered by the prop guard mount in his photo.
From memory each arm has the same sizes of screw 1 & 4 are self tappers and 1 is longer than 4,
2 & 3 are machine screws of equal length
 

Attachments

  • 20190904_202445 c&p.jpg
    20190904_202445 c&p.jpg
    312.3 KB · Views: 158
Last edited by a moderator:
Re "P.S. Looking at the dissassembly i really am not looking forward to this, just so f-ing many different screws involved in the process, and this is coming from a tech savvy person :D"

What are you proposing to take apart?
If you are separating the shell halves then there are 4 screws per arm, Cheddarman missed the one right out on each end which is covered by the prop guard mount.
Just corrected my statement to accommodate this one. Couldn't see them on my drone as I have the prop guard mounts on the end and forgot they were there. It really is not rocket science!!
 
Guys here's the plates I tried the bolt pattern matchs but the ad says for Phantom 3 & not professional so that might be my problem the spacers that came with it had to be pulled out with needle nose pliers see pics there is one on amazon that states for P3P but I did not buy it yet tried this instead So I glued it took a blade & opened crack slightly then let set for 24hrs just flew 3 batteries & the glue is holding so far Oh plus I always hand caught my drone & was told that is hard on shell so I quit doing that to will let you know if cracks open up again
 

Attachments

  • cracks 010.JPG
    cracks 010.JPG
    2.7 MB · Views: 156
  • cracks 005.JPG
    cracks 005.JPG
    2.6 MB · Views: 166
  • cracks 009.JPG
    cracks 009.JPG
    2.7 MB · Views: 146
  • cracks 007.JPG
    cracks 007.JPG
    2.8 MB · Views: 219
Last edited:
They do work on all phantom 3’s. The aluminum spacers should fit snugly. Like I mentioned earlier, these mounting plates work great! And they look good too!
Again in my opinion.
 
Which holes where the spacers in? I am guessing they are meant for the two inboard screws that clamp the shell halves together.
 
. The aluminum spacers should fit snugly.
The spacers were tight like they were pressed in I have replaced a P3P shell on one I had before so it's not like I really boomed them down or something & I did buy a set for all 4 arms thought they looked good to just scared me when the motor twitch's don't want to tear up my bird it flys great:)
 
Make very sure you use the correct length screws to attach anything under the motors as the threaded holes in the motors go right through to the stator windings! You've got about 5mm between the end of the thread and the windings!

IMG_6497.jpg
 
  • Like
Reactions: KachemakDiver
Make very sure you use the correct length screws to attach anything under the motors as the threaded holes in the motors go right through to the stator windings! You've got about 5mm between the end of the thread and the windings!

View attachment 114325
Right used the screws that came with plates then put original screws back on
They do work on all phantom 3’s. The aluminum spacers should fit snugly. Like I mentioned earlier, these mounting plates work great! And they look good too!
Again in my opinion.
@KachemakDiver this is what i bougt and amazon one I'm looking at
 
If the spacers are a tight fit in the recesses into which they fit it might be an idea to lightly file them until they JUST slide into those recesses. Make sure the filing is even all the way around the spacer's outer surface. The recesses in the shell might have a slight taper but you might be able to sense this when trialing the spacers for fit, the spacer would probably become a tight fit quite suddenly. I use a warding file for this sort of stuff, a power tool would probably remove too much too quickly.
You are aiming to remove the minimum amount of material possible.

Dronsky with regard to the differences between the types of reinforcing you show.
If the upgraded ones have shoulders of the correct length they will, at least with regards to the 4 motor mount screws, restore the original clamping mechanism between the shell and the motors i.e. the screw heads clamp an annulus of material to the motor mount i.e. the end of the recess. The flat plate version transmits the clamping force via the side walls of the recess to the outer edge of the above annulus.
I don't know if the change in mechanisms is significant but it concerns me enough that, if I fit unshouldered reinforcing, I am contemplating packing the motor mount screw recesses with epoxy putty etc. which will, when hardend, be drilled and filed flush with the shell's surface.
 
Last edited by a moderator:
  • Like
Reactions: KachemakDiver

Recent Posts

Members online

No members online now.

Forum statistics

Threads
143,094
Messages
1,467,600
Members
104,980
Latest member
ozmtl