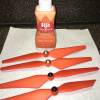
Prop dyeing question

Thats pretty cool! If you dont get the results your after try the tangerine rit...thats what i used and its pretty **** neon looking in person compared to the pic i posted... i like the dyes you have tho
I just used the RIT "DyeMore Synthetic" Apricot Orange, and was very happy with the neon-like results.
Didn't make them asphalt proof, however.
IMG_0416.JPG
 
That looks ok. Not exactly day-glow orange (hunter orange). Ticks me off RIT quit selling any day-glow colors.
 
I decided to pull and rinse the test sample in the Nuclear Green at 2 hours:


As you can see it is clearly impregnating the plastic of the prop. Seeing signs, any signs after only 2 hours is really exciting. Remember, this is being done at room temp (cool basement temp!) not a hot boiling water temp. I had expected to see just a white prop chip after rinsing! My hopes are up that this experiment may well yield some usable results.

The test chip is back in the green awaiting morning. I am starting to get that 10yr-old-kid-Christmas-Morning-Is-Almost-Here-feeling :)
 
  • Like
Reactions: Procharged97
Tangerine..way more neon looking outside in person...try it out if the neons dont work....looking firward to seeing your results tmrw!
 

Attachments

  • 1464747382754.jpg
    1464747382754.jpg
    89.9 KB · Views: 521
Lagunitas RC...looking for graphics for the AC. Hoping for sponsorship here...not a flying easter egg lol.
 

Attachments

  • 1464754192545.jpg
    1464754192545.jpg
    62.5 KB · Views: 454
Ok, the chip I took out this morning showed much more dye penetration than last night! Time on the meter...14:26 so just under 14 1/2 hrs.


Reference the post above for difference between 2hrs and 14hrs.

I am not seeing a dramatic difference in the florescent light but under UV, the difference is far more apparent. Right now its cloudy as heck. Soon as we get a sunny day I will take the chip(s) outside and shoot some pictures under daylight. Its supposed to be not so nice on saturday so hopefully I will get a chance to shoot them under cloudy conditions too (we don't always fly in bright blue skies).
 
Ok, here are the 24hr test results. I didn't have a chance to post last night, homework with the granddaughters and a video conference.

For reference, in the photos, the 2nd chip near the nuclear green on the left is the one I pulled out in the morning (14hrs).

Standard florescent lighting:


Florescent with UV:


And UV only:


To the naked eye, there is very little change between 14hrs and 24hrs as far as dye penetration and white light colorization. However, under UV the uniformity of the penetration appears to be better with the full 24hrs (see nuclear green chips and compare how flat and uniform the 24hr sample is from the 14hr sample). Its distinctly possible and quite likely that heat will change the absorption rate just as it does with RIT. The uniformity may stem from being partially submerged in the dye which we likely wouldn't be doing as we would most likely be dying the entire prop, not a small portion of it. So under those circumstances, the evaporation and concentration that occurs at the edges where the dye surface was won't be a factor.

The only dyed chips that exhibit a noticeable change with mixed visible light (florescent only > florescent + UV) that are significant enough to warrant further experimentation for the original purpose of dying props so they are more visible in daylight are: Electric Blue, Blizzard Blue, Nuclear Green and Atomic Purple. The rest show little to no detectable change when the UV light is flipped on and off with the room lights still on. That tells me that if they are used along with RIT to color the props, they won't contribute additional visibility to any significant degree. I still need to get the chips out in sunlight and see if there are any detectable changes when hit with true daylight that could alter those impressions.

Under UV only, the visually brightest samples are the two blues (Electric and Blizzard) and the surpriser of Atomic Purple which I was not expecting due to its fairly dark purple look in the vial. With Fuchsia being the runner up. Nuclear Green is a bit ahead of the Atomic Orange and last place is the Fire Red.

Although there are 7 dye colors and they are in visible light different colors, under UV, there are only 3 colors distinctly different. There is a bluish color (electric blue, blizzard blue, atomic purple, fuchsia), greenish yellow (nuclear green), and orange (atomic orange and fire red).

As for white light dye color change in the prop samples, it seems the least bright under UV chips show the most change in plastic color after being dyed. The Nuclear Orange and Fire read chips show the most significant color change in the plastic. Nuclear Green comes in an extremely close second and the difference is extremely minor as far as intensity goes but there is an obvious hue difference.. Fuchsia is next with only slight color change and its barely pink. Blizzard Blue and Atomic Purple exhibit almost no color change with the change being barely detectable short of placing an undyed chip next to them. And quite unexpectedly the totally clear Electric Blue left the prop chip completely unchanged and you can't tell its ever been in the dye under white light however its one of the brightest under UV.

I would like to finish with a note about these dyes and a reminder. This application is NOT listed on their website as a use for this product. I don't feel it was intended nor designed for dying plastics. Clothing, yes. Water, yes. As a paint, yes. Not for coloring plastics. So, while these didn't exhibit the changes in the plastic I had hoped for, I do not blame the product nor the company for its unsuitability for this use. I am posting a question to their contact form about suitability and safety of the dye in the microwave for heating purposes. I will post back when I get a response.
 
Still seems like a cool product. It was worth the try...what's the plan now? Rit?


Sent from my iPad using PhantomPilots mobile app
 
Want to get the test chips outside during the day and photograph them to see if there is any difference between the indoor tests and what it may do under natural sunlight. I need both cloudy and sunny conditions to happen when I am off work. Weekend is very likely to provide the cloudy aspect (70% rain chance for Saturday).

Then I have to figure out whether its worth combining these dyes with RIT. I mean, if they make no difference in the look of the prop chips in daylight, whats the point? Most of us aren't going to fly with UV lights on our Phantoms are we? My hopes were that the UV aspect of these could enhance visibility of dyed props. We all know RIT works. I was just experimenting on a way to take that to the next level. Since RIT discontinued their neon dyes in the consumer lines (they still have 3 in their pro line), I was trying to simulate the day-glow effect with these dyes as an additive to non-neon RIT colors.

I agree, they are still a cool product and I will likely end up using them associated with some sort of prop for Halloween whether or not they turn out to be useful as a phantom prop dye. Either way, its not a loss for me.

For those playing along and desiring neon RIT colors, they still have 3. Unfortunately they are in the ProLine category of products. They are available only as 1# bags (roughly 15 standard boxes) of powder and are about $20 plus shipping unless you can find them locally which isn't likely. The three colors are Neon Green, Neon Pink, and Neon Yellow. And in communication with a RIT rep, she confirmed they are not UV reactive nor considered day-glow colors.
Powder Dye (1 lb) - Neon Green: The Rit Studio
Powder Dye (1 lb) - Neon Pink: The Rit Studio
Powder Dye (1 lb) - Neon Yellow: The Rit Studio
I don't think I want to drop $60 to see if the green and yellow are what I think they are. Again, not interested in pink props. Maybe one of you are willing?

According to the rep they do not sell in any line, a Neon Orange or any color that could be construed as Blaze or Hunter Orange. Sometimes I just don't get company logic. I really would have thought that blaze orange would be rather popular. Obviously not. Or maybe lawyers got involved and it got pulled as a liability risk. "Lets sue RIT since Bubba got shot, the orange wasn't the correct color. If it was, he would still be alive.". I can see it now.
 
Here is some outdoor tests. I placed the chips on a piece of coro so I could move it around easily.
The photos don't show as much as I can see with my eyes. Not surprising.

First Test: Full Sun (afternoon low in sky)


Under full sun, the dyes are virtually invisible except for the stained color they impregnated into the plastic. The UV glow aspect is totally lost due to the brightness of the white light. Looking closely I can see the Electric Blue glowing slightly. Very slightly. But if I am that close, duh, I am going to pick up the drone because it ain't lost anymore!. It will not assist in finding it on a sunny day. None of them will. So that portion is completely shot as far as a possible aid.

Next Test: Shade on a Full Sun day


Next, under shady conditions, I can see that the Electric Blue, of all of them, is the only one that shows clearly where it had been dyed and where it hadn't. Even from a few feet away I could see the slight blue tint. So perhaps when mixed with a white light visible color, it could help. Almost. The Atomic Purple was visible close but from afar, almost not so its a wash as are the rest of the colors including, surprisingly, the Blizzard blue which I couldn't distinguish unless I looked really really hard.

Here is a crop of one image showing the chip:

Even in this photo you can see the slight purplish blue on the lower 3/4 of the chip. Its quite a bit more obvious to the human eye.

Last Test: Window light mixed with Interior Incandescent


Indoors with window light its very similar to being outside in the shade. Electric Blue is the obvious winner.

I still need to photo them on a cloudy day as a final test.

I suppose next clear moonlit night, I can drag the chips out and see how they would play in that scenario. Many of us do fly at night.

Would the visibility be worth buying a jar at $2.25? Iffy at best. Worth $9.95 for a 4oz jar? No. Absolutely not. Unless you had another use for it after you dyed your props. Say Halloween decorations, rave parties or just screwing around (invisible ink for example). But I think you can get virtually the same color and intensity of glow under UV using Tonic water (which contains quinine). So, maybe not worth it there either. And if you have washed the fabric and its white, the electric blue can't be seen on the cloth as the whitener that ALL fabric soaps contain now already makes white glow as much as this dye does. If you are staining plastics or some other material like paper or burlap, ok, might be useful.

About the only way these would actually aid in locating your Phantom is if you were searching at night with a UV flashlight. Then, I guarantee they would pop! All of them. But if that is your scenario you want to go for then I would rank them in this order:
1. Electric Blue
2. Blizzard Blue
3. Atomic Purple
4. Nuclear Green

The rest are rather muddy in dim UV. The first three will produce a purplish blue, the fourth will yield either a neon green or a muddy yellow-green depending on the UV strength.

As of now, the only promising one is Electric Blue. What color to mix it with for RIT is another thing. Since its bluish I would lean toward any of the colors with a blue component such as the ProLine Neon Green (blue+yellow) or one of the lime green consumer ones (also blue+yellow). Possible candidates:
1 Neon Green
2 Lemon Yellow
3 Teal
4 Aquamarine

I may pull the trigger on the 1# bag of the Neon Green. Of those colors, its the one likely not to exist in nature. And also likely the most useful for other projects around Halloween. I can't imagine anything else around here I might like to have any of the three remaining colors.

So I guess until I get a cloudy day, moonlit night or decide which RIT I want to go with, thats kinda the end of the experiment.
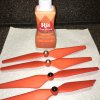
 
Props.JPG
Well, here is the result of my first try dying, as far as the dye adhering to the P4 finish, I was very pleased. Only soaked them for 35min, and the finish is perfect, no streaks or anything, I have seen others say they had to soak for 24-48hrs to get a good finish, I am wondering if they weren't using the synthetic dye. Now the problem, I wanted the maroon props to be orange like the RIT bottle next to it, the yellow came out exactly as I wanted, and I did them the exact same way. Also, the dye bled under the darker props, but didn't bleed at all through the yellow, I was going for white. So, do you think I dyed the orange ones to long, or do I need to add less dye? (I used the whole bottle on both)
On a side note, I was debating between orange and a dark/maroon red, so no harm really, they will still look ok with my design. I'll post the whole P4 when I get the rest done.
 
Now the problem, I wanted the maroon props to be orange like the RIT bottle next to it, the yellow came out exactly as I wanted, and I did them the exact same way. Also, the dye bled under the darker props, but didn't bleed at all through the yellow, I was going for white. So, do you think I dyed the orange ones to long, or do I need to add less dye? (I used the whole bottle on both)
I used the same synthetic "apricot orange", but only used a small amount in the water. As I recall they were only in the dye for 10 - 15 minutes at most.
upload_2016-6-3_17-56-0.png
 
I used the same synthetic "apricot orange", but only used a small amount in the water. As I recall they were only in the dye for 10 - 15 minutes at most.
View attachment 55955

Oh wow, those look great, that's the exact color I was going for, guess I need to use less dye and shorter time. I have another set of props, I'll have to try again. Thanks for your pic and reply, that totally answered my question!
 
Ok, I have a new thing to test! I was out getting a bike lock for the granddaughter at walmart. I decided to swing by the office section. There were quite a few "neon" claiming things. Well, guess what I found! Something that actually claimed to glow under blacklight!

Mixed florescent and UV

As you can clearly see, they are quite visible in white light and what doesn't quite show is that they have a glow about them with the UV present. You can see the electric blue chip to compare to.

UV Only:

Under UV only they POP! Obviously brighter than the UV dyes. Keep in mind that the marks were painted on using the felt tips of the markers.

The Package:


Right now its fairly cloudy overcast late evening (7:15ish). When I take the chip outside, there is an obvious "day-glow" effect happening. That is something I didn't get with the dyes from the prior experiments. I could tell with the dyes, but I had to work at it. This is obvious as a elephant in your face they have a distinct glow. With my eyes, I can clearly see the glow difference from being just inside the door in incandescent only and a step or two out on the deck.

I suspect it won't be easy to get a streak-free paint-on using the felt tips. Anyone tried painting a whole prop using a color Sharpie?

What I am thinking of trying is busting a couple open (green and orange) to get access to the ink tampon inside. I plan to soak it in 100% denatured alcohol to try to extract it into a volume of fluid I can soak the props in. Alcohol mixes readily with water so combining the extract with RIT is a distinct possibility. I have one prop left I can sever into chips so I can do some dye experiments with the extracted sharpie ink. Will have to see what comes of this.
 
Well, I finally got my P4 finished, the props only took me 4 times to get the orange I wanted. Using apricot orange I tired entire bottle for 1hr they turned maroon, 1/3 a bottle for 20min and they were a weird orange with blotchy spots, 1/4 of a bottle for 2hrs they turned maroon again, finally I used 3/4 of a bottle pulled them out after 3min, and got the color I wanted. They may look a little red in this picture, but they match the orange splatter on the skin perfectly. For the body I used a decal wrap from mightyskinsdecals on ebay. Now the landing gear is a weird story...I originally used a blue sharpie, which looked better than I thought it would, coverage wise, but the color, unless looking at it directly under a bright light, looked like a dark purple. So I got a light blue paint pen, to match the light blue on the skin, and it covered the sharpie quite nicely and gave some texture to it. It was a little too much light blue for me, but I was ok with it, and I was tired of messing with it. I went to spray it with clear coat, but for some reason the clear coat mixed with the paint and made it start to bleed and cause blotches. Well, I REALLY liked the marbled look of the light blue and dark blue, so with a paper towel and some carefully aimed clear coat, I marbled the entire landing gear. I don't think the project is going to knock anybody's socks off, but overall, I am happy with it.

IMG_2024.JPG
 
Ok, here was my final choice for color:


In the dusk hours the show pretty clearly yellow-green. In the photo they don't look as lime color as they really do in person.

Here is the recipe:
1tbs + 1tsp Neon Green dissolved in 2c boiling water.
Add that to 2c clear boiling water in your dye pan/tray for a total of 4c of liquid.
Add 1tbs of white vinegar.
Add 5tbs of the yellow dye right from the bottle. Mix well.
Cool to 190f and maintain that temp.
Immerse props for 5min. Less will shift it slightly blush, more will shift it slightly more yellowish.
Remove and rinse well in cool running water. I suggest checking the color at 4min and pull and rinse when you are happy with the hue.

At roughly 3min they were distinctly bluish in color.
At 5min they seemed spot on.
At 10min the samples I tried were quite yellow and had lost most of the green cast to them.

The Neon Green dye doesn't seem to be Neon. Or the green I expected it would be. At least not in the tests and not on plastic. The test chips at 5 and 10 min in straight green (2tbs/4c water) were almost a forest green. At 1tbs/4c they were more green but so not the color I had envisioned. I experimented by gradually adding yellow (2,3,4, 5 and finally 6tbs) and dying chips. I arrived at the 5tbs as the color I liked and closest to my mental image of what color I wanted. Not the actual color I wanted, which was day glow green. I guess thats simply not going to happen.

Now they are a color, I can tinker with chips and the UV options to get a glow. Maybe. Maybe I will just leave them as is.
 
That is the bright green i wanted but settled for orange..now i can do the green!! Thanks for the recipe!
 

Recent Posts

Members online

Forum statistics

Threads
143,066
Messages
1,467,357
Members
104,935
Latest member
Pauos31