Video: Fitted my Phantom v1 into a Phantom 2 shell (easy!)

Re: Video: Fitted my Phantom v1 into a Phantom 2 shell (easy

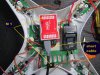
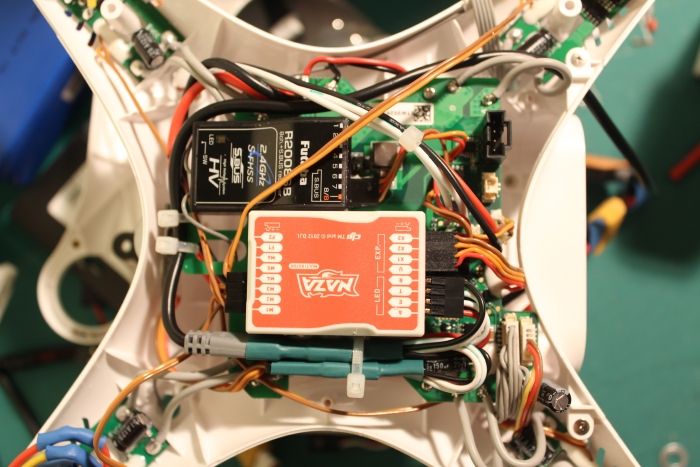
GearLoose... As you can see in my P1.5 I have my Naza Control Unit more forward than OI's... I also have the Upgrade Board installed in my P1.5, so I don't know if that would make a difference... I needed the room for the LED v2 Module Cable to fit correctly when plugged in (as you can see)... (PS: The black cable going across behind the NAZA is my Zemuse Gimbal cable... I have since repositioned that cable toward another landing leg out-port).

13480942355_0412eb94b1_z.jpg
 
ESC connectors too short

In this photo you'll see that the cable from ESC M1, in the lower right, is too short to reach the NAZA.

Also, there is a short cable coming to the EXP port on the NAZA. This limits the position of the NAZA to a very small area.

I've compared my components to the photos posted by others and have to assume that my Phantom is different?
 

Attachments

  • IMG_1687.JPG
    IMG_1687.JPG
    73.5 KB · Views: 326
Re: Video: Fitted my Phantom v1 into a Phantom 2 shell (easy

First problem M1 is top right in your picture not bottom right. (As you are looking at it from the rear of Phantom.) LOL I had to keep reminding myself that it's now facing forward when seeing battery opening.
 
Re: Video: Fitted my Phantom v1 into a Phantom 2 shell (easy

EMCSQUAR said:
First problem M1 is top right in your picture not bottom right. (As you are looking at it from the rear of Phantom.

So that makes the motor in the bottom right, M4, correct? ... yet that doesn't explain or solve the short connector to the NAZA. Have others encountered this situation -- I don't recall reading of this in previous posts?
 
Re: Video: Fitted my Phantom v1 into a Phantom 2 shell (easy

GearLoose said:
EMCSQUAR said:
First problem M1 is top right in your picture not bottom right. (As you are looking at it from the rear of Phantom.

So that makes the motor in the bottom right, M4, correct? ... yet that doesn't explain or solve the short connector to the NAZA. Have others encountered this situation -- I don't recall reading of this in previous posts?

Yes sir re: motor positions .... re:the connection to EXP should be coming from GPS in lid. that small cable in your pic from left is the old rx connector used for original DJI controller and by the looks you're now using Futaba.
 
Re: Video: Fitted my Phantom v1 into a Phantom 2 shell (easy

OK, I disconnected the old rx lead and popped the Futaba rx off of the board, hoping that would allow the NAZA-to-M1 connector to reach the NAZA.

But the M1 cable still doesn't reach. In fact, I'd have to point the NAZA 90 degrees to the right and even then it would be tight.

Surely I don't have a unique P1? Or is Murphy's Law being applied here with force?

Any reason not to splice/extend the M1 ESC cable?

EMCSQUAR said:
GearLoose said:
EMCSQUAR said:
First problem M1 is top right in your picture not bottom right. (As you are looking at it from the rear of Phantom.

So that makes the motor in the bottom right, M4, correct? ... yet that doesn't explain or solve the short connector to the NAZA. Have others encountered this situation -- I don't recall reading of this in previous posts?

Yes sir re: motor positions .... re:the connection to EXP should be coming from GPS in lid. that small cable in your pic from left is the old rx connector used for original DJI controller and by the looks you're now using Futaba.
 
Re: Video: Fitted my Phantom v1 into a Phantom 2 shell (easy

You shouldn't have to extend anything - nothings really changed from original position. Set NAZA dead center - motor plugs end facing front of craft - plug motors in numerical order. (In your pic board isn't screwed down - make sure you've done that also.)
 
Re: Video: Fitted my Phantom v1 into a Phantom 2 shell (easy

EMCSQUAR said:
You shouldn't have to extend anything - nothings really changed from original position. Set NAZA dead center - motor plugs end facing front of craft - plug motors in numerical order. (In your pic board isn't screwed down - make sure you've done that also.)

OK, I've secured the board and as you can see, there's no way the M1 connector will reach the NAZA port. Which makes me wonder if I need to rotate everything but the NAZA 180 degrees? I'm seriously disoriented at this point!
 

Attachments

  • IMG_1689.JPG
    IMG_1689.JPG
    65.7 KB · Views: 270
Re: Video: Fitted my Phantom v1 into a Phantom 2 shell (easy

Naza has to be further forward - no way you'll get lid on with LED cable hanging out. Once you move it forward all connections should reach. And in that picture lower left is motor # 3
 
Re: Video: Fitted my Phantom v1 into a Phantom 2 shell (easy

Lets see if we can get you on the right path Geraloose.

Here is how mine ended up....

IMG_4143.jpg


You can see that one of my ESC cables (M4) is pretty **** tight.

I think what you've done (judging from the DJI looking solder) is rotate your board around 180 but you've left your ESC's attached to it when you rotated it. The net result would be:

1) The long ESC cables are at the top (when they need to be at the bottom)
2) Your red lights will now be at the rear not the front.

The ESC cables 'should' have different lengths to them. Your resolultion to the problem with the NAZA where it is would be to swap the ESC's around so that the ones at the bottom (bottom being the end with the battery hole) have long cables and the ones at the top have short ones.
 
Re: Video: Fitted my Phantom v1 into a Phantom 2 shell (easy

GearLoose said:
EMCSQUAR said:
You shouldn't have to extend anything - nothings really changed from original position. Set NAZA dead center - motor plugs end facing front of craft - plug motors in numerical order. (In your pic board isn't screwed down - make sure you've done that also.)

OK, I've secured the board and as you can see, there's no way the M1 connector will reach the NAZA port. Which makes me wonder if I need to rotate everything but the NAZA 180 degrees? I'm seriously disoriented at this point!

I think you may have reversed your motors. Your m1 is now in the back, so the shorter lead will not reach. Also, your LEDs will be backwards this way (red in back, green in front). Swap the motors/ESCs and they should reach.
 
Re: Video: Fitted my Phantom v1 into a Phantom 2 shell (easy

Your board is upside down... I know because I still have my original board screwed into my P1 shell... If you were to transfer it the correct way, the battery door would now be in the BACK and the circuit boards 'opening holes' should be towards the front...

I screwed in the circuit board, then placed the UNATTACHED NAZA in the middle... Made all my connections, then double sided taped the NAZA down...

Look at my previous picture a few post back of my instal, and you'll see that I had to turn the Futaba RX around. I originally had it like yours...

Good Luck...

13928048938_1d477d8806_c.jpg
 
Re: Video: Fitted my Phantom v1 into a Phantom 2 shell (easy

It's undoubtedly the case that he oriented the board to the battery door and not the true front of the phantom, but that shouldn't matter since you can see his pushed his Naza so far back in the picture that the top shell can no longer fit over the led wires, and the ESC still can't reach. My spun phantom is set up like that--Naza and motors 180 degrees to put the battery door in back.

I think he set up the motors/ESCs in orientation with the battery door as well, so the front motors are now in back and the ESC wires are too short to reach.
 
Re: Video: Fitted my Phantom v1 into a Phantom 2 shell (easy

Yes, I left the ESCs and motors attached... I thought this procedure could be done without de-soldering? How did I miss that? :oops:

DeweyAXD said:
I think what you've done (judging from the DJI looking solder) is rotate your board around 180 but you've left your ESC's attached to it when you rotated it. The net result would be:

1) The long ESC cables are at the top (when they need to be at the bottom)
2) Your red lights will now be at the rear not the front.

The ESC cables 'should' have different lengths to them. Your resolultion to the problem with the NAZA where it is would be to swap the ESC's around so that the ones at the bottom (bottom being the end with the battery hole) have long cables and the ones at the top have short ones.
 
Re: Video: Fitted my Phantom v1 into a Phantom 2 shell (easy

GearLoose said:
Yes, I left the ESCs and motors attached... I thought this procedure could be done without de-soldering? How did I miss that? :oops:

DeweyAXD said:
I think what you've done (judging from the DJI looking solder) is rotate your board around 180 but you've left your ESC's attached to it when you rotated it. The net result would be:

1) The long ESC cables are at the top (when they need to be at the bottom)
2) Your red lights will now be at the rear not the front.

The ESC cables 'should' have different lengths to them. Your resolultion to the problem with the NAZA where it is would be to swap the ESC's around so that the ones at the bottom (bottom being the end with the battery hole) have long cables and the ones at the top have short ones.

Well you weren't wrong in the sense it can be done without de-soldering its just you can't do it AND the 180 rotation without de-soldering ;)

I didn't ever have to de-solder my ESC's when I did it and the only thing that caused me problems after that was the v2 LED plug being too chunky... all that is needed to resolve that is unsticking the naza and moving it forward about 1cm though. You then have to also run a longer battery wire but if you intendt to add/use the P2 Inter Power Connector then you will end up doing that anyway :D
 
Re: Video: Fitted my Phantom v1 into a Phantom 2 shell (easy

To summarize a bit: I do intend to use the LED module and I'll also be using P2 batteries with an XT60 adapter. Which is the easier procedure: to extend the battery cables or desolder the ESCs? (I'd have to do that to all 4 ESCs, correct?)

Running out of time this morning, so this will have to be continued later....

thanks!

DeweyAXD said:
GearLoose said:
Yes, I left the ESCs and motors attached... I thought this procedure could be done without de-soldering? How did I miss that? :oops:

DeweyAXD said:
I think what you've done (judging from the DJI looking solder) is rotate your board around 180 but you've left your ESC's attached to it when you rotated it. The net result would be:

1) The long ESC cables are at the top (when they need to be at the bottom)
2) Your red lights will now be at the rear not the front.

The ESC cables 'should' have different lengths to them. Your resolultion to the problem with the NAZA where it is would be to swap the ESC's around so that the ones at the bottom (bottom being the end with the battery hole) have long cables and the ones at the top have short ones.

Well you weren't wrong in the sense it can be done without de-soldering its just you can't do it AND the 180 rotation without de-soldering ;)

I didn't ever have to de-solder my ESC's when I did it and the only thing that caused me problems after that was the v2 LED plug being too chunky... all that is needed to resolve that is unsticking the naza and moving it forward about 1cm though. You then have to also run a longer battery wire but if you intendt to add/use the P2 Inter Power Connector then you will end up doing that anyway :D
 
Re: Video: Fitted my Phantom v1 into a Phantom 2 shell (easy

GearLoose said:
Yes, I left the ESCs and motors attached... I thought this procedure could be done without de-soldering? How did I miss that? :oops:]

If you watch Deweys Video on page one, at the 18:15 mark he transfers everything over from the P1 Shell to the P2 Shell... Everything is still attached... Motors, ESC's all attached to the board... Just orientate everything the way Dewey does in the P2 Shell the same way...easy-peasy!!! :p

The battery door now becomes the back of the quad... No need to unsolder anything... All wires should fit perfectly... None of my ESC wires are stretched or too short...

Position your Futaba RX on the side of the NAZA which fits the best. Mine wound up on the right side of my NAZA...

Final Version:
13497556344_349915829b_c.jpg
 
Re: Video: Fitted my Phantom v1 into a Phantom 2 shell (easy

Whew... glad the P1.5 support staff came to the rescue & hopefully G Loose will be flying soon...

On another P1.5 milestone - here's fitted w/ Zen H3 3D - had to use Z2 GCU (although DJI says it doesn't work according to an email I rec'd ... lol) https://www.youtube.com/watch?v=ve5YuWMTaZQ
 
Re: Video: Fitted my Phantom v1 into a Phantom 2 shell (easy

EMCSQUAR said:
Whew... glad the P1.5 support staff came to the rescue & hopefully G Loose will be flying soon...

On another P1.5 milestone - here's fitted w/ Zen H3 3D - had to use Z2 GCU (although DJI says it doesn't work according to an email I rec'd ... lol) https://www.youtube.com/watch?v=ve5YuWMTaZQ

Hey EMC,

Is it the case that the H3-3D works with the 2D GCU, but NOT with the Phantom upgrade board?

Makes you wonder what's going to change with the H3-3D GCU when released (my guess would be to make it cheaper, as the parts obviously fit on a $60 upgrade board with PMU and CAN functionality built in)...
 
Re: Video: Fitted my Phantom v1 into a Phantom 2 shell (easy

Yea, oddly it didn't like the upgrade board for some reason. And after my email volleys w/DJI tech - I wouldn't be surprised that they repackage the Zen 2 GCU into and new vera and charge more.
 

Members online

No members online now.

Forum statistics

Threads
143,121
Messages
1,467,772
Members
105,008
Latest member
ctlfreak