Part 2 - The Transmitter Setup
Prerequisites:
1. You've completed "Part 1 - The Physical Installation" of this tutorial.
2. You have the Phantom 2 Assistant Software installed and working.
3. You have an SD card on hand (SD: 32MB-2GB or SDHC 4GB-32GB).
4. You have a Microsoft Windows PC with a Card Reader.
If you don't have DJI's Phantom 2 Assistant Software installed you can download it and other Phantom 2 related software below...
http://www.dji.com/download/phantom-2-downloads/
-------------------------------------------------------------------------------------------------------
Step 1 - Downloading The Files
Download my preconfigured 14SG Profile by clicking the link below, it includes a copy of Futaba's File System Utility, it is all in a ".zip" file you will need to extract.
Click Here For Phantom 2 14SG Profile!
File Contents:
Futaba File System Utility.exe
Instructions (FFSU).pdf
PHANTOM 2 File
Step 2 - Formatting The SD Card
WARNING: Only use an SD Card that DOES NOT have important data on it, when you insert this card into the 14SG it will format the card and erase EVERYTHING.
1. Insert the SD card into the SD card slot of the T14SG.
2. Turn on the T14SG power. When an unformatted card is inserted, the "This Card Has Not Been Initialized" screen will appear.
3. If the T14SG is ready to format, move the cursor to [FORMAT] and touch the RTN button.
4. Move the cursor to [YES] and touch the RTN button.
Formatting starts. During formatting, the [NOW FORMATTING...] message is displayed.
When formatting is completed, the [FORMAT COMPLETED] message is displayed. Depending on the card capacity and speed, formatting may take as long as several minutes.
[IMPORTANT] Do not turn off the power until the [FORMAT COMPLETED] message is displayed.
5. End formatting by touching the RTN button.
6. Turn off the T14SG power.
7. Remove the SD card.
Step 3 - Importing The Profile
1. Insert the SD card into your computer.
2. Execute the "Futaba File System Utility.exe" located in the .zip file you downloaded and extracted in Step 1.
3. Go to "File" and then "Mount", and select the SD card, and then click "OK".
4. Click (Highlight) the lowest number on the list that is not greyed out.
5. Go to "Edit" and then "Import", and select the "PHANTOM 2" file located in the .zip you downloaded and extracted in Step 1.
6. You should now see on the number you chose the "PHANTOM 2" profile!
7. Go to "File", click "Unmount", and then click "OK", and close the program.
8. Remove your SD card from the computer.
Step 4 - Installing The Profile
1. Insert the SD card into the SD card slot of the T14SG.
2. Turn on the T14SG power.
3. Double tap "LNK" on the touch sensor to get to the "LINKAGE MENU"
4. Scroll to "MODEL SEL." and and touch the RTN button.
5. Scroll to "TX" on the left and change it to "CARD" and and touch the RTN button.
6. Scroll to "PHANTOM 2" on the right and touch the RTN button.
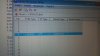
7. Scroll to "COPY" on the right and touch the RTN button.
8. Your screen should look like the image below...
9. Scroll to "COPY", and touch the RTN button, and then hold the RTN button for 1 second.
10. Turn off the T14SG power.
11. Remove the SD card.
Step 5 - Command Stick Calibration
1. Connect the Phantom 2 to your computer with the Micro USB cable.
2. Turn on the Phantom 2.
3. Turn on the T14SG power.
4. Open the Phantom 2 Assistant Software
5. Go to the "Basic" page and change the Elevator and Throttle channels from "NORM" to "REV".
6. Start a "Command Stick Calibration" by clicking the "START" button in it's section.
7. Move all of the sticks throughout their complete range several times.
8. Click the "FINISH" button when you finished the above procedure.
9. When you release the sticks they should all return to 0 or be very near 0.
Step 6 - X1 Calibration
1. Start a "X1 Calibration" by clicking the "START" button in the X1 Calibration section.
2. Move the left bottom "LS" Slide Lever up and down maxing out it's range several times.
3. Click the "FINISH" button when you finished the above procedure.
Step 7 - Confirming The Controls
1. Go to the "View" page in the Phantom 2 Assistant Software.
2. Confirm that the "SA" switch (IOC) throws the "X2" channel to the +783 (Up), 0 (Middle), and -784 (Down) values.
3. Confirm that the "SD" switch (CMS) throws the "U" channel to the -783 (Up), 0 (Middle), and +784 (Down) values.
4. Confirm that the "LS" Slide Lever (Gimbal) throws the "X1" channel to the -1000 (Up), and +1000 (Down) values.
Congratulations, We're Done!
Your Controls Are...
SA = Intelligent Orientation Control
SB = Control Mode Switch
SE = Timer (Up Is Start, Middle Is Stop, Down Is Reset)
SF = Limits The Rudder Control To 50% Speed (For Slow Pans)
SH = Momentary Failsafe Switch (This Will Throw You Into Failsafe Regardless of Mode)
LS = Gimbal Tilt (Left Bottom Slide Lever)
Basically I've tried to make the T14SG as similar to the original transmitter's switches as possible (referring to the "SA" and "SD" switches).
Note: Because the T14SG does not have a self centering throttle like the original DJI transmitter I have set a throttle curve in the profile to create a sort of "dead zone" in the middle. I have flown it for a week and I'm already used to it.


")