Remote controller charging issue, something you could try. Possible solution

I don't think it discharges like the "smart" flight batteries do. There is some issue with heat though and the guy who suggested replacing the voltage read ic chip mentioned the little heat sink between the board and chip. I can't find the link now but will keep searching. I think its a "tin" or dry joint problem and definitely around the right of the LEDs.
I have posted on a later thread here
 

Attachments

  • PSX_20181120_085703.jpg
    PSX_20181120_085703.jpg
    97.4 KB · Views: 390
I don't think it discharges like the "smart" flight batteries do. There is some issue with heat though and the guy who suggested replacing the voltage read ic chip mentioned the little heat sink between the board and chip. I can't find the link now but will keep searching. I think its a "tin" or dry joint problem and definitely around the right of the LEDs.
I have posted on a later thread here
If it's a problem on the tin We can solve for sure the problem by refreshing all the weldings with a microscope and a welder.
 
Do you mean a magnifying glass, fine soldering iron, and a steady hand?
Yes it's not hard. If we are confident it's just a matter of tin we can solve the problem without other workarounds. Strange that so many units has the same problem.
 
My second reflow from earlier this year is still holding up. I’ve got maybe six or seven charge cycles on the controller since then.
 
  • Like
Reactions: Droneted and gaucho
Yes it's not hard. If we are confident it's just a matter of tin we can solve the problem without other workarounds. Strange that so many units has the same problem.
A friend of mine welded its board instead of using the hot air. I'll let you know. Up to now it's all right.
 
After long time not using it, I pressed once the button and it showed full charge (4leds) then I switched on the controller and I showed only one led and it started beeping. I recharged the battery but the problem is again still there. I don’t think it’s a problem of weldings. I think some other kind of problem. A reverse engineering of the schematic could help us
 
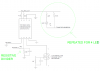
I STARTED A REVERSE ENGINEERING OF THE CONTROLLER PCB.
DOES SOMEONE WANT TO HELP ME?


EDIT1: I added some corrections in red color, to my first schematic.

controller Phantom4_.png


EDIT2: CW2015CSAD5U2 is a a fuel gauging system for lithium batteries. It reads voltage and it give output on a serial line. You will find datasheet online.

THESE ARE THE VOLTAGE MEASUREMENTS WITH THE BATTERY PLUGGED IN:
-THE BATTERY VOLTAGE WITH THE CONNECTOR PLUGGED IN THE PCB IS 8,27VOLT
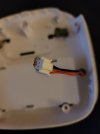
-ON THE PIN 2 OF THE CW2015CSAD5U2 I MEASURED 3,45VOLT INSTEAD OF 4,13!!! THIS COULD BE STRANGE, in fact voltage raises a little bit when the problem was solved. This point on the board corresponds to the TP_VCELL pad, located on the right of the battery connector (shown on next image).
20210207_105951.jpg

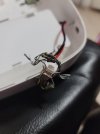
EDIT3: I welded a wire on TP_VCELL pad and I applied 4volt (negative on the ground of the board) with external power supply, then I plugged the full charged battery to the controller, then I switched on the controller and problem was solved (full battery charge is shown). This is due to the fact that the CW2015CSAD5U2 estimates the battery charge status as soon as you plug in the battery. Of course by removing the external 4 volts, the battery status estimation slowly returns to its original value.
NOTE: acoustic buzzer is active if flat cables are disconnected, but this is not relevant.

EDIT4: I tried to unweld CW2015CSAD5U2 but i was not successful. May be the component is glued. I could try to remove the glue with a scalpel. I ordered one online.

Some measures/tests:
-ON THE VCC_MCU_3,3V I MEASURED 3,3VOLT ONLY WHEN THE CONTROLLER IS ON.
-On DRAIN pin and SOURCE pin of mosfet NXP PMV65XP I measured 3Volts both when controller is ON and OFF.
-On GATE I always measure 0volt. This means that the circuit correctly powers the CW2015CSAD5U2.

EDIT5: I connected clock and gate to a oscilloscope and i tried THE AUTOMATIC DECODING OF I2C DATA. The ARM requests register 04 (State of Charge of the battery) and CW2015CSAD5U2 returns 01 (1%), then the ARM requests register 02 and 03 (analog battery voltage) and CW2015CSAD5U2 returns 2B31 (LSB is 305uv, then 2B31 is around 3,37 volt (voltage on pin 2 of the CW2015CSAD5U2 was around this value).
Screenshot_20210123-212416_Video Player.jpg


EDIT6: So at the end I suspect there is a dispersion from TP_VCELL pad to ground. By measuring resistance between TP_VCELL and ground and between TP_VCELL and battery positive pin, i get the same value in ohms. I could try to replace the capacitor, otherwise it could be a problem between PCB layers.
 

Attachments

  • Untitled.png
    Untitled.png
    42.1 KB · Views: 374
  • dji controller.png
    dji controller.png
    202.4 KB · Views: 221
  • 20210123_222510.jpg
    20210123_222510.jpg
    97.6 KB · Views: 208
  • 20210124_092811.jpg
    20210124_092811.jpg
    39.5 KB · Views: 256
Last edited:
Hi all,
thank you for this excellent discussion. I had exactly the same failure mode on my phantom 3 RC. Measuring the voltage on pin 2 of cw2015 I found a too low voltage of 3.5V, although the battery was fully charged at 8.34V. A correct reading would be at 4.17V (8.34/2). And now the root cause of the issue: The chip cw2015 leaks into itˋs input (pin 2). Therefore the resistor devider (which has high impedance of 2x100kOhms) is loaded, and the voltage to be measured by the ADC drops
I desoldered the chip (there is a soldered die pad on bottom, so it takes a while to heat up) and soldered a new one bought at Aliexpress. Voilà, reading on pin 2 changed to 4.17V. PROBLEM SOLVED.
So it is definitely not a soldering or PCB topic as it is being assumed in many posts.
The chip is what becomes faulty. Transistor threshold voltage shifts due to unwanted ions or carriers on silicon can be healed with temperature....But not permanently. This is why heating the chip with hot air gun is not a permanent solution.
Have fun

P.S: Be careful with the LEDˋs. They are very sensitive and can be destroyed with hot air easily So they would not light up anymore. This caused some confusion on my repair procedure...
 

Members online

No members online now.

Forum statistics

Threads
143,087
Messages
1,467,537
Members
104,965
Latest member
cokersean20