

Redrocks and More.... | DJI Phantom Drone Forum
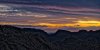
Most of the above shot with 3 frames at 2 EV intervals, exposures changed manually which takes a bit less than ten seconds. Camera in Truecolor, aperture priority, 200 iso, auto white balance, neutral sharpening/contrast/brightness.
DNG files are converted to TIFFs (16-bit, ProPhoto RGB, 300 dpi) with Photoshop Camera Raw, with slight adjustments of exposure, saturation, contrast as necessary, but nothing extensive. TIFs are composited with Photomatix Pro, using handheld alignment mode with standard or maximum movement (perspective modification). Now the most extensive editing begins, choosing an appropriate Photomatix template and making further template customizations as needed, saving the composite in the same format.
TIFF from Photomatix is now edited with PhotoShop CC, with typical adjustments being crop, levels, white point and black point, color balance, saturation, color replacement, haze reduction,Topaz 6 DeNoise (selective), On1 Resize to at least 4800 x 3600 px if necessary, Shake reduction sharpening (selective). Perhaps some selective dodging and burning in Photoshop, selective pixel-level cloning for little defects, etc.
From TIFF masters, JPEGs are made in sRBG color space, in full size, medium (2400 px) small (1200 px) and watermarked versions of medium and supersmall (800 px). Only the supersmall watermarked version is shared or posted, in most cases.

")


