


This is an installation guide for the H3-3D gimbal in the original P2 without using the optional adapter plate. This is for the "version 1.1" which comes with the anti-interference board and has the ribbon cable that plugs into the side of the GoPro for video and power as opposed to using the connector on the rear of the GoPro.
1. Open up the Phantom removing the top of the shell. This you should know how to do! I can't even count how many times I've opened up the Phantom. Way more than I ever anticipated.
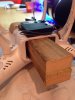
2. You'll need to get access to the battery area inside the Phantom to do this properly. To do so, with the Phantom facing away from you, you'll need to remove the screws holding the front and back motors and ESCs on the right side. You'll need to unscrew the main board as well. The goal is to make it possible to flip the main board and right side motors up and away so you can get access to the battery area. You want to free up anything holding the main board down. Be gentle.

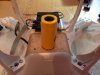
3. With the battery area exposed, you now need to expand the opening in the bottom to accommodate the yaw motor. The easiest way to do this is to temporarily screw in the H3-3D mounting bracket and trace the outline of the circle in the middle. A Dremel with a small grinding bit will work best. Plastic dust will go everywhere!

4. The anti-interference (AI) board will go on the right side of the main board using the same screws that hold that side down. Use the short ribbon cable supplied to run between the AI board and the main board. Note, the AI board is directional and installs only one way.
5. The longer ribbon cable that came with the Phantom runs to the gimbal from the AI board. I made a little cut in the belly and routed the ribbon cable along the bottom of the battery tray and to the gimbal. Use the Dremel as needed to clear a path for the ribbon cable under the battery. Tape the the ribbon cable down to make sure it doesn't snag on the battery.

6.Reinstall the right side motors and ESCs as well as the main board. Reconnect all wires and double check. Mount the AI board using the two right side main board screws. I used one of the adhesive pads supplied with the H3-3D under the AI board.
7. Mount the gimbal using the marshmallow white vibration dampeners. Attach two small zip ties loosely through opposite corners of the gimbal mount. The zip ties should be loose enough not to compress the dampeners or inhibit their movement. Connect the ribbon cable to the gimbal.
8. I couldn't tell if the battery was rubbing on the yaw motor. If it wasn't, it was very close. I used the Dremel to cut off part of the battery's plastic frame to make sure it cleared the gimbal motor. Be very careful doing this. Use a cutting wheel on the Dremel to cut a path across the surface of the plastic. Don't cut all the way through as you really don't want to cut into the battery itself! Once you've cut the outline into the plastic, you can wedge some needle nose pliers under it to pry the plastic off.

9. Put a battery in confirming it is clear of the ribbon cable and that the gimbal moves freely with it in position. Confirm all the connections are correct. Attach the GPS cable from the top of the shell and power it up to see that it starts up normally. Re-attach the top of the shell.
10. Download and install the latest P2 Assistant software. Upgrade anything that is not current (main board, firmware, gimbal) rebooting the P2 as necessary. Check, change and confirm all settings in the P2 Assistant and give the IMU an advanced calibration (ignore temp warnings) and allow it to finish. Check and calibrate all stick controls including X1 which is for the gimbal tilt.
11. Carefully free the small ribbon cable where the GoPro mounts to the gimbal and attach the supplied mini USB adapter. Mount the GoPro, screw in the retainer and plug in the ribbon cable.
12. If you're shooting in bright daylight, you'll probably want to use an ND filter. The H3-3D is more sensitive to rolling shutter and JELL-O effects and an ND will slow the shutter speed enough to compensate. I found even the H3-2D needed an ND filter. I used a Polar Pro ND filter. It is very important when using an ND filter to rebalance the gimbal otherwise the motors will get overworked. I tape a paper clip to the pitch motor that has a small weight on the end. There are other methods. Experimentation is needed here. You want the gimbal to be able to balance on its own in both pitch and roll axes no matter what position it is in. If it falls forward or to one side, you're not balanced. Further complicating matters, you need to make sure that the counterbalance will not interfere with the movement of the gimbal or get caught on anything. I used washers with a nut and bolt. The bolt I cut down and rounded after taking this picture.

That's it. My first impressions of the H3-3D are here: viewtopic.php?f=26&t=15010
Watch the video of my test flights with the H3-3D here:

1. Open up the Phantom removing the top of the shell. This you should know how to do! I can't even count how many times I've opened up the Phantom. Way more than I ever anticipated.
2. You'll need to get access to the battery area inside the Phantom to do this properly. To do so, with the Phantom facing away from you, you'll need to remove the screws holding the front and back motors and ESCs on the right side. You'll need to unscrew the main board as well. The goal is to make it possible to flip the main board and right side motors up and away so you can get access to the battery area. You want to free up anything holding the main board down. Be gentle.
3. With the battery area exposed, you now need to expand the opening in the bottom to accommodate the yaw motor. The easiest way to do this is to temporarily screw in the H3-3D mounting bracket and trace the outline of the circle in the middle. A Dremel with a small grinding bit will work best. Plastic dust will go everywhere!
4. The anti-interference (AI) board will go on the right side of the main board using the same screws that hold that side down. Use the short ribbon cable supplied to run between the AI board and the main board. Note, the AI board is directional and installs only one way.
5. The longer ribbon cable that came with the Phantom runs to the gimbal from the AI board. I made a little cut in the belly and routed the ribbon cable along the bottom of the battery tray and to the gimbal. Use the Dremel as needed to clear a path for the ribbon cable under the battery. Tape the the ribbon cable down to make sure it doesn't snag on the battery.
6.Reinstall the right side motors and ESCs as well as the main board. Reconnect all wires and double check. Mount the AI board using the two right side main board screws. I used one of the adhesive pads supplied with the H3-3D under the AI board.
7. Mount the gimbal using the marshmallow white vibration dampeners. Attach two small zip ties loosely through opposite corners of the gimbal mount. The zip ties should be loose enough not to compress the dampeners or inhibit their movement. Connect the ribbon cable to the gimbal.
8. I couldn't tell if the battery was rubbing on the yaw motor. If it wasn't, it was very close. I used the Dremel to cut off part of the battery's plastic frame to make sure it cleared the gimbal motor. Be very careful doing this. Use a cutting wheel on the Dremel to cut a path across the surface of the plastic. Don't cut all the way through as you really don't want to cut into the battery itself! Once you've cut the outline into the plastic, you can wedge some needle nose pliers under it to pry the plastic off.
9. Put a battery in confirming it is clear of the ribbon cable and that the gimbal moves freely with it in position. Confirm all the connections are correct. Attach the GPS cable from the top of the shell and power it up to see that it starts up normally. Re-attach the top of the shell.
10. Download and install the latest P2 Assistant software. Upgrade anything that is not current (main board, firmware, gimbal) rebooting the P2 as necessary. Check, change and confirm all settings in the P2 Assistant and give the IMU an advanced calibration (ignore temp warnings) and allow it to finish. Check and calibrate all stick controls including X1 which is for the gimbal tilt.
11. Carefully free the small ribbon cable where the GoPro mounts to the gimbal and attach the supplied mini USB adapter. Mount the GoPro, screw in the retainer and plug in the ribbon cable.
12. If you're shooting in bright daylight, you'll probably want to use an ND filter. The H3-3D is more sensitive to rolling shutter and JELL-O effects and an ND will slow the shutter speed enough to compensate. I found even the H3-2D needed an ND filter. I used a Polar Pro ND filter. It is very important when using an ND filter to rebalance the gimbal otherwise the motors will get overworked. I tape a paper clip to the pitch motor that has a small weight on the end. There are other methods. Experimentation is needed here. You want the gimbal to be able to balance on its own in both pitch and roll axes no matter what position it is in. If it falls forward or to one side, you're not balanced. Further complicating matters, you need to make sure that the counterbalance will not interfere with the movement of the gimbal or get caught on anything. I used washers with a nut and bolt. The bolt I cut down and rounded after taking this picture.
That's it. My first impressions of the H3-3D are here: viewtopic.php?f=26&t=15010
Watch the video of my test flights with the H3-3D here:


") Thanks ianwood and Marconi.
Thanks ianwood and Marconi.


