- Joined
- Dec 1, 2014
- Messages
- 433
- Reaction score
- 396
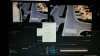
A closer look at what "the scopes" are for when color correcting and grading your P3 footage
Last edited:


Hmmmm. Make sure you have the graduated layer set to "overlay" under "opacity". It shouldn't be making the bottom brighter.I like the grad application technique, however I find using the overlay mode makes the lower part of the frame brighter? - (unless I missed something!)
If you use darken mode it seems to only act on the brighter area (sky mostly)
You can also make an ND grad for bright cloud layer days to bring back some definition without making it blue.
The Gaussian Blur effect looks pretty good, it's very like making an Orton Effect in stills.
I do find it seems to greatly increase the rendering time when you add these adjustment layers though.
That was funny.As usual, great tutorial. Much better than ones I've seen and learned from on YouTube.
I use to adjust my composite RGB curves the same way, but read it should be more like an 'S' versus 'Z'. Then adjust individual colors like 'Z'. Any perspective? My log shots tend to be flatter than your examples using same camera settings. As such 'S' adjustments to highs and lows seems less extreme than 'Z', although not all the time.... I guess I answered my own question...it depends...[emoji37]
Btw- hope DJI takes care of you with your P3 replacement
 I was thinking, "I think he's answering his own question".... and then I read you last bit, "I guess I answered my own question...it depends.." Made me laugh. Thanks for your kind words.
Fantastic tutorial. I love the sky overlay and I'm not very good with Photoshop. Is there any chance you could post a link to download the one you've created?
Sent from my iPad using Tapatalk
Thanks for your kind words. I have more footage than I know what to do with. lol.Frederick... awesome tutorial, as always. I'm sad to read about your P3 in the other post. It seems like it's a total compass error and I hope DJI takes care of you. Keep up the good work in the mean time! We all benefit from it.
Thanks for the comment. Yes I film just about everything at 24fps. The only advantage to shooting at 30fps and editing in 24fps is if you reinterpret the 30p footage to 24 within Premiere Pro. That'll give you a slight slo-mo effect. I do this when filming in the 1080 60fps mode. 60fps reinterpreted to 23.97 (or 24fps) will give you beautiful slow motion.I love your videos. Tell me do you film in 24fps? Is there any advantage to filming in 30fps and changing to 24 in post?
Thanks, Ill give it a goIt's a big file for uploading. But it's easy to create....
• In Photoshop select create new document
• Set the file background as "transparent" and size it 3840 x 2160 pixels at 72dpi
• Create a "blue" color
• Use the graduated paint tool and drag from the top to the middle of the canvas to create the graduation.
• Save as a .psd so the image doesn't flatten and the transparency stays in tact.
You're done. Place the newly created file in Premiere Pro, Final Cut or DaVinci and you're all set.
Sorted this, I was using an existing PS grad which was blue to white rather than blue to transparent - from the simple selection.I like the grad application technique, however I find using the overlay mode makes the lower part of the frame brighter? - (unless I missed something!)