Here it is! The TACT SWITCH, the image should answer any and all questions pertaining to this switch and its replacement. The switch itself is relatively small. I did not measure it as there is enough room to go with one even larger then the factory installed switch. I went a step further and used a 2 prong oppose the the 4 prong switch. since the top 2 solder points are on the same circuit, and the bottom two solder points are on the same circuit, you can get away with using a 2 prong and, as the colors indicate, must be crossed from either top pin to either bottom pin.
Ebay has them for free basically (100 pcs for $1.19 SHIPPED ((2-3 weeks from HK), or US 10 for $3.88 shipped).
I used one with a long plunger as my original was broken, I didnt bother to put back the clear housing as I misplaced it and the plunger itself sticks out far enough to be visible once the housing is assembled.
The controller paired beautifully and am back in the air! I hope this helps anyone with issues pertaining to this switch and/or its function.
thanks everyone for your insight and advice!
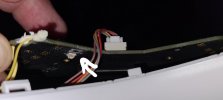
NOTE: if you have a steady hand, and have the soldering gun and a pair of tweezers, this is a cakewalk. NO need to remove the entire board either. Unplug the connectors which will give you enough allowance to just lower the board ( with the drone upside down). Prop something underneath the 2 arms closest to you, and the switch, which will have the drone sitting at a 45 degree angle (or so). With it in this position, the board will just hand down giving you the room to view and work on the button.


")


")