Noisy picture

It is not deception per se, merely a historic leftover.
citing Image Sensor Sizes:

‘When the vidicon tube was invented in the early 1950s, the glass tubing used to make the first units had a nominal exterior diameter of one inch. These were referred to as "One-inch tubes". After allowing for the space taken up by the interior metal structures needed to control the electron beam, the portion of the photoconductor on the front glass accessible for scanning had a diameter of about 5/8 inch. Early television used a raster aspect ratio of 4:3 so the corresponding scanned area was 1/2 inch horizontal by 3/8 inch vertical - the canonic 3:4:5 right triangle. After a while, the image size assumed the name of the tube and a 5/8 inch diagonal raster became commonly called the 1-inch size. 5/8 inch is 15.875 mm and so 16 mm became the designated metric diagonal for 1-inch tubes.”

And the main issue with the sensor is not the size but rather the (color) noise which is quite easily mitigated as per my previous answer.
Stretching the truth is deception. They picked the route which deviated from the industry standard for lens sizes as read, to make their product look better than what it is. Hey, that’s the way the world is. I was just making note of it.
Advertising takes liberties that sometimes goes too far.
 
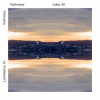
I posted some tips above regarding noise reduction, and for competition here is a 100% crop (ie fullsize pixels) sample of a high-contrast and shadow-lifted iso 100 capture from yesterday.

Along one axis, color noise is reduced (lightroom setting 50), and the other luminance noise is reduced (lightroom setting 15).

As this demonstrates, color noise is the deamon here, and must be addressed for a good result.
 

Attachments

  • noise_Sample.png
    noise_Sample.png
    1.8 MB · Views: 733
I posted some tips above regarding noise reduction, and for competition here is a 100% crop (ie fullsize pixels) sample of a high-contrast and shadow-lifted iso 100 capture from yesterday.

Along one axis, color noise is reduced (lightroom setting 50), and the other luminance noise is reduced (lightroom setting 15).

As this demonstrates, color noise is the deamon here, and must be addressed for a good result.
The issue with using the noise reduction tool is that it reduces the sharpness of an image. Sometimes it better than having a bunch of noise in an image though. Depends on your purpose I guess.
 
The issue with using the noise reduction tool is that it reduces the sharpness of an image. Sometimes it better than having a bunch of noise in an image though. Depends on your purpose I guess.
You always (should) reduce noise, even with a full format low iso body such as a Nikon D810. The question is: how much. The answer is: enough.

The above sample which shows very apparent color noise and the reduction of said noise is from one of the sourceimages of the 100 megapixel panorama below.

Could I get a better quality panorama with my D810 with much less noise reduction? Without a question.
Could I reach the same vantage point with the D810? Not on my budget (some 50 meters above the ocean).

Given the tools you have available, you should strive to get the best results for the application you intend (where large format printing differs from instagram), but that means a little work. For me, the P4P has made this much easier as compared to my previous P4. I expect and hope the P5 will continue this trend.
 

Attachments

  • PANO_sample.jpg
    PANO_sample.jpg
    730.1 KB · Views: 376
  • Like
Reactions: Hikaru Sulu
You always (should) reduce noise, even with a full format low iso body such as a Nikon D810. The question is: how much. The answer is: enough.

The above sample which shows very apparent color noise and the reduction of said noise is from one of the sourceimages of the 100 megapixel panorama below.

Could I get a better quality panorama with my D810 with much less noise reduction? Without a question.
Could I reach the same vantage point with the D810? Not on my budget (some 50 meters above the ocean).

Given the tools you have available, you should strive to get the best results for the application you intend (where large format printing differs from instagram), but that means a little work. For me, the P4P has made this much easier as compared to my previous P4. I expect and hope the P5 will continue this trend.
Beautiful picture.
 
  • Like
Reactions: Hikaru Sulu
Stretching the truth is deception. They picked the route which deviated from the industry standard for lens sizes as read, to make their product look better than what it is.
Although it appears to be deceptive marketing, it's not.
All sensor sizes up to 4/3" are misleading and the numbers are not related to any dimensions of the sensor.
DJI didn't deviate from the very confusing industry standard that is used by lots of camera makers.
The standard industry name for a sensor that measures 12.8mm x 9.6mm " and has a 16mm diagonal is 1 inch.
Unravelling Sensor Sizes - Photo Review
Well, at least they did say," pervading irrational measurement system."
 
Tried minimal amount of NR on DNG required
to make images acceptable without turning
them into "watercolorings"...? Via ACR (AdobeCameraRaw)...?
The numbers I posted earlier for lightroom also applies for ACR as it is the same engine. Try color 50 and luminance 15-25 as a starting point (for ISO 100)
 
You take a number of images, 5 or more for best results, align and stack them followed by a median blend. The theory is simple. The noise you are trying to remove is random so by doing a median stack a lot of it is disregarded in producing the resultant image.

The free software Registax6 will take these and blend them together for you and allow for adjustments.
 
The numbers I posted earlier for lightroom also applies for ACR as it is the same engine. Try color 50 and luminance 15-25 as a starting point (for ISO 100)

My NR scheme based on my non-expert 100% eyeballing...
Coincidentally, I just discovered the change below brings back detail!

my new ACR NR scheme will be:
ISO = under 640, 640, 800, 1000, 1250, 1600, 2000, 2500, 3200
then:
luminence = 20, 34, 37, 40, 43, 47, 50, 54, 60
luminence detail = 20, 34, 37, 40, 43, 47, 50, 54, 60
(used to be 1/2 luminence, but never below 20)
(just changed to same as luminence = brings back natural detail)

luminence contrast = always 20
color = always 20
color detail = always 20

Any opinions? Comments?
 
Last edited:
  • Like
Reactions: Hikaru Sulu
My NR scheme based on my non-expert 100% eyeballing...
Coincidentally, I just discovered the change below brings back detail!

my new ACR NR scheme will be:
ISO = under 640, 640, 800, 1000, 1250, 1600, 2000, 2500, 3200

luminence = 20, 34, 37, 40, 43, 47, 50, 54, 60
luminence detail = 20, 34, 37, 40, 43, 47, 50, 54, 60
(used to be 1/2 luminence, but never below 20)
(just changed to same as luminence = brings back natural detail)

luminence contrast = always 20
color = always 20
color detail = always 20

Any opinions? Comments?
I believe you are over complicating this slightly. You should really never go beyond base iso 100 unless there is very low light. It is better to increase the aperture to allow more light if the shutterspeed is too long and causes motion blur.

Color 20 will not remove the color-noise; so at least double this. I start at 50 as loss of color detail is seldom noticeable, while noise is very much noticeable so that it is better to go high than low here.

The detail option controls the masking of the noise-reduction and can usually just be left at 50 unless you really need to do some tweaks for special occasions.

You have meaningful numbers for luminence, and 15-25 seems to be a good range here.

Always inspect at at least 300% when evaluating noise.
 
Thanks on response!
Forgot to mention, this is for Sony RX10-IV processing;
my P4P+ always at ISO 100, f4.5 so far 1 yr owned...
You most likely will get away with lower color noise reduction on the rx10 as the p4p seems to have a thermal issue introducing a lot of noise (unproven theory).
 
My approach is to shoot these kinds of shots about 15-20 minutes earlier and then post process them until I get the lighting I was after. You’ll have much less issue with grainy images and with dynamic range.
 
My approach is to shoot these kinds of shots about 15-20 minutes earlier and then post process them until I get the lighting I was after. You’ll have much less issue with grainy images and with dynamic range.
In this instance 15-20mins earlier would have the sun higher above the horizon (assuming a setting sun) in which case you might have better foreground illumination however would be dealing with the same or greater overall dynamic range (would still exceed the capability of the sensor). You may also be shooting before the colour in the sky had developed nicely. The better options may be to bracket so you have the luxury of creating a HDR image in post or blending frames manually to balance foreground and sky. I usually shoot at sunrise and will often blend properly exposed sky and foreground images. If restraint is exercised you can get realistic looking images without excessive noise in the shadows which tends to plaque images where the darker areas are recovered in post. If your going to shoot one frame only wxposing to the right of the histogram is the only real option in these circumstances unless you have graduated ND Filter’s.
 
  • Like
Reactions: David_Cambridge
So most sensors are sold with honest size claims — except "one inch sensors." To say it’s one inch is fraud. All to make a buck. The world is nothing but deception. There is honesty, it’s just deception is doing its best to hide it.

aaaagghhh you quoted Ken Cockwell - lose all your credibility, do not pass go, do not collect £200 :D :D :D
 
My NR scheme based on my non-expert 100% eyeballing...
Coincidentally, I just discovered the change below brings back detail!

my new ACR NR scheme will be:
ISO = under 640, 640, 800, 1000, 1250, 1600, 2000, 2500, 3200
then:
luminence = 20, 34, 37, 40, 43, 47, 50, 54, 60
luminence detail = 20, 34, 37, 40, 43, 47, 50, 54, 60
(used to be 1/2 luminence, but never below 20)
(just changed to same as luminence = brings back natural detail)

luminence contrast = always 20
color = always 20
color detail = always 20

Any opinions? Comments?
Stick to full stops for ISO settings. If you need a faster shutter @ISO 400 shoot at 800, digger 640. The in between full stop ISO settings often perform worse, that we the case with a lot of DSLR. The actual ISO of the P4P is actually a little below the indicated setting anyway.
 
Grain is either a ISO too high, or an underexposed image. Both should be avoided. Note that a ND filter left on from daylight will cost you at least 2 stops, plenty to cause trouble in a marginal light settings. Check your image in a photo program like Lightroom or Photoshop histogram display. The histogram should be roughly centered, with no bunching at the top or bottom. Underexposed will bunch at the bottom, and guarantees a noisy image. For maximum quality, still photographers expose to the right on original shooting, and bring the exposure down afterward in editing. Even the best camera sensor will be lousy if not used properly.
 

Recent Posts

Members online

Forum statistics

Threads
143,106
Messages
1,467,680
Members
104,992
Latest member
Johnboy94