Hey.
So as some of you may know this is my second phantom 3 standard that had cracked on the first few gentle flights. (Bad luck or factory torque issues) ?
To cut a long story short, on my second phantom standard ( different dealer) rather than sending it back for repair the dealer and I agreed to send new replacement shell for free, rather than sending it to DJI to repair/ waiting list. (My choice)
After weeks on deciding whether to replace my shell or continue to fly with 2 small hairline cracks.. I decided it was time to replace the shell because it was bugging me!! (wise choice)
I got all my tools out and made a start last night, so far it's taken about 12 hours all together, I did not rush anything and watched a few videos which helped. The hardest part is cracking open the 2 halves of the shell trying not to break the tabs or pinch anything, strong cardboard strips wedged in between helps a little but it's an ABSOLUTE NIGHTMARE.
The rest was fairly reasonable as long as you know what you are doing. Luckily I didn't snap or break anything on the old shell either.
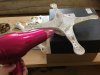
The 2, 5.8ghz antenna's that connect from the battery tray to the gimbal are glued and double sided sticky taped at an angle each side of the battery compartment. I cut glue with an exacto knife and used hot glue and thin double sided strips to secure them back in place on the new shell.
I torqued everything down and made sure NOTHING was over torqued too much - including all arms and motor screws. All are tightened down enough....
All went well, everything works as it should. I will do a test flight hopefully tomorrow. The weather is bad here (strong wind and rain at the moment).
And one thing - NO MORE CRACKS!! [emoji106][emoji854][emoji854]
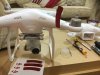
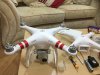
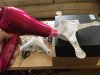
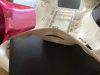
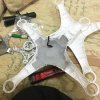
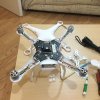
Here is some pictures of Dis-assembly-


Re-assembly pics to follow..
So as some of you may know this is my second phantom 3 standard that had cracked on the first few gentle flights. (Bad luck or factory torque issues) ?
To cut a long story short, on my second phantom standard ( different dealer) rather than sending it back for repair the dealer and I agreed to send new replacement shell for free, rather than sending it to DJI to repair/ waiting list. (My choice)
After weeks on deciding whether to replace my shell or continue to fly with 2 small hairline cracks.. I decided it was time to replace the shell because it was bugging me!! (wise choice)
I got all my tools out and made a start last night, so far it's taken about 12 hours all together, I did not rush anything and watched a few videos which helped. The hardest part is cracking open the 2 halves of the shell trying not to break the tabs or pinch anything, strong cardboard strips wedged in between helps a little but it's an ABSOLUTE NIGHTMARE.
The rest was fairly reasonable as long as you know what you are doing. Luckily I didn't snap or break anything on the old shell either.
The 2, 5.8ghz antenna's that connect from the battery tray to the gimbal are glued and double sided sticky taped at an angle each side of the battery compartment. I cut glue with an exacto knife and used hot glue and thin double sided strips to secure them back in place on the new shell.
I torqued everything down and made sure NOTHING was over torqued too much - including all arms and motor screws. All are tightened down enough....
All went well, everything works as it should. I will do a test flight hopefully tomorrow. The weather is bad here (strong wind and rain at the moment).
And one thing - NO MORE CRACKS!! [emoji106][emoji854][emoji854]
Here is some pictures of Dis-assembly-
Re-assembly pics to follow..
")