- Joined
- Jul 9, 2014
- Messages
- 242
- Reaction score
- 48
Hi All,
When I started looking into antenna modification I found it all a bit bewildering and I just didn't know what I wanted or where, or indeed how to actually do the mods. However, now that I've fully modded my Phantom 2 Vision+ with a Stage 4 kit, I wanted to write a quick guide to help others thinking of doing the same thing, along with links to the various tutorials out there.
This is unashamedly an http://fpvlr.com/ biased post, but that's only because I've got nothing but praise for both the quality of the antennas and Tony's (the owner) commitment to helping you out with post and pre-sales support. I've seen many posts from other users who say they've visited him personally at his antenna factory and said what a really nice and very hard working guy he is, and it was those types of posts that gave me the confidence and trust in spending a lot of money for the antennas.")
FPVLR offer different stage kits, each designed to include everything you need for your desired price point/distance.
Some people have mentioned that their transmitter and quadcopter need to be relinked after the Stage 3/4 mod
Desired Outcome: Do you want to avoid loosing video feed before control signal?
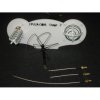
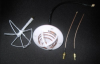
Contents: 2.4Ghz Half-sphere helix for distance, plus a 2.4Ghz pinwheel for close range operation.
Tutorial: http://youtu.be/OO-_btIbYtA
Improvements: Expect 2 to 3 times range compared to stock
Modification: Range extender only
Kit Required: Stage 1 - http://fpvlr.com/shop/index.php?route=product/product&path=76&product_id=102
Desired Outcome: Improve both the video and control signal distance.
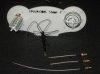
Contents: Stage 1 plus 5.8Ghz 4-1/4 turn helix
Tutorial: https://www.youtube.com/watch?v=7BfMFmRiWM4 (a bit long but you can skip to see the useful bits)
Improvements: Around 5000-8000ft (wifi congestion dependant)
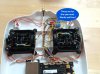
Modification: Range extender and transmitter
Kit Required: Stage 2 - http://fpvlr.com/shop/index.php?route=product/product&path=76&product_id=103
Outcome: Great 360 degree control at long distances
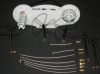
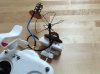
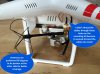
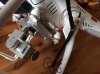
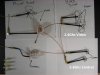
Contents: Stage 2 plus 2 x 2.4Ghz pinwheels and 2 x 5.8Ghz pinwheels for the Phantom
Tutorial (my own 5.8Ghz mod): https://www.youtube.com/watch?v=OMEsdj2SaMw
Tutorial (2.4Ghz mod - end of video, except replace both 2.4Ghz antennas): http://youtu.be/ZFltb2f08l8
Improvements: Increase in distance and a reliable control and video feeds at those distances
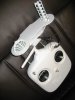
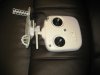
Modification: Range extender, transmitter, and Phantom
Kit Required: Stage 3 - http://fpvlr.com/shop/index.php?route=product/product&path=76&product_id=112
Outcome: Massive distances (3.1 miles, 16469ft, 5km) documented, other users have gone further
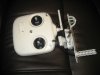
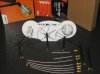
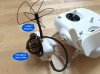
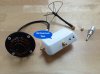
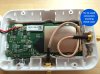
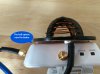
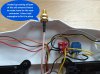
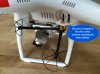
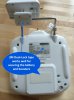
Contents: Stage 3 plus Sunhans 2.4Ghz and 5.8Ghz boosters with battery pack
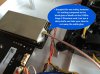
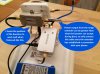
Tutorial: As Stage 3 plus stick the boosters on with velcro (or 3M Lock Tape) as seen in the pic below.
Improvements: Really great distances! I did 3.1 miles as seen here viewtopic.php?f=54&t=26776
Modification: Range extender, transmitter, Phantom, and additional attachments to transmitter
Kit Required: Stage 4 - http://fpvlr.com/shop/index.php?route=product/product&path=76&product_id=114
Antenna Mounts: Sold by Tony at FPVLR: http://fpvlr.com/shop/index.php?route=p ... uct_id=117
When I started looking into antenna modification I found it all a bit bewildering and I just didn't know what I wanted or where, or indeed how to actually do the mods. However, now that I've fully modded my Phantom 2 Vision+ with a Stage 4 kit, I wanted to write a quick guide to help others thinking of doing the same thing, along with links to the various tutorials out there.
This is unashamedly an http://fpvlr.com/ biased post, but that's only because I've got nothing but praise for both the quality of the antennas and Tony's (the owner) commitment to helping you out with post and pre-sales support. I've seen many posts from other users who say they've visited him personally at his antenna factory and said what a really nice and very hard working guy he is, and it was those types of posts that gave me the confidence and trust in spending a lot of money for the antennas.
FPVLR offer different stage kits, each designed to include everything you need for your desired price point/distance.
Some people have mentioned that their transmitter and quadcopter need to be relinked after the Stage 3/4 mod
Desired Outcome: Do you want to avoid loosing video feed before control signal?
Contents: 2.4Ghz Half-sphere helix for distance, plus a 2.4Ghz pinwheel for close range operation.
Tutorial: http://youtu.be/OO-_btIbYtA
Improvements: Expect 2 to 3 times range compared to stock
Modification: Range extender only
Kit Required: Stage 1 - http://fpvlr.com/shop/index.php?route=product/product&path=76&product_id=102
Desired Outcome: Improve both the video and control signal distance.
Contents: Stage 1 plus 5.8Ghz 4-1/4 turn helix
Tutorial: https://www.youtube.com/watch?v=7BfMFmRiWM4 (a bit long but you can skip to see the useful bits)
Improvements: Around 5000-8000ft (wifi congestion dependant)
Modification: Range extender and transmitter
Kit Required: Stage 2 - http://fpvlr.com/shop/index.php?route=product/product&path=76&product_id=103
Outcome: Great 360 degree control at long distances
Contents: Stage 2 plus 2 x 2.4Ghz pinwheels and 2 x 5.8Ghz pinwheels for the Phantom
Tutorial (my own 5.8Ghz mod): https://www.youtube.com/watch?v=OMEsdj2SaMw
Tutorial (2.4Ghz mod - end of video, except replace both 2.4Ghz antennas): http://youtu.be/ZFltb2f08l8
Improvements: Increase in distance and a reliable control and video feeds at those distances
Modification: Range extender, transmitter, and Phantom
Kit Required: Stage 3 - http://fpvlr.com/shop/index.php?route=product/product&path=76&product_id=112
Outcome: Massive distances (3.1 miles, 16469ft, 5km) documented, other users have gone further
Contents: Stage 3 plus Sunhans 2.4Ghz and 5.8Ghz boosters with battery pack
Tutorial: As Stage 3 plus stick the boosters on with velcro (or 3M Lock Tape) as seen in the pic below.
Improvements: Really great distances! I did 3.1 miles as seen here viewtopic.php?f=54&t=26776
Modification: Range extender, transmitter, Phantom, and additional attachments to transmitter
Kit Required: Stage 4 - http://fpvlr.com/shop/index.php?route=product/product&path=76&product_id=114
Antenna Mounts: Sold by Tony at FPVLR: http://fpvlr.com/shop/index.php?route=p ... uct_id=117


 ??
??