Dual Battery Mod

Thanks to all you p3 battery mods especially the how to video I have ordered 1600 and1800 mah batts from hobbyking will test these but winter is almost here so what do you think about bigger batts yes more weight but I see fpv costoms running 1600 mah
 
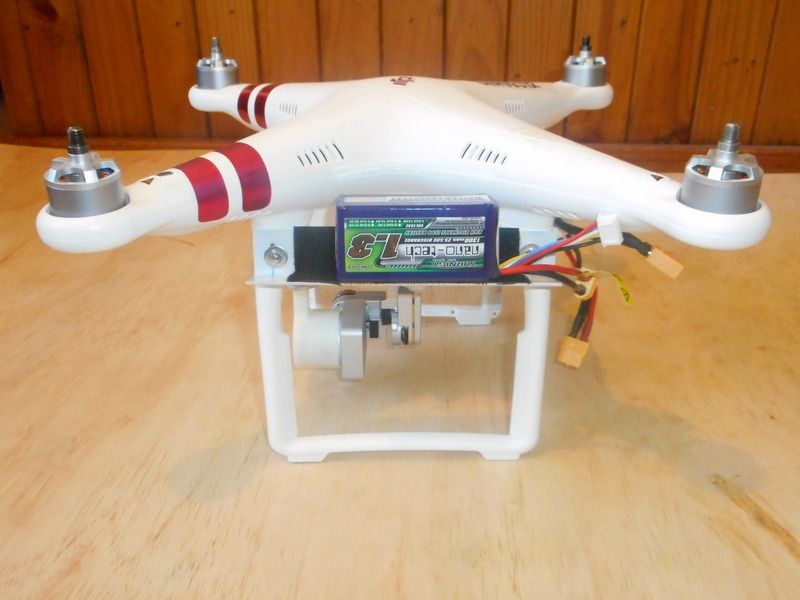
Hey there just thought I'd post a little thread about how I did my battery mod.I wont go into finite detail but reading this anyone with basic soldering skills could perform this mod.Now this is how I did the mod first time round, I'm no electronics wiz and am sure that I will refine the mod as I do more of my battery's I've just had many requests for a how to, so here goes.
First things first you need to get the smart battery cover open...I found this video on YouTube although its for a phantom vision2 it's practically identical to the p3's cover. I found that with a sharp hobby knife there is no need to heat it up as he does in the vid.The top cover of the smart battery has four tiny plastic tabs the joins it to the main body of the smart battery's cover but just take your time and using some small flat headed screw drivers etc you'll pry it off in a jiff>
To view this content we will need your consent to set third party cookies.
For more detailed information, see our cookies page.

After you have opened it it's time to grab your drill out ...start with a thin bit roughly the size of the lead in a pencil to make a pilot hole for your larger bit.I used rated 20amp wire which is sufficient for the current draw and drilled out holes through the top cover through the pilot hole I made with a bit that suited the size wire I was using>
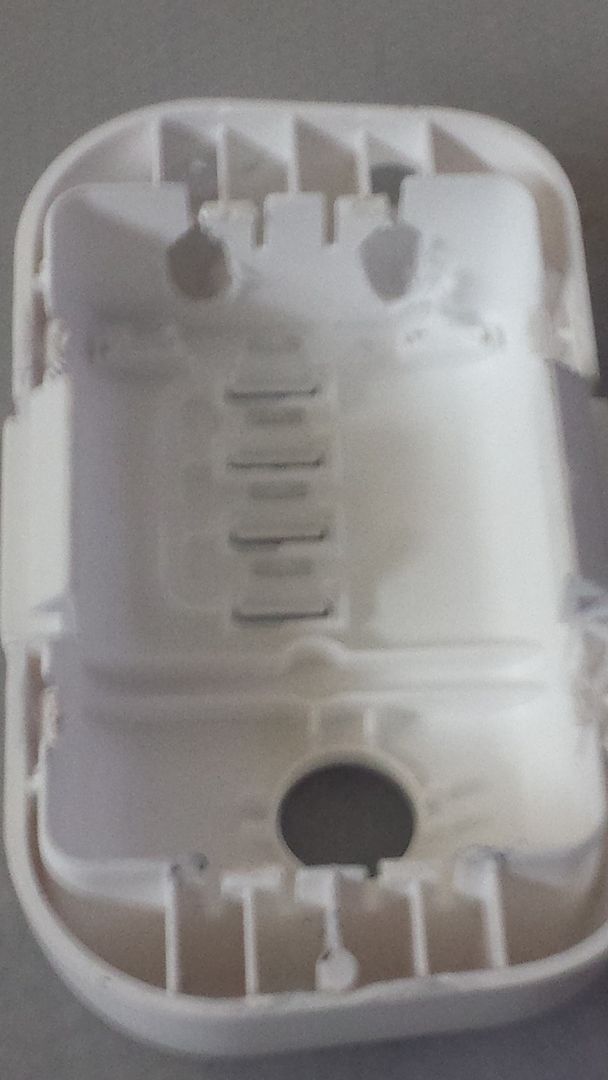
Next you will want to drill two more pilot holes in the main body of the battery that line up with the holes you made in the top cover to poke the wire through.
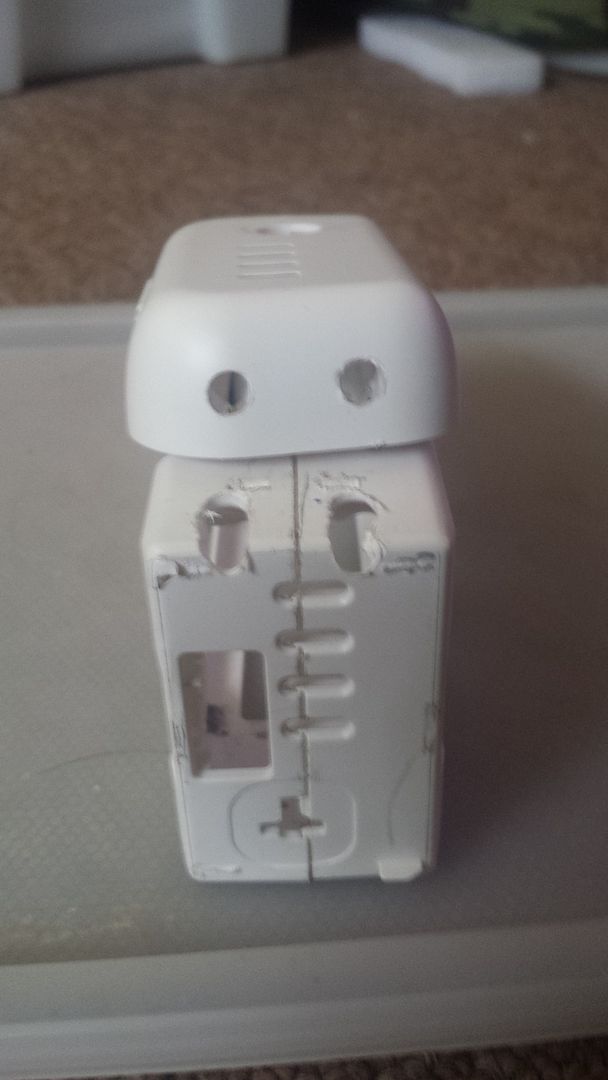
Then the fun begins the positive and negative terminals are coated in some sort of epoxy goop now I tried heating it with a hot air gun to no avail so don't waste your time.Anyway just sit the iron on the soldered joints for a few second to get the goo to melt away.Next add some solder to the existing connections enough to hold the new wires on it. Having tinned your wires like this guy does
To view this content we will need your consent to set third party cookies.
For more detailed information, see our cookies page.
then solder your wires to the existing positive and negative connections inside the smart battery. Leave enough wire to play with then its time to reassemble. Ok start with one half of the smart battery main body and poke one of your wires through it's a bit fiddly but just take your time and repeat with the other half of the main body. Once you have the two halves together add some little dobs of super glue to the main body to seal it up. Then replace your smart battery's power button and poke your wires through the smart battery top squeeze it back on add a few more dobs of super glue to keep it on and the hard bits over.
Next get some heat shrink and solder and some xt60 connectors which are available at any electronics shop/hobby store and proceed to solder your connector on
To view this content we will need your consent to set third party cookies.
For more detailed information, see our cookies page.
Now you will also need a XT60 Y harness to run the batteries in parallel you can get them off hobbykings website ebay etc.XT60 Harness for 2 Packs in Parallel (1pc)
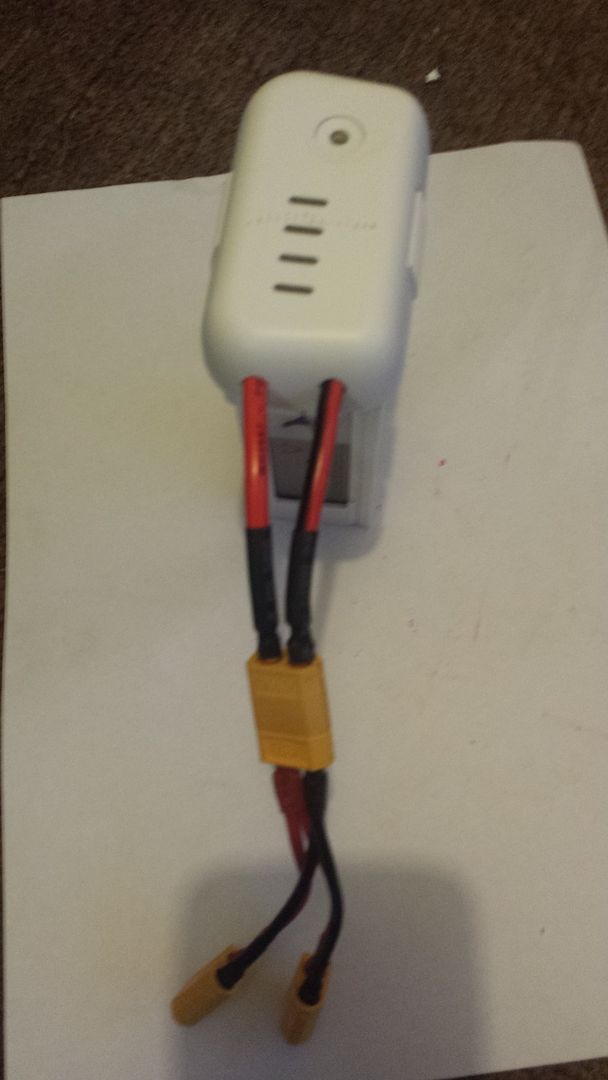
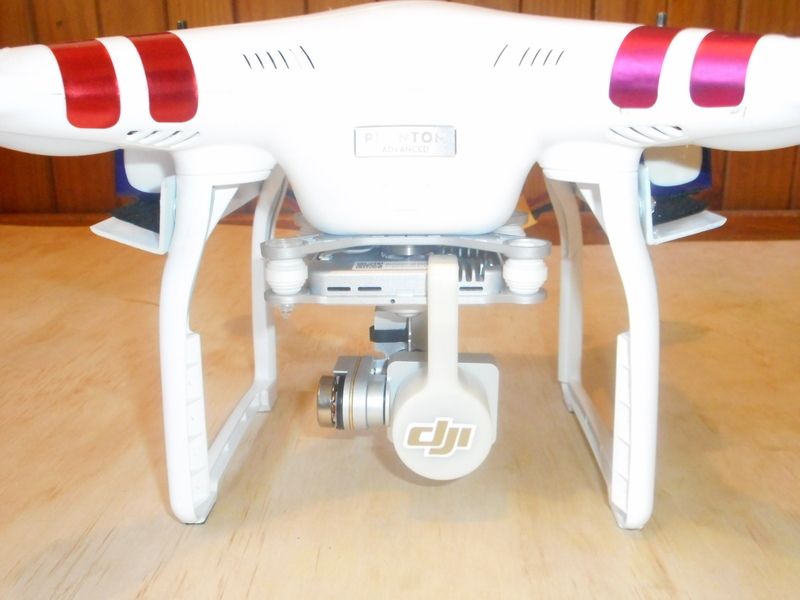
Now since I was not able to find a dual battery holder for the phantom3 anywhere I had to search for something off the self. What I found at my local hardware store was some plastic plasters capping its very strong,light weight,durable easy to work with and cheap.....ticks all the boxes.Peer Industries 20 x 20mm x 2.4m Plasterers Capping Trim I cut a couple of 13.5cm lengths and drill some holes through the tops of the legs carefully as not to drill through your antenna wires, just move them out of the way while drilling. A couple of little bolts washers and nuts later add some velcro for your battery's and your done. The other great bit about the capping that I got is that as you can see in the pics it's not right angled so the battery's actually lean into the bird. The battery's I'm starting with are these Turnigy nano-tech's 1300mAh 4S 25-50C lipos Turnigy nano-tech 1300mAh 4S 25~50C Lipo Pack (AU Warehouse)
Anyhow the whole mod including the batteries was under $50 .........any questions ask away :)
DSCN1212.jpg

Daul battery mounts infinity hobby goodluck buy
 
That s correct 3s for the p2 as the p2's battery is 11.1v
Set a new pb today 8.066km/5miles lost signal on the DBS after I turned to head home reached about the limit of the DBS antenna/mod but boosters are on the way.Still landed with plenty of juice left in the 1300's.
I wonder if any one else that has a battery mod has noticed there smart battery running 20c cooler :)
This is great news awesome
 
Thanks to all you p3 battery mods especially the how to video I have ordered 1600 and1800 mah batts from hobbyking will test these but winter is almost here so what do you think about bigger batts yes more weight but I see fpv costoms running 1600 mah

I'd recommend getting carbon fibre props but other than that havent noticed the weight being any issue.Infact imo the bird actually handles much smoother and also comforting to no that if you smart battery ever dies mid flight ie:cell failure you can keep on flying as you have your lipos as a redundancy. I started off with these Turnigy nano-tech 1300mAh 4S 25~50C Lipo Pack
they only weigh 145grams but not satisfied with 25mins flight time lol I have gone to something bigger :)
Hi again now we are getting somewhere I hope all goes well as we keep on pushing the limits what size of battery
 
Hi again now we are getting somewhere I hope all goes well as we keep on pushing the limits what size of battery
Daul battery mounts infinity hobby goodluck buy
Hmm didn't find any mounts for the phantom3?
Hi again now we are getting somewhere I hope all goes well as we keep on pushing the limits what size of battery
If you jump on hobbykings website you can refine lipo search by weight Batteries & Accessories>Li-Poly (All brands)
 
Hey I'm thinking of doing the battery mod (not the mod done on the P3 itself), I was wondering how do I get about placing the extra batteries onto my P3 without modifying i.e screwing anything on, can I not use zip ties to put like a flat panel on each side of the legs and then velcro the batteries onto the panel?

Let me know guys.

Thanks

Yeh you could use zip ties no probshttp://store.dji.com/product/phantom-2-vision-plus-landing-gear
 
  • Like
Reactions: D4T_PoM
This mod is also a good test of the shell strength in the areas where failures are know to occur.

Adding mass certainly increases the stresses and this would seem to increase the likelyhood of cracking in shells prone to them.
 
I have this mod since a few weeks. Today, I flew 28.5 minutes in windy conditions (to 10%), using these batteries Hyperion G6 4S LiHV G6 Hi-Voltage 2400mAh 4S 60Cmax LiPo (I didn't buy them there). These are LiHV batteries, an extension of LiPo, and actually the same technology used in the stock battery. You need a charger that supports LiHV, such as the SkyRC D100 D100 Charger
 
  • Like
Reactions: Extreme24 and Ed209
I have this mod since a few weeks. Today, I flew 28.5 minutes in windy conditions (to 10%), using these batteries Hyperion G6 4S LiHV G6 Hi-Voltage 2400mAh 4S 60Cmax LiPo (I didn't buy them there). These are LiHV batteries, an extension of LiPo, and actually the same technology used in the stock battery. You need a charger that supports LiHV, such as the SkyRC D100 D100 Charger
Thax for the info
 
  • Like
Reactions: Extreme24
I have this mod since a few weeks. Today, I flew 28.5 minutes in windy conditions (to 10%), using these batteries Hyperion G6 4S LiHV G6 Hi-Voltage 2400mAh 4S 60Cmax LiPo (I didn't buy them there). These are LiHV batteries, an extension of LiPo, and actually the same technology used in the stock battery. You need a charger that supports LiHV, such as the SkyRC D100 D100 Charger
10% more flight time than a standard lipo I like that :)
 
  • Like
Reactions: Mr.Spock
I'd recommend getting carbon fibre props but other than that havent noticed the weight being any issue.Infact imo the bird actually handles much smoother and also comforting to no that if you smart battery ever dies mid flight ie:cell failure you can keep on flying as you have your lipos as a redundancy. I started off with these Turnigy nano-tech 1300mAh 4S 25~50C Lipo Pack
they only weigh 145grams but not satisfied with 25mins flight time lol I have gone to something bigger :)

What bigger batteries are you refering to?

Also how about these batteries, would they work?

viewproduct | Turnigy Bolt 2400mAh 4S 15.2V 65~130C High Voltage Lipoly Pack (LiHV)
 
  • Like
Reactions: maddingomike
What bigger batteries are you refering to?

Also how about these batteries, would they work?

viewproduct | Turnigy Bolt 2400mAh 4S 15.2V 65~130C High Voltage Lipoly Pack (LiHV)
Yeh they would work no probs the C rating is a bit of over kill but as for the bigger batteries I'v asked alot of long range p3 duel batt flyers what lipo's they are using to get like 30mins plus flight times and all I hear is the sound of silence.With those 2400mah lipo's I would imagine you would be getting close to 30mins flight time.
 
Yeh they would work no probs the C rating is a bit of over kill but as for the bigger batteries I'v asked alot of long range p3 duel batt flyers what lipo's they are using to get like 30mins plus flight times and all I hear is the sound of silence.With those 2400mah lipo's I would imagine you would be getting close to 30mins flight time.

What do you mean by overkill?

Sorry trying to gain a bit of knowledge before I pull the trigger and get the battery mod done lol
 
What do you mean by overkill?

Sorry trying to gain a bit of knowledge before I pull the trigger and get the battery mod done lol

Have a read of this link Common Sense RC and this thread New P3 World Record 8.065 miles | Page 5 | DJI Phantom Forum

If your after wire get the silicone its super flexible thinner than the standard wire I used on my first batt mod and can handle high temps. 14AWG looks to be optimal Hardware & Accessories>Wires & Connectors>Silicon Wire
 
Last edited:
Have a read of this link Common Sense RC and this thread New P3 World Record 8.065 miles | Page 5 | DJI Phantom Forum

If your after wire get the silicone its super flexible thinner than the standard wire I used on my first batt mod and can handle high temps. 14AWG looks to be optimal Hardware & Accessories>Wires & Connectors>Silicon Wire

I'm going to get FPV Horizon in the UK to get the battery mod done.

I'm thinking of which 2 batteries I should get, so would those turnigy bolt ones I posted above work well?
 
Hey there just thought I'd post a little thread about how I did my battery mod.I wont go into finite detail but reading this anyone with basic soldering skills could perform this mod.Now this is how I did the mod first time round, I'm no electronics wiz and am sure that I will refine the mod as I do more of my battery's I've just had many requests for a how to, so here goes.
First things first you need to get the smart battery cover open...I found this video on YouTube although its for a phantom vision2 it's practically identical to the p3's cover. I found that with a sharp hobby knife there is no need to heat it up as he does in the vid.The top cover of the smart battery has four tiny plastic tabs the joins it to the main body of the smart battery's cover but just take your time and using some small flat headed screw drivers etc you'll pry it off in a jiff>
To view this content we will need your consent to set third party cookies.
For more detailed information, see our cookies page.

After you have opened it it's time to grab your drill out ...start with a thin bit roughly the size of the lead in a pencil to make a pilot hole for your larger bit.I used rated 20amp wire which is sufficient for the current draw and drilled out holes through the top cover through the pilot hole I made with a bit that suited the size wire I was using>
Next you will want to drill two more pilot holes in the main body of the battery that line up with the holes you made in the top cover to poke the wire through.
Then the fun begins the positive and negative terminals are coated in some sort of epoxy goop now I tried heating it with a hot air gun to no avail so don't waste your time.Anyway just sit the iron on the soldered joints for a few second to get the goo to melt away.Next add some solder to the existing connections enough to hold the new wires on it. Having tinned your wires like this guy does
To view this content we will need your consent to set third party cookies.
For more detailed information, see our cookies page.
then solder your wires to the existing positive and negative connections inside the smart battery. Leave enough wire to play with then its time to reassemble. Ok start with one half of the smart battery main body and poke one of your wires through it's a bit fiddly but just take your time and repeat with the other half of the main body. Once you have the two halves together add some little dobs of super glue to the main body to seal it up. Then replace your smart battery's power button and poke your wires through the smart battery top squeeze it back on add a few more dobs of super glue to keep it on and the hard bits over.
Next get some heat shrink and solder and some xt60 connectors which are available at any electronics shop/hobby store and proceed to solder your connector on
To view this content we will need your consent to set third party cookies.
For more detailed information, see our cookies page.
Now you will also need a XT60 Y harness to run the batteries in parallel you can get them off hobbykings website ebay etc.XT60 Harness for 2 Packs in Parallel (1pc)
Now since I was not able to find a dual battery holder for the phantom3 anywhere I had to search for something off the self. What I found at my local hardware store was some plastic plasters capping its very strong,light weight,durable easy to work with and cheap.....ticks all the boxes.Peer Industries 20 x 20mm x 2.4m Plasterers Capping Trim I cut a couple of 13.5cm lengths and drill some holes through the tops of the legs carefully as not to drill through your antenna wires, just move them out of the way while drilling. A couple of little bolts washers and nuts later add some velcro for your battery's and your done. The other great bit about the capping that I got is that as you can see in the pics it's not right angled so the battery's actually lean into the bird. The battery's I'm starting with are these Turnigy nano-tech's 1300mAh 4S 25-50C lipos Turnigy nano-tech 1300mAh 4S 25~50C Lipo Pack (AU Warehouse)
Anyhow the whole mod including the batteries was under $50 .........any questions ask away :)
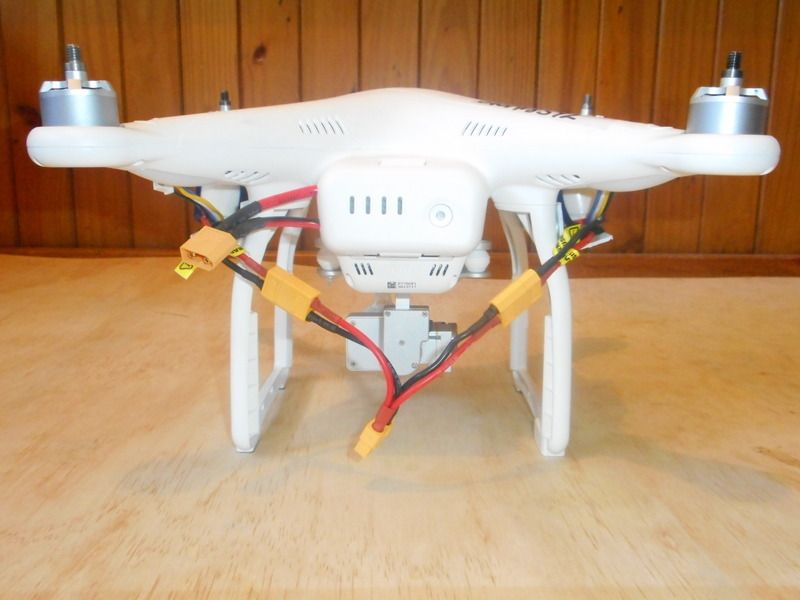
DSCN1212.jpg

Thank u for this
 
I'm going to get FPV Horizon in the UK to get the battery mod done.

I'm thinking of which 2 batteries I should get, so would those turnigy bolt ones I posted above work well?

Yeh they would offer excellent flight time.
Thank u for this
No worries actually since my bird is almost out of warranty I'm going to do the mod to the bird itself.
 
Yeh they would offer excellent flight time.

No worries actually since my bird is almost out of warranty I'm going to do the mod to the bird itself.

Whats the difference in doing the mod to the bird compared to doing the battery mod?
 

Recent Posts

Members online

Forum statistics

Threads
143,066
Messages
1,467,352
Members
104,933
Latest member
mactechnic