WORKFLOW: How do you take h.264 garbage and make it useable for editing (per requests)

Could you explain what the differences between Cineform (now Gopro) and Prores are and the cons and pros of each?
They are both intermediate codecs and CineForm was developed as a proprietary format/codec for the GoPro Hero series of cameras.

Outside of that the differences are so great that I wouldn't even want to start listing them. They are two massively different algorithms and if you would like to really see the difference in them, I would google the specs and look at them. If I had more use with GoPro cameras and hence the CineForm codec, I might have more to directly point out the differences but since I don't use CF, I don't have anything to say about it other than again, it's also an intermediate codec.

I do know very competent people that have ditched using ProRes in favor of CineForm because of it's render time but I haven't done enough testing with it myself to know quality, speed, interoperability, etc. My company still uses ProRes 422 as it's intermediate deliverable.

stats.jpg
 
Thank you Adam, you saved a lot of my time, money, and nerves. Have NUC5i7 16GB and use DaVinci Resolve. To edit in h264 was tedious and it crashed often. Today first try converted my holiday video with Brorsoft converter to Prores and it works flawlessly. As the my desired output is mostly home video either 1080P or UHD what output format you'd recommend? H264 MP4 or?
Thanks for advice.
Once you come to CZ I owe you good beer;)
Sweet on all accounts! Love it.

As for which I would recommend as a final deliverable format, you said h.264 or mp4 which you can have both of. MP4 is a container like MOV and can have an H.264 in it. And I would probably recommend H.264 for final output if you want to keep the file small. Keep in mind that fine rendering sometimes takes a couple tries and you have to mess with color correction in one way or the other (I save the project file for each output, Project_A_forH.264, Project_A_ProRes, Project_A_DNxHD15 for example because each coded does different things to cause artifacts and you may have to play with it until you get what you want. H.264, WMV, whether in an MP4 or MOV container will always darken the video for some reason and you have to compensate for that for example.

Hard to give you a recommendation without knowing what your final desires are though. Sounds like h.264 or even smaller if you are sending to someone on a phone or tab, wmv is fine. Shoot, if there isn't a ton of movement, m4v can look beautiful on a huge 4k screen even.

All depends.
 
Thanks heaps for both videos jussaguy. Been using h264 and swapped to pro res and the difference is unbelievable. I was always wondering why the quality was quite never there in post production and learning about generation loss etc explains it all! Pro res is the bomb! I don't think I would have figured that out by myself so thank you !


Sent from my iPhone using PhantomPilots mobile app
Loving it! So thrilled that some of you guys got it.
 
Loving it! So thrilled that some of you guys got it.
I'll say it.. Of all the posts I have read of yours, this is the most helpful, and knowledgeable. I hope for more of the same in the future and less of what happened last week.
 
  • Like
Reactions: Jussaguy
I'll say it.. Of all the posts I have read of yours, this is the most helpful, and knowledgeable. I hope for more of the same in the future and less of what happened last week.
:) :) :) that's all I have to say! Awesome sauce!
 
You said it yourself, that your video is long, tedious and boring. I watched as much as I could stand, about the first 20 minutes. It seemed much of the time you repeated essentially the same thing about Tom's Tech Time over and over and over again, unnecessarily. I think you could have said once, briefly, that you disagree with information he's presented and that you believe your point of view would be supported by knowledgeable professionals. Done!

I also found that your presentation wandered and lacked focus and had many incomplete thoughts.

I'm convinced you may have some great video editing knowledge to share but I'm equally convinced the way you go about it--lacking organization and focus, laden with unnecessary repetition--is working against you and those who would like to learn from you and that you would be much more successful building a following by bringing your presentation skills in line with your knowledge.

Maybe draw up an outline, be brief and stay on point. This would work better in all regards, for all concerned, IMHO.

HTH, and thanks for your efforts toward sharing your knowledge!


Sent from my iPhone using PhantomPilots mobile app
Appreciate the feedback.

There are certainly people that would rather have short and exactly to the point info but that's not really what I am offering here and there is plenty of it around if that is your dish of choice.

While it may seem that I am lacking any sort of direction or that I am randomly repeating things, in fact I've been teaching thin stuff for years and have a pretty good understanding of where I want to go and how I want to teach something.

That doesn't make it the best for everyone or even necessarily most of the people but again, I'm not neccaserily going after the group that wants that.

As for the older video, I used TTT video because it was off to the point where it made a good tool to show what to actually do. That said, I remade it to take some out of it. I'm aware it ruffled the feathers of some and we already went through that with the original video. This thread was for the newer video.

This isn't bullet point info. It can be condensed to that but there is a lot of information to digest and the method of laying it out and the repetition is all planned although yes, again I'll admit it's tedious and repetitious and that's why the disclaimer is there.

There are a million ways to get smaller doses of info from all sorts of places around the net and YouTube and its full of some good info.

Please don't take my answer to your constructive criticism as a strike back. I actually very much appreciate it. I just want to be clear of what I am aware of, and that includes some of my own faults and the pre-awareness of how some will react to a long, tedious, repetitious and boring bunch of concepts.

Thanks!
 
Last edited:
Sweet on all accounts! Love it.

As for which I would recommend as a final deliverable format, you said h.264 or mp4 which you can have both of. MP4 is a container like MOV and can have an H.264 in it. And I would probably recommend H.264 for final output if you want to keep the file small. Keep in mind that fine rendering sometimes takes a couple tries and you have to mess with color correction in one way or the other (I save the project file for each output, Project_A_forH.264, Project_A_ProRes, Project_A_DNxHD15 for example because each coded does different things to cause artifacts and you may have to play with it until you get what you want. H.264, WMV, whether in an MP4 or MOV container will always darken the video for some reason and you have to compensate for that for example.

Hard to give you a recommendation without knowing what your final desires are though. Sounds like h.264 or even smaller if you are sending to someone on a phone or tab, wmv is fine. Shoot, if there isn't a ton of movement, m4v can look beautiful on a huge 4k screen even.

All depends.
I'd like to ask one more question -is there some way how to avoid or eliminate the artifacts - or moiree once the original record is already done. I see it on sea surface in my holiday video and do not know how to get it smooth. I understand there is no simple answer but any hint is welcome...
 
I'd like to ask one more question -is there some way how to avoid or eliminate the artifacts - or moiree once the original record is already done. I see it on sea surface in my holiday video and do not know how to get it smooth. I understand there is no simple answer but any hint is welcome...
****EDIT: When I first started to answer this for you, I thought I would just throw you a bone about how it's done but know you probably wouldn't know how and then I kept expounding so you would hopefully understand and it's turned into a quasi-tutorial but I am going to take this info and make a video tutorial out of it. Removing moire is a fantastic idea for a video tutorial for these type of cameras so look for that video from me in the next week or so but for now...

Before I go on at all, if you happen to be using an editor with Digital Anarchy's "Beauty Box", it is quite useful for some color picking methods of moire removal. It's not as good or as targeted as the below method that I am going to give you and you have to own Beauty Box but it will work inside of your editor and I've found it quite good for some moire removal on the quick but probably not for vistas. I usually use if for shirts and the like. It's when I am not getting paid enough to do what I am going to lay out below. Basically you pick a color and tweak it until your moire pattern is gone. The effect wasn't designed for that purpose but it does a bang up job for it.

For the following method, I would use on a well paying gig, or one that I care about like a family video. I've got good news and bad news. The good news is yes, there is definitely a way to fix up moire artifacts in After Effects (and other VFX software but on the desktop, if you are using effects on video, 90% chance you are using After Effects, otherwise you're adding effects in something like Premiere Pro, Avid, FCP or whatever editor) but this move takes some video power and you need to do it in AE.

So the bad news is that it's not as easy as clicking a button. You could I suppose do the first part of what I am going to say over the whole screen and see what it looks like but what you really need to do is isolate the area that has the moire in what is called a matte in AE and then after selecting the matte, you have to keyframe (animate) the matte so it stays in the right place over the whole video (the area with visible moire). In your case, the sea surface area needs to be isolated from the rest of the image and as the camera moves, so must the matte. If you are an advanced to advanced intermediate user of AE, you should be able to pull of an offset track and apply it to your matte. It all depends on the original matte and what else is going on in the image (If the last two sentences are confusing to you, you don't know how to track a matte and should just roto it until you do, and I will teach you). So what you have to do to remove moire for a single frame is SUPER DUPER simple, but picking, animating and if you can, tracking the matte (which is called a "track matte") is where it's difficult. So the harsh irony for you is that removing the moire is a piece of piss but adding the correct matte, animating it, feathering it and doing all those things that will make you a better professional editor/vfx/generalist but will take some time but you might as well get practicing if you don't know how, that is if you want to raise your level to pro.

There are a million ways to try and remove moire and aliasing but I will give you the one I think is the most easy while being useful. There are easier ways even but this is the easiest way to get a pretty good looking finish and there are better ways even after this but it will require an advanced level of After Effects that we are nowhere near yet. Let's think about what moire is and what we are doing to remove it. What is moire? In reality, it's a fabric. It's like a silky fabric and the sheen that comes off of it is a pattern that is used to describe an artifact that is caused in video where the image is too sharp for the movement and so we get a pattern that looks like that silky moire pattern. It's different than aliasing because aliasing is used to describe a similar effect but on edges and is usually called aliasing or "dancing or marching ants" but this method can also help with aliasing as well. But in general, its for moire. To remove something that exists because it's too sharp, the removal of it is the obvious, blur. If you blur the pattern, you will remove it. There are loads of various blurs in AE but we are going to use an effect called MEDIAN which is defined by Adobe as

"The Median effect replaces each pixel with a pixel that has the median color value of neighboring pixels with the specified Radius. At low Radius values, this effect is useful for reducing some types of noise. At higher Radius values, this effect gives an image a painterly appearance." <--- So what this is saying is that it takes the average color value of the specified radius (which is the only variable in median) and selects a median (average) value and applies it to the defined area. So the more pixels you choose (the higher the radius), the larger the sample for the color. But remember, we will be working on the luma channel of color so it won't actually effect our color at all, unless we want it to by duplicating the matte and adding a color median as well. That's something you'll need to tinker with.

The main effect we will use is called the "Median" effect in AE and we will put it on an adjustment layer and we will matte that adjustment layer. I will explain what these things are as I explain what to do.

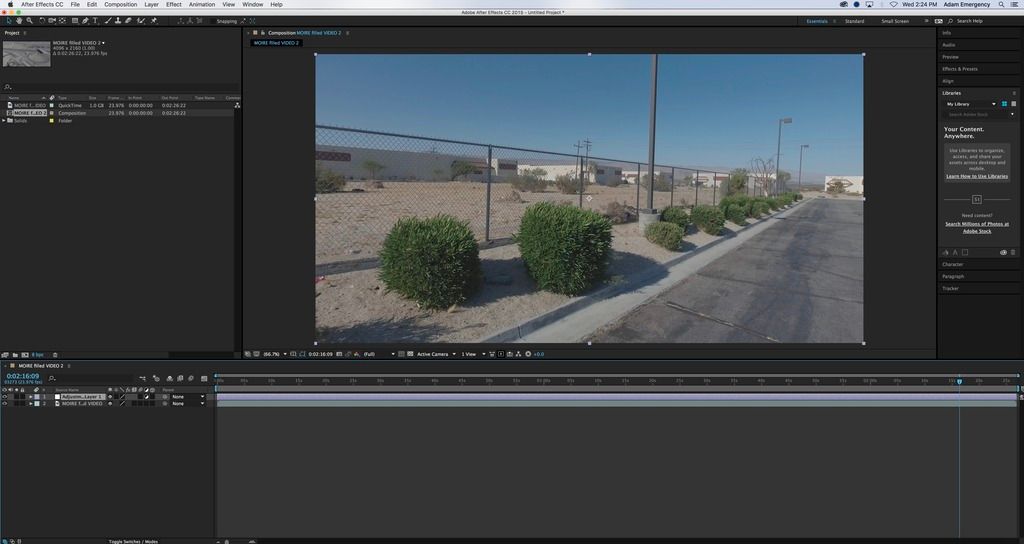
1. Create NEW adjustment layer and put it directly on top of the layer of video that needs moire removal.

1-Adjustment%20Layer_zps6j6dcn0f.jpg


What an adjustment layer is, is a layer that effects everything below the layer and not above it, allowing you to add effects in AE without being a) destructive to the video and b) creating an easily replicated version of an effect. Also we can use blending methods on the layer itself instead of the whole video that way we can tell whatever effects we have on the adjustment layer. Remember I said that MOST (not all of) the moire effect that happens on a video happens on the luminosity channel so we will choose the luma channel in the adjustment layer's blending modes.

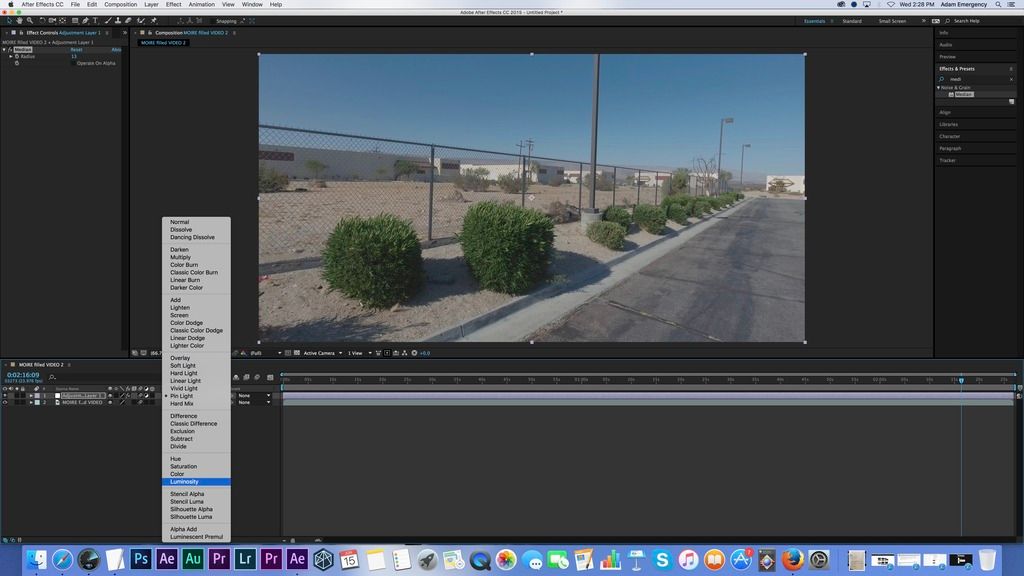
2. Set the adjustment layer's blending mode to "Luminosity".

4%20-%20Show%20how%20to%20choose%20blening%20mode_zps8sjlxszy.jpg


3. Add the MEDIAN effect to the adjustment layer.

3-Show%20drop%20on%20Adjustment_zpsecijyzdd.jpg

There are a lot of ways to add effects in AE. You can hover over the layer, go to effects, go tot he right category, then choose your effect and it's variables will show yup in the "effects" window of AE. You can also go to the "Effects & Presets" search box, type in "Median" and drop it on the layer you want it on. You want it on the ADJUSTMENT LAYER for this.

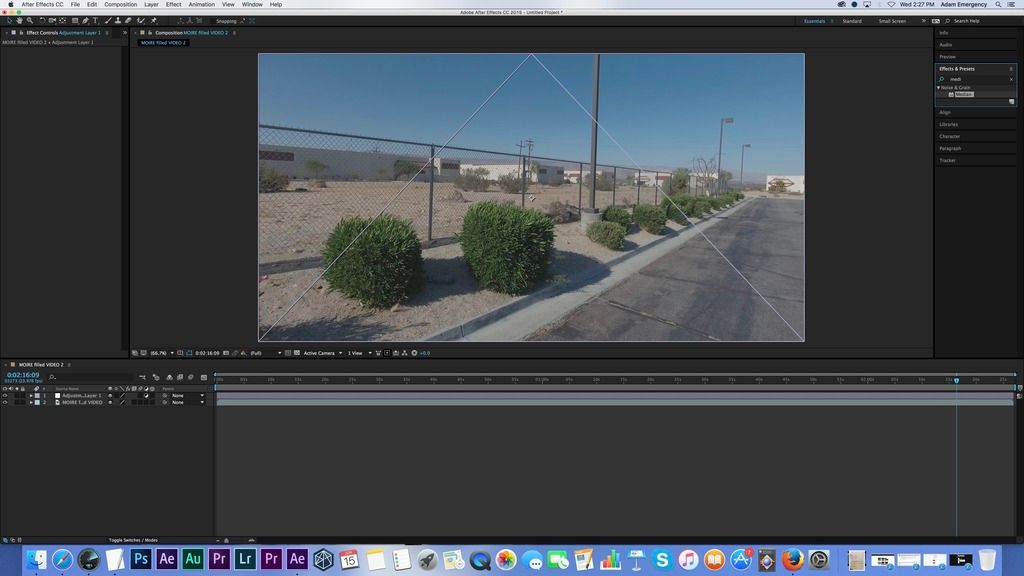
4. Matte the area that will be the effected part of the layer.
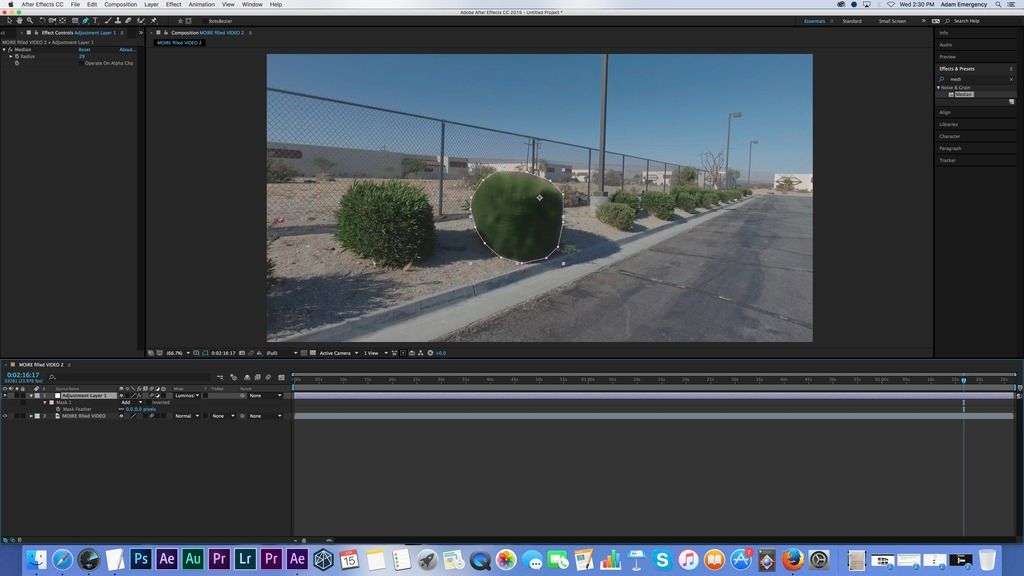
The matte I made around an area that actually has no moire but I just picked a piece of video to show for this. Let's pretend that the plant (2nd to the right) is fall of moire. Now to do this matte correctly, I would need to tediously and finely draw it out by zooming in and making it perfect. VFX on the edges is a game of millimeters and I am not treating it so in this example but I just want you to have the idea. So we are going to draw a matte around the plant (it would be the same thing if it was a roof and it actually had moire). When I do the tutorial on video, I will show you how to best draw it, and how to track it as well. But for now, draw a matte as best as you can.

8%20-%20Drawing%20matte_zpsk7hwazjf.jpg

As you can see, this is quick draw.

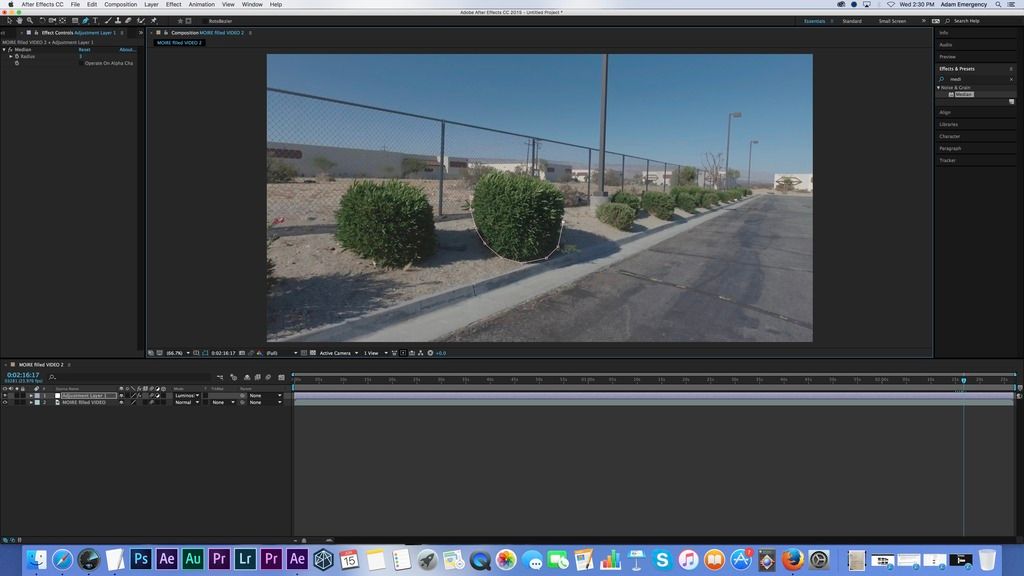
5. After you complete drawing the matte around object, area or whatever, mess with the radius settings until you are at the LEAST number you can be while being pleased with the moire removal at that level. Here is an over-cranked version of the median effect. This looks ridiculous on purpose. First, I have no moire to actually remove so I am showing by cranking the hell out of it.

9%20-%20Completing%20matte_zpsqfflj8je.jpg


6. Animate the matte so that it moves with the camera. (Track the matte if you know how or if you don't or if it's not possible you have to rotoscope the matte and animate it to the camera). For the uninitiated, rotoscope is a general term in the VFX world where you do something one frame at a time. For example, wire removal one frame at a time is rotoscoping. I once had a gig on a feature film (when I was just starting out) where I had to remove frame by frame a booger out of Steven Seagal's nose for a whole scene. True story! Talk about paying dues.

I can't really show this without video so will have to wait for the actual full tutorial to learn how to animate the matte but it's just, move the matte and animate it with the camera movement or it will be left behind like this. Here is the bird taking off and the scene starts to move but without direction, the matte will stay behind like this:

10%20-%20show%20why%20we%20need%20to%20animate%20matte_zpsttjc0jti.jpg


7. Feather matte so it doesn't create a new alias.

If you go on a layer that already has a mask on it and you hit the shortcut "F" it will let you feather the matte. YOU MUST ALWAYS FEATHER moving mattes. Almost always if you have a moving matte, you need to feather it or you will have a hard edge. Feathering is the process of softening the edge of a matte in order to make it not be seen.

9%20-%20Completing%20matte_zpsqfflj8je.jpg


8. Render and keep tweaking until you get it right.

This part includes doing things like making a duplicate of the matte. Don't forget, now that you went through the trouble of creating, animating and either tracking or rotoscoping a matte that is now useable for us on our poor piece of video for whatever we want to make it look better. Might as well use that to your advantage. See what adding the median effect on the color channel does. Don't forget to play around with the numbers as a variance of one number could mean the difference.

I could go on and on but I will stop here and let you ask any questions you may have. I am DEFINITELY going to make a moire removal video tutorial soon so don't feel bad that I spent this much time going over your simple question. I was sort of preparing it in my mind.

I even already know what footage I'll be using. I have the perfect one I think.

I have to end this sort of abruptly as I had more to say but I have to go pick up my daughter from camp.

HTH!!!

HAPPY FLYING!!!!!
 
Last edited:
  • Like
Reactions: Vasekp
Thank you again now i think my head is like the Corel baloon now but i appreciate your help. Lot to learn ahead
 
  • Like
Reactions: Jussaguy
Thank you again now i think my head is like the Corel baloon now but i appreciate your help. Lot to learn ahead
Lol. I knew this might be a little above your pay-grade. If you PM me, if interested, I'll get on the horn with you and walk you through it. It's a lot easier with some help!
 
Considering buying the new Canon 1DX Mk II for its video specs but need more examples and explanation which video format is better, cleaner.
M-JPEG or AVC/H.264

Canon EOS-1D X Mark II DSLR Camera Premium Kit 0931C016 B&H
Ew, that's a tough one. PHoto-Jpeg is a OLLLD codec but a real good one but it is 1) HUGE 2) fairly lossless because it uses a rounding algorithm that causes some motion errors. Motion-JPEG looks at each individual frame instead of the video as a whole which gives you less artifacts because it analyzes everything. However, it increases render times considerably and file size considerably. Also, it's just a very old format.

If you were going to demand that my only choices of a final deliverable would be h.264 (by AVC hardware) vs. Photo-Jpeg as a client, I'll take the photo-jpeg every time but as an artist, I don't know what I would do. I would personally look for something better than h.264 and newer and faster than photo-jpeg (like ProRes). Both at highest quality will do a very good sample rate and get a fairly lossless compression but P-Jpeg better but again, slower and larger. Tough one.
 
Last edited:
Need it more for videos than stills, looking at Canon 1DX Mk II and RED Raven 4.5K. Nothing pro, just for fun and chase monsoon storms around...:). Since both take Canon glass (I have no glass at this time), the investment is the same either way. Canon is more "ready" to shoot from the box as opposed to RED that needs monitor, media, power adapter and battery. As for glass, I consider Schneider-Xenon 75mm lens.
 
If you need it for video (hate to continue the derailing of this thread, but alas) and are SERIOUS about quality, you are comparing apples to an Orchard of apple trees. I have been shooting commercially on DSLRs for the past 8 years, and just recently acquired a proper Cinema Camera that shoots RAW video, and the difference is night and day. Yes the Canon line will have better low light capability, and if that is what you're after for the majority of your work, then get one. Or the Sony A7SII or whichever, because it can literally see in the dark. But if you want latitude and range in Post, go with the RED. Plus, the RED is an investment, and you can always rent it out when you aren't working and make money on it that way.
 
Loving it! So thrilled that some of you guys got it.
I have been reading a good deal of the discussion, I still don't get it. I don't get why you need to transcode your original footage to Prores 422 before editing. I just throw .mov, mp4, mxf or Mpeg2 422 long gop to my PR CC and go... I work at full resolution, everything is smooth like butter, and I export when I'm done to whatever I need... Don't need to create a middle generation to edit faster or getting a better resolution while editing. If prores was allowing more space for grading it would be lost at export I suppose. So is this transcoding useful for weaker computers or does it really bring something special? I've always thought that the less generations the less loss...
 
I have been reading a good deal of the discussion, I still don't get it. I don't get why you need to transcode your original footage to Prores 422 before editing. I just throw .mov, mp4, mxf or Mpeg2 422 long gop to my PR CC and go... I work at full resolution, everything is smooth like butter, and I export when I'm done to whatever I need... Don't need to create a middle generation to edit faster or getting a better resolution while editing. If prores was allowing more space for grading it would be lost at export I suppose. So is this transcoding useful for weaker computers or does it really bring something special? I've always thought that the less generations the less loss...
There is a lot here that is not right but I'm on my phone so can't hit them all.

Firstly, no ProRes always runs better than h264 on any editor and I say that as someone that works on the most powerful workstations literally in the world for professional broadcast. So it's not because I'm using inferior hardware or software for that matter as I have to use them all including ones that are hardware accelerated like Avid Nitris and Symphony.

Also, your assumption that a change of codec equals a generation loss is objectively false.

All that happens when you up concert an h264 mov to a prores mov or MP4 (which container doesn't matter), and the when you're working with the denser color space afforded by the ProRes or parallel better than h264 codec (whatever you're using) then when you expor the final deliverable master from your editor it will be as good as your original h264 and therefore making that encode (to YouTube) for example will be the only generation so you actually save a generation by doing that up convert.

If you compress h264 to h264 you should just piss on your footage first and say how much you hate it.

All that said, I always say "if it works, do it" and don't let someone else tell you otherwise. I'm just imparting my knowledge. But it's good knowledge. ;)
 
  • Like
Reactions: mudrephoto
There is a lot here that is not right but I'm on my phone so can't hit them all.

Firstly, no ProRes always runs better than h264 on any editor and I say that as someone that works on the most powerful workstations literally in the world for professional broadcast. So it's not because I'm using inferior hardware or software for that matter as I have to use them all including ones that are hardware accelerated like Avid Nitris and Symphony.

Also, your assumption that a change of codec equals a generation loss is objectively false.

All that happens when you up concert an h264 mov to a prores mov or MP4 (which container doesn't matter), and the when you're working with the denser color space afforded by the ProRes or parallel better than h264 codec (whatever you're using) then when you expor the final deliverable master from your editor it will be as good as your original h264 and therefore making that encode (to YouTube) for example will be the only generation so you actually save a generation by doing that up convert.

If you compress h264 to h264 you should just piss on your footage first and say how much you hate it.

All that said, I always say "if it works, do it" and don't let someone else tell you otherwise. I'm just imparting my knowledge. But it's good knowledge. ;)

Maybe I don't understand the process when I import my footage to premiere, but as far as I know, Premiere is editing in native format and doesn't require transcoding, and again, my workstation can take it whatever I throw at it, including native 4K. So why should I bother transcoding when I can avoid it?
 

Members online

Forum statistics

Threads
143,087
Messages
1,467,528
Members
104,965
Latest member
cokersean20