I installed this myself hoping for better image quality and some added distance. Took the first test flight today and there was a nice improvement in both areas.
There is definitely a learning curve now using the controller. It has to pointed at the drone for best results. This means horizontal and vertical aiming. I found myself looking at the signal strength meter quite a bit on this first flight to keep the controller pointed in the right direction.
The install:
It wasn’t too bad. There is zero paperwork/instructions included in the box. A quick search on YouTube found the install video from 4hawks.
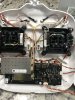
The connections on the main board are really tiny! I was using a magnifying glass and flashlight to make sure they went together correctly. I ended up putting hot glue on the connections to make sure they stayed connected.
The three wires for the inside of the controller are longer and stiffer than the originals so when you turn or twist the wires it wants to pop them off the connections. I also added a some hot glue towards the front of the controller to keep the wires from interfering with any of the controls inside the controller. I decided to drill the holes through the top so I could secure the wires before closing the controller up.
I removed to original antennas from inside the controller. This took some patience with the exacto knife.
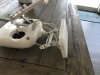
I think having the terminals mounted on the top front made for a clean looking install.
The tools I used:
1. Phillips screw driver ( long skinny blade)
2. Exacto knife - for removing glue from original connections
3. Drill with 1/4” bit
4. Flashlight on a stand
5. Magnifying glass
6. Hot glue gun (mandatory in my opinion) Didn’t want to risk having a connection pop off after I closed the case up.
Took close to two hours to do the install.
The bracket for the antenna attaches real easy to the metal bar and it’s suprisingly solid for being held on by spring clips. Those clips make for easy removal for storage in a case.
I would recommend watching the YouTube installation video for your drone before purchasing to decide if you want to tackle this yourself or pay someone.
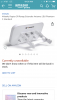
I included a couple of pics to show the install.
Hope this post was helpful for those thinking about installing this mod.
Phantom 3 Standard...
There is definitely a learning curve now using the controller. It has to pointed at the drone for best results. This means horizontal and vertical aiming. I found myself looking at the signal strength meter quite a bit on this first flight to keep the controller pointed in the right direction.
The install:
It wasn’t too bad. There is zero paperwork/instructions included in the box. A quick search on YouTube found the install video from 4hawks.
The connections on the main board are really tiny! I was using a magnifying glass and flashlight to make sure they went together correctly. I ended up putting hot glue on the connections to make sure they stayed connected.
The three wires for the inside of the controller are longer and stiffer than the originals so when you turn or twist the wires it wants to pop them off the connections. I also added a some hot glue towards the front of the controller to keep the wires from interfering with any of the controls inside the controller. I decided to drill the holes through the top so I could secure the wires before closing the controller up.
I removed to original antennas from inside the controller. This took some patience with the exacto knife.
I think having the terminals mounted on the top front made for a clean looking install.
The tools I used:
1. Phillips screw driver ( long skinny blade)
2. Exacto knife - for removing glue from original connections
3. Drill with 1/4” bit
4. Flashlight on a stand
5. Magnifying glass
6. Hot glue gun (mandatory in my opinion) Didn’t want to risk having a connection pop off after I closed the case up.
Took close to two hours to do the install.
The bracket for the antenna attaches real easy to the metal bar and it’s suprisingly solid for being held on by spring clips. Those clips make for easy removal for storage in a case.
I would recommend watching the YouTube installation video for your drone before purchasing to decide if you want to tackle this yourself or pay someone.
I included a couple of pics to show the install.
Hope this post was helpful for those thinking about installing this mod.
Phantom 3 Standard...
Attachments
Last edited: