

- Joined
- Aug 26, 2015
- Messages
- 5,404
- Reaction score
- 1,826
Hello -
I have a camera tripod and I modded my controller to fit on it. I've had so much help from so many others on this site I thought I'd share the details.
Note: Before starting, see UPDATE at bottom of this post.
Why mount your controller on a tripod?
There are three ways to get a good connection to your aircraft: 1) a strong signal, 2) good antennas, and 3) aim. If you use directional antennas, aim is more important than you might think. And with a tripod, you can aim your antenna like a sniper rifle. Furthermore, you can effortessly raise and lower the degree of height while holding it rock steady, and you can easily move it from side to side as your craft flies along the horizon. A tripod is not just for distance, but can aid you in getting a very strong high-quality FPV signal at medium range without pixelating. And if you suddenly need to remove your controller from the tripod, you can do it in less than a second.
If you have a camera, even a cheap one, you should have a screw hole in the bottom of it. It is probably 1/4 inch SAE thread, although it may be 3/8 inch. It may also have an anchor hole in front of the screw hole. We are going to mod our controller so that it includes a quarter inch SAE screw hole embedded into the bottom of it just like a camera, which will allow it to mount to the tripod just like a camera.
For this mod, you need a camera tripod with a mount that will fit into a quarter inch screw hole. This means your tripod will have a screw end jutting out of the top with quarter inch thread. My tripod is a Vanguard.

The mount comes off the tripod easily by moving the spring-loaded red lever behind and just underneath the top.

We're going to install a screw hole mount onto the bottom of our controller which will accept this tripod screw. We're also going to drill an anchor hole for the spring-loaded anchor pin.
The key part to make this mod work is here: OB1039 | B&H Photo Video
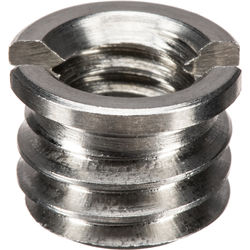
It's $2.49.
It has a 3/8 inch threads on the outside and quarter inch threads on the inside, SAE. It also has a nice lip.
Take your controller and lay it upside down on something like an empty egg carton to protect the sticks. Remove the four screws. Carefully remove the back panel partially - and then carefully disconnect the ribbon cables that connect the front to the back. Note where they go so you can connect them later.
Turn the back panel of the controller inside down on your work bench and drill your first hole at the top of the silver DJI label, centered. You can make this first hole right at the bump in the plastic. I would recommend drilling this hole with a dremel and a small bit. A dremel drill tip won't try to move around on you like a normal drill will. This is your pilot hole. Check your tripod anchor pin so that you use the correct size drill bit and finish it with a regular drill if you need to. Your anchor pin will fit into this hole.
Now you must measure the exact distance from the pin to the screw hole on your tripod. In my case, the distance was 9/16 of an inch but yours may be different. Measure and mark the DJI label. Drill with the dremel to make the pilot, then get your real drill out and finish with a 21/64 drill bit.
Now take your dremel and carve or grind away at the edges of the larger hole. You want to grind at a 45 degree angle so that the opening is beveled. This way, the lip of the part that you're going to install will sink into the hole but not through the hole. Make a nice even bevel all the way around the hole.
The hole in the plastic is not quite large enough to accept the part. That's a good thing. You're going to manually screw it in so that you drive it into the plastic so that the threads bite into the plastic to give it extra strength. Ideally you'll have a large (wide) snub-nosed flat head screwdriver. Turn the screwdriver clockwise and drive the part into the hole. Try to keep your screwdriver vertical so you drive it straight in. If it starts to go in crooked, start over. Get it in straight. You must push down very hard while you turn this screw. Keep pushing and screwing it in until the top of the part is flush with the plastic.
Now turn it over. You're looking at the inside of the back of the controller. You can see the screw sticking out. You're going to need a large thin steel flat washer to lay over this part. It must be thin, or it won't work. And it should be as large as possible. This steel washer is what's going to reinforce your plastic backing.
Next take a quarter inch SAE nut and screw it onto the screw. You don't have a lot of screw sticking up from the washer, but you need a full turn. If you can't get a full turn, take it off and find a thinner flat washer or get the part into the plastic a bit deeper by screwing it in another quarter turn or so, or my making a deeper bevel.
Once you're sure the nut will go on a full rotation, put some blue loctite on the threads.
Next thread the quarter inch nut onto the part. Get at least one full turn.
Now tape it over with some electrical tape.
The bottom of your controller should look like this:

Now you can thread your tripod part right into the threads that are in the bottom of the controller as if it was a camera. Use the hinged wing nut to turn the tripod screw end so it threads into the new mount you have on the controller.

The flat hard rubber surface of the tripod part will come flush and tight with the bottom of your controller, sandwiching the bottom plastic of the controller between it and the steel washer inside, making a very strong tight fit.

At this point you can test it. Mount the controller back onto the tripod. It should be strong and steady.

Take the back of the controller off the tripod. Carefully put the controller back together. Replace the ribbon cables. Replace the four screws. Don't pinch any wires.
Now you have a controller that will attach and unattach itself to/from your tripod in less than a second and it will be as steady as any camera. With the tripod piece attached to the controller, the bottom of the controller will fit snugly into the square section of the tripod and will lock into place with the red spring-loaded lever (yours may have a different design).

You'll be able to move your controller up, down, left, and right with ease - and follow your craft with precision wherever it goes.

The mod also gives you the option of using a smaller tripod like this:
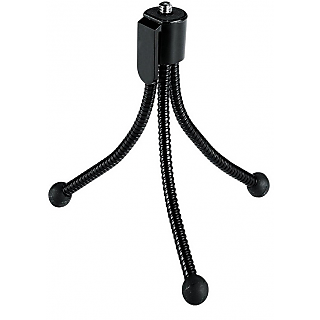
The one I have with the quarter inch screw is made by Digital Concepts. You can then set your controller on a small table out in the field and adjust the angle of your controller exactly as you like it.

THE P2V LIVES
UPDATE: With the new large heavy antennas coming out now, you may want to get the 3D bracket sold by fpvcustoms.com. It will fit on the P2V controllers (you may need to widen the slot a bit with your dremel) but it will cover the bottom. So if you get one, you'd want to mount the tripod mount onto that bracket, not the controller. If you do that, you wouldn't use the steel flat washer, you'd just drill the hole with the same 21/64 bit and then screw the adapter straight into the plastic 3D mount. The plastic is plenty thick and strong enough to hold your controller, battery, amps, and antennas securely onto a tripod.
Here is the link for the bracket: 3-D PRINTED BRACKET INCLUDES PRIORITY SHIPPING
I have a camera tripod and I modded my controller to fit on it. I've had so much help from so many others on this site I thought I'd share the details.
Note: Before starting, see UPDATE at bottom of this post.
Why mount your controller on a tripod?
There are three ways to get a good connection to your aircraft: 1) a strong signal, 2) good antennas, and 3) aim. If you use directional antennas, aim is more important than you might think. And with a tripod, you can aim your antenna like a sniper rifle. Furthermore, you can effortessly raise and lower the degree of height while holding it rock steady, and you can easily move it from side to side as your craft flies along the horizon. A tripod is not just for distance, but can aid you in getting a very strong high-quality FPV signal at medium range without pixelating. And if you suddenly need to remove your controller from the tripod, you can do it in less than a second.
If you have a camera, even a cheap one, you should have a screw hole in the bottom of it. It is probably 1/4 inch SAE thread, although it may be 3/8 inch. It may also have an anchor hole in front of the screw hole. We are going to mod our controller so that it includes a quarter inch SAE screw hole embedded into the bottom of it just like a camera, which will allow it to mount to the tripod just like a camera.
For this mod, you need a camera tripod with a mount that will fit into a quarter inch screw hole. This means your tripod will have a screw end jutting out of the top with quarter inch thread. My tripod is a Vanguard.
The mount comes off the tripod easily by moving the spring-loaded red lever behind and just underneath the top.
We're going to install a screw hole mount onto the bottom of our controller which will accept this tripod screw. We're also going to drill an anchor hole for the spring-loaded anchor pin.
The key part to make this mod work is here: OB1039 | B&H Photo Video
It's $2.49.
It has a 3/8 inch threads on the outside and quarter inch threads on the inside, SAE. It also has a nice lip.
Take your controller and lay it upside down on something like an empty egg carton to protect the sticks. Remove the four screws. Carefully remove the back panel partially - and then carefully disconnect the ribbon cables that connect the front to the back. Note where they go so you can connect them later.
Turn the back panel of the controller inside down on your work bench and drill your first hole at the top of the silver DJI label, centered. You can make this first hole right at the bump in the plastic. I would recommend drilling this hole with a dremel and a small bit. A dremel drill tip won't try to move around on you like a normal drill will. This is your pilot hole. Check your tripod anchor pin so that you use the correct size drill bit and finish it with a regular drill if you need to. Your anchor pin will fit into this hole.
Now you must measure the exact distance from the pin to the screw hole on your tripod. In my case, the distance was 9/16 of an inch but yours may be different. Measure and mark the DJI label. Drill with the dremel to make the pilot, then get your real drill out and finish with a 21/64 drill bit.
Now take your dremel and carve or grind away at the edges of the larger hole. You want to grind at a 45 degree angle so that the opening is beveled. This way, the lip of the part that you're going to install will sink into the hole but not through the hole. Make a nice even bevel all the way around the hole.
The hole in the plastic is not quite large enough to accept the part. That's a good thing. You're going to manually screw it in so that you drive it into the plastic so that the threads bite into the plastic to give it extra strength. Ideally you'll have a large (wide) snub-nosed flat head screwdriver. Turn the screwdriver clockwise and drive the part into the hole. Try to keep your screwdriver vertical so you drive it straight in. If it starts to go in crooked, start over. Get it in straight. You must push down very hard while you turn this screw. Keep pushing and screwing it in until the top of the part is flush with the plastic.
Now turn it over. You're looking at the inside of the back of the controller. You can see the screw sticking out. You're going to need a large thin steel flat washer to lay over this part. It must be thin, or it won't work. And it should be as large as possible. This steel washer is what's going to reinforce your plastic backing.
Next take a quarter inch SAE nut and screw it onto the screw. You don't have a lot of screw sticking up from the washer, but you need a full turn. If you can't get a full turn, take it off and find a thinner flat washer or get the part into the plastic a bit deeper by screwing it in another quarter turn or so, or my making a deeper bevel.
Once you're sure the nut will go on a full rotation, put some blue loctite on the threads.
Next thread the quarter inch nut onto the part. Get at least one full turn.
Now tape it over with some electrical tape.
The bottom of your controller should look like this:
Now you can thread your tripod part right into the threads that are in the bottom of the controller as if it was a camera. Use the hinged wing nut to turn the tripod screw end so it threads into the new mount you have on the controller.
The flat hard rubber surface of the tripod part will come flush and tight with the bottom of your controller, sandwiching the bottom plastic of the controller between it and the steel washer inside, making a very strong tight fit.
At this point you can test it. Mount the controller back onto the tripod. It should be strong and steady.
Take the back of the controller off the tripod. Carefully put the controller back together. Replace the ribbon cables. Replace the four screws. Don't pinch any wires.
Now you have a controller that will attach and unattach itself to/from your tripod in less than a second and it will be as steady as any camera. With the tripod piece attached to the controller, the bottom of the controller will fit snugly into the square section of the tripod and will lock into place with the red spring-loaded lever (yours may have a different design).
You'll be able to move your controller up, down, left, and right with ease - and follow your craft with precision wherever it goes.
The mod also gives you the option of using a smaller tripod like this:
The one I have with the quarter inch screw is made by Digital Concepts. You can then set your controller on a small table out in the field and adjust the angle of your controller exactly as you like it.
THE P2V LIVES
UPDATE: With the new large heavy antennas coming out now, you may want to get the 3D bracket sold by fpvcustoms.com. It will fit on the P2V controllers (you may need to widen the slot a bit with your dremel) but it will cover the bottom. So if you get one, you'd want to mount the tripod mount onto that bracket, not the controller. If you do that, you wouldn't use the steel flat washer, you'd just drill the hole with the same 21/64 bit and then screw the adapter straight into the plastic 3D mount. The plastic is plenty thick and strong enough to hold your controller, battery, amps, and antennas securely onto a tripod.
Here is the link for the bracket: 3-D PRINTED BRACKET INCLUDES PRIORITY SHIPPING
Last edited:


