

You are using an out of date browser. It may not display this or other websites correctly.
You should upgrade or use an alternative browser.
You should upgrade or use an alternative browser.
Slow Yaw mod P2V!
- Thread starter J Dot
- Start date

dirkclod
Premium Pilot
So,Ya need ta make up a few of those switch's just in case someone ya know wants to get one !!
Looks like ya got it dead on bro")
Ya sayin ya need one? Lol
Take care, Fly safe!
J Dot
dirkclod
Premium Pilot
 Not at the moment but Ahaa ya never know
 dirkclod
Premium Pilot
- Joined
- May 8, 2015
- Messages
- 2
- Reaction score
- 0
- Age
- 26
Hello ( djivosionfl )
Yes stock controller, or any dji controller. It is easy to do, requires soldering, I did mine in about 1/2 hour. You first have to get these items.
10k resisters ( 2 ) note must be matched pair, you'll need a multi-meter to check resistance! Find 2 alike, and recheck after soldering, as the values can change.
1 dpdt ( double pole double throw ) on-off micro or mini switch ( 6 pin )
Small wire ( yellow, & black )
Solder
Shrink wrap ( 1/8" ) yellow, black
Drill bit ( whatever size your switch is? )
Here is the best video I could find on it:
[youtube]
J Dot
- Joined
- May 8, 2015
- Messages
- 2
- Reaction score
- 0
- Age
- 26
Hey DJIVISIONFL,
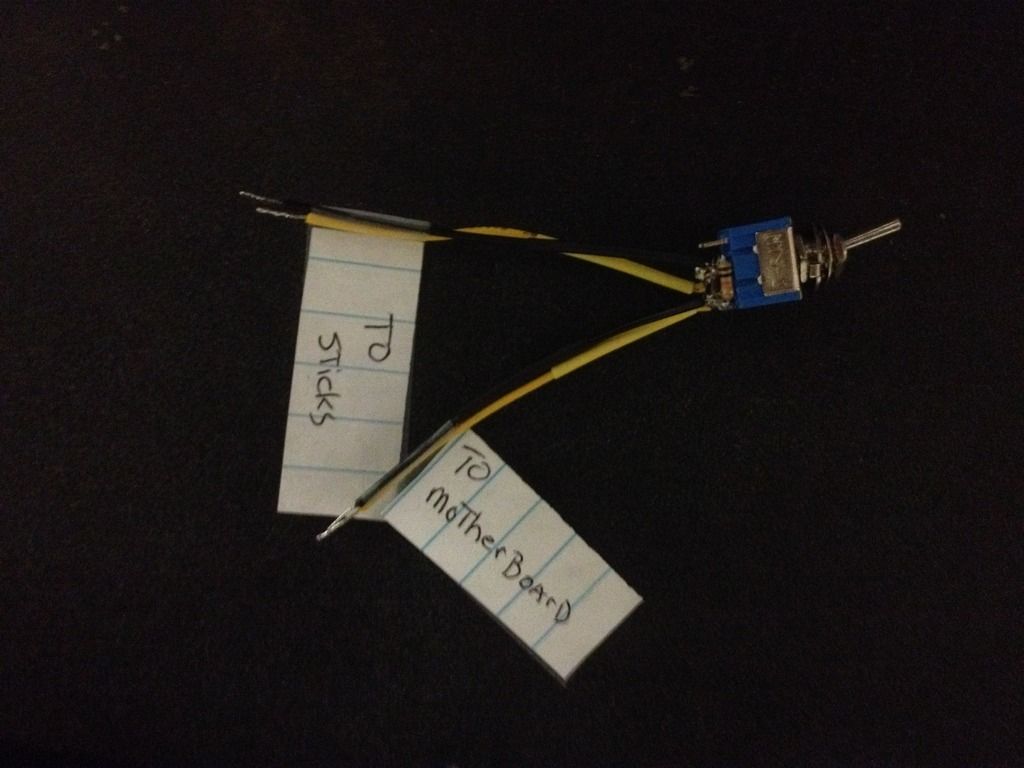
I built your switch, and will send as soon as possible, to you! Just watch the video and follow its direction exactly, you should be fine, here is your switch, I labeled everything for you, and tinned the wires already, shrink tubing, is on wires already cut to length. You may want to TRIM wire tails a little, I always leave them long, in case future repair, plenty to work with, just bundle the wires NEATLY in Tx, before closing, to insure no pinched / broken wires, when reassembling radio!
Take care, fly safe!
J Dot
Ps: resistance is 9.76 BOTH! Perfectly matched! ( on first try ) **** I'm good!
Lol just kidding, but they really are matched! Enjoy your weekend!
Hello ( djivosionfl )
Yes stock controller, or any dji controller. It is easy to do, requires soldering, I did mine in about 1/2 hour. You first have to get these items.
10k resisters ( 2 ) note must be matched pair, you'll need a multi-meter to check resistance! Find 2 alike, and recheck after soldering, as the values can change.
1 dpdt ( double pole double throw ) on-off micro or mini switch ( 6 pin )
Small wire ( yellow, & black )
Solder
Shrink wrap ( 1/8" ) yellow, black
Drill bit ( whatever size your switch is? )
Here is the best video I could find on it:
[youtube]
J Dot
Hi J Dot,
Thanks very much for sharing, going to do the mod within the next week or so & for under a tenner £10, can't be bad
")
Cheap mod
Sweet,
Did you get shrink tube, and wire?
I used an ( on-off ) sticker from my P2v Tx sticker set, looks nice!
If they are not matched set, won't hurt nothing, but it will spin faster one direction, and slower the other!
I found the POINTY TIP ( sucks for soldering these types of connections ) I use the FLAT TIP ( looks like a flat screwdriver tip ) works really well, and minimizes heat, as you don't have to hold it on very long!
There is also a SLOW PITCH mod for the dial wheel Tx, to slow camera motion ( up-down ) I have a China CNC Gimbal, but I tweaked the pitch in SIMPLEBGC software ( Alexmos ), so I decided NOT to do that mod, but very similar to yaw mod! You cut the ( RED/BLACK ) wires from dial wheel, and use ( 2k resistors, NOT 10k ).
I built the switch, but not going to use it!
Good luck my friend,
TAKE PICTURES of your mod, for others to view and learn, ( if you can ) I did not, don't know why? I usually do, got in a hurry I guess!
Take care, Fly safe!
J Dot
dirkclod
Premium Pilot
Didn't take pictures cause ya sneaky like your cat avatarSweet,
Did you get shrink tube, and wire?
I used an ( on-off ) sticker from my P2v Tx sticker set, looks nice!
If they are not matched set, won't hurt nothing, but it will spin faster one direction, and slower the other!
I found the POINTY TIP ( sucks for soldering these types of connections ) I use the FLAT TIP ( looks like a flat screwdriver tip ) works really well, and minimizes heat, as you don't have to hold it on very long!
There is also a SLOW PITCH mod for the dial wheel Tx, to slow camera motion ( up-down ) I have a China CNC Gimbal, but I tweaked the pitch in SIMPLEBGC software ( Alexmos ), so I decided NOT to do that mod, but very similar to yaw mod! You cut the ( RED/BLACK ) wires from dial wheel, and use ( 2k resistors, NOT 10k ).
I built the switch, but not going to use it!
Good luck my friend,
TAKE PICTURES of your mod, for others to view and learn, ( if you can ) I did not, don't know why? I usually do, got in a hurry I guess!
Take care, Fly safe!
J Dot

Sweet,
Did you get shrink tube, and wire?
I used an ( on-off ) sticker from my P2v Tx sticker set, looks nice!
If they are not matched set, won't hurt nothing, but it will spin faster one direction, and slower the other!
I found the POINTY TIP ( sucks for soldering these types of connections ) I use the FLAT TIP ( looks like a flat screwdriver tip ) works really well, and minimizes heat, as you don't have to hold it on very long!
There is also a SLOW PITCH mod for the dial wheel Tx, to slow camera motion ( up-down ) I have a China CNC Gimbal, but I tweaked the pitch in SIMPLEBGC software ( Alexmos ), so I decided NOT to do that mod, but very similar to yaw mod! You cut the ( RED/BLACK ) wires from dial wheel, and use ( 2k resistors, NOT 10k ).
I built the switch, but not going to use it!
Good luck my friend,
TAKE PICTURES of your mod, for others to view and learn, ( if you can ) I did not, don't know why? I usually do, got in a hurry I guess!
Take care, Fly safe!
J Dot
Hi J Dot,
Here we goooooo
I already had the heat shrink & wires, one black, one orange.... Well it's almost yellow
 but that will dooooo just been checking the tolerance on the resistors, fingers X I'll have a matched pair.
My solder tip is the pointy micro one but that's what I'm use toooooooo so I'll be fine with that.
I'll give the camera pitch mod a miss for now, not got the new TX so will have to keep on using the slider on the FPV screen.
I'll keep you posted how I get on, I'll have more time this weekend
Hi J Dot,
Here we goooooo
View attachment 19100
I already had the heat shrink & wires, one black, one orange.... Well it's almost yellow
My solder tip is the pointy micro one but that's what I'm use toooooooo so I'll be fine with that.
I'll give the camera pitch mod a miss for now, not got the new TX so will have to keep on using the slider on the FPV screen.
I'll keep you posted how I get on, I'll have more time this weekend
ALL RIGHT!
Resisters look good, and your switch came red? Mine were blue, lol. Does not matter, you'll never see it anyway!
I wanted to add this
When you open Tx, and seperate halves, ( not sure where you are wanting to put switch? ) I chose between sticks, almost like in video, VERY EASY ACCESS, while flying!
With halves separated, on the INSIDE of top half ( half with sticks )
There is a MOLD MARK, directly between sticks ( little round circle ) I used this mark as my center point, worked out perfectly, as there is nothing there on top or bottom, to interfere with your mod, plus it is already centered both directions!
Easy peasy. ( please, do whatever you need to make life easier for YOU, just a suggestion, but everyone is different ) that is what I chose to do! Plus makes wire bundling a breeze, as that is where they all go anyway!
Good luck, and please feel free to reply, or hit me up, if you need help, or have a question! I'm here for you!
One other thing, I used alligator clips to hold wires while soldering, also ( helping hands ) but the clips smash, and damage fragile tiny gauge wires, so I took some strips of paper, folded a couple times, wrapped paper around wires, placed clips on paper, did not damage any wires, first one I did was a bit messy, just completed #3, now it is a breeze! Just want to share a few hurdles I came across along the way!
J Dot
Is your switch ( on-off ) or ( on-off-on )? Mine are ( on-off ), 1 click one way, one click the other! Just checking!
J Dot
J Dot
Is your switch ( on-off ) or ( on-off-on )? Mine are ( on-off ), 1 click one way, one click the other! Just checking!
J Dot
Yep same as your, one click on one click off
Had to search around to get that switch all I could find was (on-off-on) which I didn't want.
Tested on my multimeter last night, working as it should
Thanks for asking though

Similar threads
- Replies
- 0
- Views
- 1K
- Replies
- 0
- Views
- 512


