How to use Bondic on stress cracks ?


Yup I got the gallon size for a few bucks more, Store it in a well marked glass container. It is very very flammable, use it outside, if you are tempted to use it inside throw the rag outside as soon as you are done, it stinks and has a huge LEL and UEL in other words it will blow your house up. Treat it with the respect of gasoline, it is only slightly worse.
 
I have to go with @Phil Tuggle on these repairs @Shammyh

Bondic only bonds because it fills tiny voids in the surface, it does not actually form a covalent chemical bond with the surface. I typically use MEK to clean the surface before I scuff the surface and then use a long cure epoxy or what I have found recently is a type of bisphenol resin used for carbon fiber and it is great.

Again I would not use Bondic for any permanent fix at all.

My bondic didn't fail... Or fail to bond. Though I agree that it is not glue, and does not behave as such.

The plastic itself still cracked, that's the point I'm trying to make. You can attach an anvil any way you want to a beam, but if the beam won't hold the weight, it doesn't matter.

My completely untested unscientific hypotheses is that the increased rigidity is actually making the situation worse. Hence it doesn't matter how you use bondic or any other product, it's still not going to solve the problem. At least without reinforcing the whole arm structure.
 
Thanks Chuck that's the kind of detail I appreciate....
 
Last edited:
Hence why I used the super glue for bonding ....

@Shammyh, your description is very good. It is truly amazing that some of these cracks propagate so badly on many of the P3's discussed in these forums. On some shells, it is ridiculous.

Aha - I figured it out! SOME of the P3's are apparently molded from potato chip medium! The behavior seems identical.

I know, that's just not funny at all. Seriously, in my many years of manufacturing experience I would be forced to consider that the material in the faulty shells (hopefully a small fraction of those produced) is crap if not potato chips.

I no longer believe it is more about flow lines or cycle times, or even a poor design, or completely wrong material choice. Yes, those all probably need addressing by DJI, but the resin itself must have been compromised in some really important way. Perhaps exposed to too much humidity? Mixed with a different resin? Too much bad re-grind (yes, there is good regrind too) from other products? This is why I firmly believe molding is contracted out, and not performed at DJI. They are better than this. Something happened to this plastic. But what?! At least it is white, so we know it isn't dirt...although, a little carbon black might be nice.

This is why material control is so fundamental to good plastic products. IF the material cannot be controlled for quality, then the the design must be ROBUST. It is a shame that, whatever the reality at DJI happens to be, we already have the possibly sub-optimal product so we must ourselves make our own aircraft shells more robust.
Oh, well.
 
Last edited:
I think we all need to remember where these things are made and adjust our expectations accordingly. I'm amazed every time it comes back to me I once piece.
 
The Real Carbon Fiber Cloth Plain weave kit and epoxy resin

I would get a batch of that, Scuff the surface
http://www.amazon.com/Scratch-Brush-Fiberglass-Colors-vary/dp/B0019V18D2/ref=pd_sim_263_5?ie=UTF8&refRID=0R5RRSDNPXJT9B0XEWNN&dpID=21cZx0a5RzL&dpSrc=sims&preST=_AC_UL160_SR160,160_

Clean the thing real well with MEK, Make sure you only clean the surface, it will etch and could dissolve the plastic. I just checked and it will eat the plastic so be careful to only clean the surface. Let the MEK evaporate in a clean environment for a couple hours.

Cut you some small patches of the CF cloth. Mix a small amount of the resin, mix precisely very precisely. Put down a thin but even layer of the epoxy (make sure to make it slightly larger than your CF patches) and let get tacky to the touch, time can vary depending on how well you measured the resin and hardener, keep testing until a nice fingerprint remains. Put down the fiber patch on the resin. Mix resin/hardener, put on top of patch and repeat the entire process until you are satisfied, 3-4 layers will probably be fine. 24-48 hours later you have a permanent fix.

I laid two layers of that ebay fiber under the weight of a book in a ziplock bage it measured 0.05" Just measured the dry CF, if they sent the same 3Kplain weave, it is 0.01" thick.
You really should have nitrile gloves and a respirator, good ventilation.

Not easy but a good fix for sure.
Question on this Chuck- this seems like I'd not be actually gluing the crack itself, but bonding a bandage over it to keep it from spreading. Would I not be putting anything directly into the crack first?
Also if I build up 2-3 layers of this stuff, won't that prevent me from putting on he UAVbits strong Arm reinforcement plates? Those seem to fit into that screwhole pretty closely.
 
I got the CF kit from that ebay link with the intent of learning how to best solve the problem of the cracks when/if my P3 gets them. I have used it a couple different times on projects and am convinced they will solve the problem of the cracks or the motor busting out of the mounts. I don't have the strong arm plates so don't know the tolerance for them to fit. I use the DJI prop guards mounted on the outside two screws and do not have cracks anywhere else so have not done anything except re-torque all the other screws to much less than factory and applied torque stripe indicator to each screw to see if they are backing out. It is my full intent to send the unit back to DJI if the cracks appear while under warranty. If cracks form and they are not covered by warranty I plan to cover the entire bottom side of the arm, from LED to the end of the arm, including down in the screw holes with 3 layers of the CF from the kit. The CF weave is extremely thin at 0.01" thick. I will probably find dowels or the like that are slightly larger in diameter than the screw heads, coat them with mold release wax and insert them in the screw recesses after layup and before it sets-up. Once cured re-drill the holes through the new CF re-enforced shell.

This is probably not for the average Joe off the street but how many of us Phantom fliers are the average Joe? If you really want to solve your cracks problem for good, get you a nice CF kit and practice. For 25 bucks you can do a lot of practicing and still have plenty left over for the P3 arm reinforcement fabrication. For a truly professional fit I may do layers inside and outside the lower half with low viscosity resin and bag and vacuum.

Don't want to burst any bubbles here but Bondic is ****, not at all for this application.
 
Thx again. I'll refund the Bondic. Put the $ towards the CF cloth
 
Chuck -Re the MEK- you say "only clean the surface"- and "it will eat the plastic"
So- you mean just the outside around the crack where I intend to put the CF cloth- don't get it IN the crack?
And how to prevent it eating the plastic?
Use cotton swab or cloth to wide area well - then wipe clean with new dry cloth?
Also-
Any reason NOT to use something like JB Weld epoxy inside the crack first?

I use MEK a lot to clean surfaces before I glue them. Many plastics and most paints can be dissolved by the MEK. I used to work on F-16s for the Air Force in Depo repair as an aircraft electrician. Wire bundles all over the aircraft are tied to studs that are fixed to the inner skin of the aircraft using a type of epoxy. The surface is prepped with about a 50/50 mixture of acetone and MEK. MEK by it's self evaporates very fast and is a bit harsh. I use it straight because I want the cleanest bonding surface. If the MEK spends more than a few seconds on the plastic of the P3 it will begin to dissolve the plastic, kind of like gasoline in a Styrofoam cup. You really don't want it to stay in contact except a few seconds just to get off the dirt, any grease or residual mold release from manufacturing, it will wipe that stuff right away. The surface of the P3s plastic will be slightly tacky for a few seconds after you wipe it down, truly the cleanest the surface will ever get.

Interesting epoxy used on F-16 studs, came in 2 pre-measured contaners, a small amount of super thin hardener and an ounce or so of light brown slightly syrupy resin. If you simply poured the hardener into the resin, gave it a little stir, and in about 30 seconds it would get real hot, begin to bubble and come out of the container like a volcanic eruption hardening before it ever touched anything. Crazy stuff.

A 50/50 mix of acetone and MEK would probably be ideal cleaning solvent for this application.

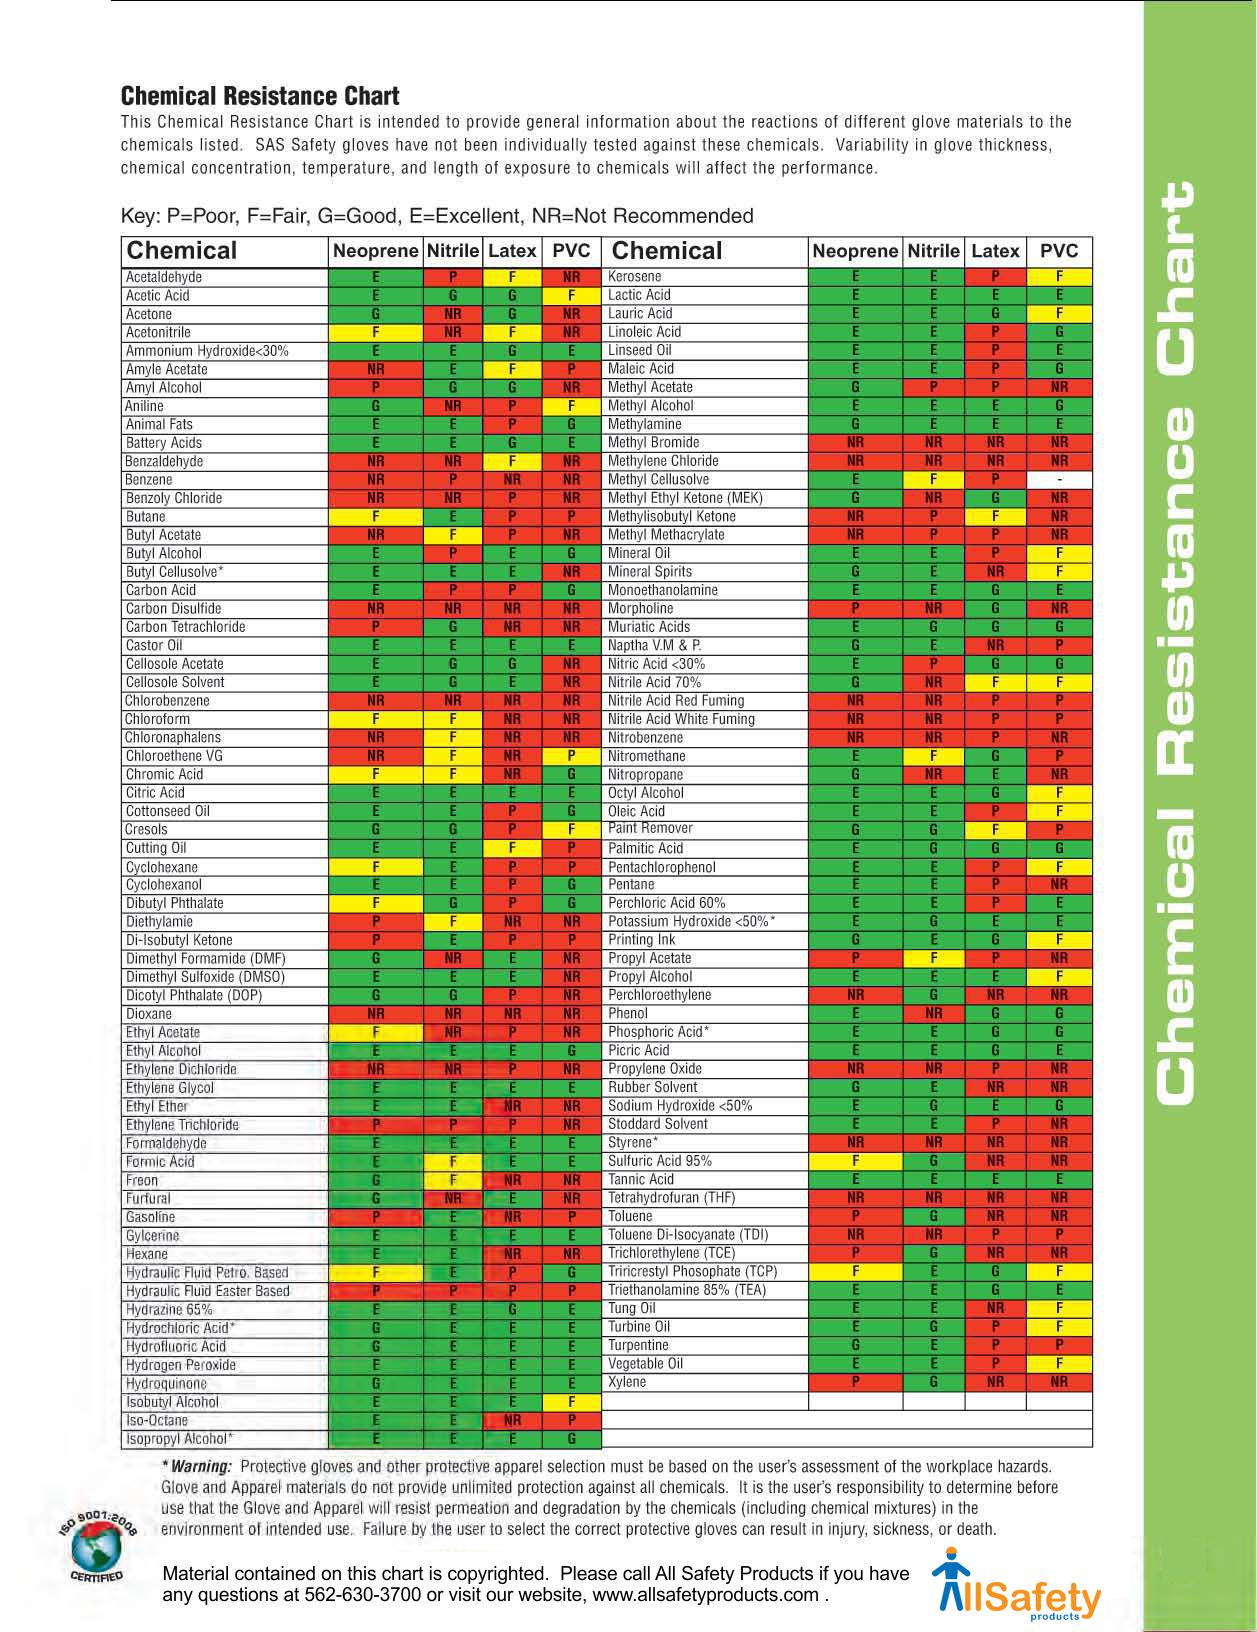
BTW you probably should use Neoprene gloves for the solvents and should check the MSDS for the resin/hardener that comes with your CF kit. A chemical will "breakthrough" most any glove you use after a period of time, should switch out your gloves before that happens.

sas_glove_chemical_resistance_chart.jpg
 
Last edited:
Chuck -Re the MEK- you say "only clean the surface"- and "it will eat the plastic"
So- you mean just the outside around the crack where I intend to put the CF cloth- don't get it IN the crack?
And how to prevent it eating the plastic?
Use cotton swab or cloth to wide area well - then wipe clean with new dry cloth?
Also-
Any reason NOT to use something like JB Weld epoxy inside the crack first?


JB weld is some good stuff, I like it alot. Seem to have better luck with the 24 hour cure stuff than the 5 minute and it should stick quite well to the surface. Problem I see with just Jb weld is it won't add much structural strength to the system. The CF will.
 
Cool. Then I will use the JB Weld in the crack and cover the area with the CF cloth after cleaning with the Mek
Thanks again for the detailed responses.
 
JB weld is some good stuff, I like it alot. Seem to have better luck with the 24 hour cure stuff than the 5 minute and it should stick quite well to the surface. Problem I see with just Jb weld is it won't add much structural strength to the system. The CF will.

Also agree on JB Weld. There is a video on Youtube showing them lift a car off the ground with a crane and its using JB Weld as the glue between 2 pieces of aluminum. Its black and not white but very strong. It takes exact 24 hours to cure and can only be removed with high heat or a grinder/Dremel.

JB can be made stronger if you add fiberglass tape or drywall tape to re-enforce the area cracked and smear JB over it as needed. Its worth a shot if your body is badly cracked.
 
I once used JBweld to glue a wheel hub that the key-way wallowed out on a 4wd International Scout. Wheel busted loose and passed me going down the highway. LOL After the jbweld fix I drove that thing everywhere in Oklahoma, about 50% low gear in the creek and river beds. Had to change an axle bearing, heated it with an old blow-torch until it was smoking, slipped off like it was a buttered bullet. Glued it right back on and went dove hunting the next day on the Red River.
 

Members online

Forum statistics

Threads
143,066
Messages
1,467,359
Members
104,936
Latest member
hirehackers