You are using an out of date browser. It may not display this or other websites correctly.
You should upgrade or use an alternative browser.
You should upgrade or use an alternative browser.
Stage 2 installed
- Thread starter GSSP
- Start date

- Joined
- Nov 25, 2014
- Messages
- 302
- Reaction score
- 21
- Joined
- Nov 25, 2014
- Messages
- 302
- Reaction score
- 21
Just finished first flight with stage 2,,, I AM VERY VERY IMPRESSED!!!!!! I shot up to double altitude (not going to say how high) and buzzed around in a circular pattern range of 2000+ feet with full control, the bird seemed to be much more responsive!!!!
I see you chose a different route for the 5.8 cable, did you eliminate the original antenna or are the both connected. Im just wondering because I plan to buy the stage 2 just to get a little more distance as I don't use my PV+ for lots of distance shots. I live in PR with mountains and tall housing, will the directional antennas be affected with obstacles in the way if i say the i'm in range of a couple 100 ft, I'm trying to put together everyone post but they kinda go different ways, some say it works and some they're having difficulties. So far your the newest post and and seems to work for you! Sorry for the intrusion on your post and thanks in advance.
- Joined
- Nov 25, 2014
- Messages
- 302
- Reaction score
- 21
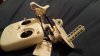
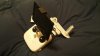
Yes, I wanted to minimize the bends in the cable, if i mounted in the top I did not like how much the 5.8 cable would have to bend and rotation of the wifi extender/antenna assembly would stress the cable, plus I wanted it to fit nicely in the case, I eliminated the factory 5.8 antenna, I bonded the small internal cable at the case exit, on my radio removing the silicone covering the attachment point was difficult, as an old man I needed a magnifying glass and a scalpel, make sure to secure this connection with silicone adhesive or in my case a hot glue gun
Thnx GSSSP, I appreciate the insight and the advice... would it be too stressful to remove the antennas during storage and fix them when ready to fly... or is it just better to cut out the needed space in the case foam.
- Joined
- Nov 25, 2014
- Messages
- 302
- Reaction score
- 21
I drilled top and bottom of WIFI extender:
Please understand that removing the silicon over the connector is very difficult as the connector on the board is VERY fragile, a razor blade is almost to bulky to use, a used a very small surgical scalpel
https://www.youtube.com/watch?v=ZFltb2f08l8
https://www.youtube.com/watch?v=7iwxl79o8A8
Please understand that removing the silicon over the connector is very difficult as the connector on the board is VERY fragile, a razor blade is almost to bulky to use, a used a very small surgical scalpel
https://www.youtube.com/watch?v=ZFltb2f08l8
https://www.youtube.com/watch?v=7iwxl79o8A8
I ordered the Stage 2 kit but I noticed there are two videos. One shows that all ya need is the one that mounts on the transmitter. The other one shows a antenna on the drone itself. In the kit it doesn't list the one for the drone. Is that something extra you guys are installing?
If im not mistaken thats a stage 3 and above kit that your talking about. The stage 2 is just for the remote-pilot side.
Tony McDrone
Premium Pilot
Stage 1. remote upgrade, fpv only.
Stage 2. remote upgrade, for fpv and control antennas.
Stage 3. remote and quad upgrades with antenna for both control and fpv.
Stage 4. remote and quad upgraded antennas, as well as 2.4 and 5.8ghz boosters for both.
None of these upgrades require soldering, only removal of adhesive.
Stage 2. remote upgrade, for fpv and control antennas.
Stage 3. remote and quad upgrades with antenna for both control and fpv.
Stage 4. remote and quad upgraded antennas, as well as 2.4 and 5.8ghz boosters for both.
None of these upgrades require soldering, only removal of adhesive.
tmc6663 said:Stage 1. remote upgrade, fpv only.
Stage 2. remote upgrade, for fpv and control antennas.
Stage 3. remote and quad upgrades with antenna for both control and fpv.
Stage 4. remote and quad upgraded antennas, as well as 2.4 and 5.8ghz boosters for both.
None of these upgrades require soldering, only removal of adhesive.
Are you sure that stage 3 or 4 does not require soldering? I thought all bird side upgrades required soldering.
Tony McDrone
Premium Pilot
No soldering is required to connect ANY of the antennas. They are all attached by mmcx connectors, very easily snapped on. The difficult part is removing the black goo of death from the connections inside the quad. Once that's complete, everything else is very easy.
Ciguli, did your installation require soldering?
Ciguli, did your installation require soldering?
tmc6663 said:No soldering is required to connect ANY of the antennas. They are all attached by mmcx connectors, very easily snapped on. The difficult part is removing the black goo of death from the connections inside the quad. Once that's complete, everything else is very easy.
Ciguli, did your installation require soldering?
I only have stage 2 installed which did not require soldering. Never tried stage 3 and 4 as I thought they required soldering. I am glad to hear that. I was already getting bored with my upgraded distance anyway. Time for the next stage(s).
- Joined
- Nov 25, 2014
- Messages
- 302
- Reaction score
- 21
ciguli said:Installed mine yesterday. I am getting about 1200 meters in distance. Haven't pushed it to its limits as I was worried about the battery life. Is this a good result for stage 2?
yes
Well I installed the Stage 2 set up yesterday and at first only flew it a couple of hundred yards around me. It was windy and cold. Took it up around 300 foot and then took it to a point I was unable to see it any more. All went well. Still doing some testing. I don't have the balls to take it a couple of miles away from me like others do. Two I would be afraid the battery wouldn't last that far away..lol,....yeah I a puss to take a chance like that.
Similar threads
- Replies
- 0
- Views
- 373
- Replies
- 0
- Views
- 807
- Replies
- 1
- Views
- 2K