Install photos of H3-3D and older Phantom 2

Joined
Mar 20, 2014
Messages
747
Reaction score
55
Location
Boston, MA
Here are a few install photos that might help someone.

I used a Dremmel to open the existing hole for the 3rd axis motor. I added #10 stainless steel washers under the mount to pull the 3-rd axis motor out of the hole a bit to add clearance with the battery. I also used some superglue to hold the washers in place during mounting. Finally, I mounted the interference circuit board inside the P2 for a nice clean look, with nothing external except the gimbal and FPV Tx. My mini-iOSD is also mounted internally.

All working great! Need to get it airborne next.

Images here:
https://www.dropbox.com/sh/3py9d1glpjco97s/1sKWfF0du-/H3-3D_INSTALL
 
Where did you buy the H3-3D from?
I cant find anyone with stock anywhere.
And what is the interference board for?
 
US Hobby. They just got a few in this week, and I was on the waiting list. The interference board helps get rid of jello and video interference. It comes with the H3-3D.


Sent from my iPhone using Tapatalk
 
damoncooper said:
US Hobby. They just got a few in this week, and I was on the waiting list. The interference board helps get rid of jello and video interference. It comes with the H3-3D.


Sent from my iPhone using Tapatalk


The board does nothing for jello. Its for getting rid of the interference between the ALV58 and a monitor like the Boscam
 
damoncooper said:
Here are a few install photos that might help someone.

I used a Dremmel to open the existing hole for the 3rd axis motor. I added #10 stainless steel washers under the mount to pull the 3-rd axis motor out of the hole a bit to add clearance with the battery. I also used some superglue to hold the washers in place during mounting. Finally, I mounted the interference circuit board inside the P2 for a nice clean look, with nothing external except the gimbal and FPV Tx. My mini-iOSD is also mounted internally.

All working great! Need to get it airborne next.

Images here:
https://www.dropbox.com/sh/3py9d1glpjco97s/1sKWfF0du-/H3-3D_INSTALL

This is something I'll be looking at doing too when my H3-3D arrives so thanks for that.

I'll be very interested to see, after your flight tests, if those washers give you sufficient clearance between that motor and the battery 100% of the time.

Please keep us updated :)
 
Keep us posted on how everything works! From the pictures, it looks like gimbal still goes up in battery compartment quite a bit!
 
So, got to fly today. Will post a short clip shortly but....ZERO jello, zero problems, amazing with 3D gimbal. Flew into the sun to try to make some bad crap happen and...nothing but amazing video. I do feel for the folks who have compass or stability or jello issues but I ain't one of them thankfully. Cheers.


Sent from my iPhone using Tapatalk
 
Thanks Damon. Looks good. Thanks for posting.

Hopefully I'll have mine here on Saturday, or early next week. I think my dealer is sending an adaptor with it so I'll look at the 'ground clearance' that gives me and, if I don't think it sufficient (or if the adaptor doesn't arrive) then I'll go your route.
 
damoncooper said:
I used a Dremmel to open the existing hole for the 3rd axis motor. I added #10 stainless steel washers under the mount to pull the 3-rd axis motor out of the hole a bit to add clearance with the battery. I also used some superglue to hold the washers in place during mounting. Finally, I mounted the interference circuit board inside the P2 for a nice clean look, with nothing external except the gimbal and FPV Tx. My mini-iOSD is also mounted internally.[/url]

OK, I did almost the exact same thing this weekend.

1. I cut a clean hole the exact same size as the hole in the gimbal mount, using my normal drill and three Dremel type grinding attachments, one conical, one spherical, and one cylindrical
2. I tried fixing the gimbal straight to the base of the Phantom without using washers and it's definitely a no-go, the battery touches the top of the motor. I just had to prove it to myself ;)
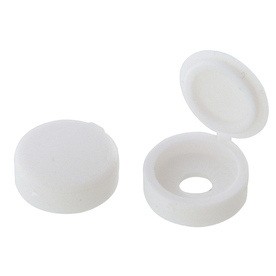
3. Instead of washers, I used the plastic 'cups' from those fittings you get for hiding screw heads
4. I also installed the anti-interference board and the iOSD-mini inside the Phantom shell

I've never done anything like this before but I followed Damon's helpful pics and these two videos and it was pretty easy
https://www.youtube.com/watch?v=TL8pqtEDuos
https://www.youtube.com/watch?v=LSZWdcd4WZ0

Comments:
I got slightly confused in the first video at 3:00 and had to play it several times before becoming confident that I could cut off the green, white and red wires from the Immersion RC Tx.

I had to go back and replay the same video several times at 3:30 and at 4:20 because there are two black ground cables, one for the video ground and one for the power ground and I wanted to be absolutely sure I was connecting the right ones! So, yes, at 3:30, the black cable he refers to is the one mixed in with the red, green, white and yellow wires attached to the Tx connector. The black cable referred to at 4:20 is the one coming from the separate red+black Tx power cable.

Heat shrink tubing is a must. I got my dealer to put a length in with my order.

As to fitting the interference board, this was not as easy as it could have been because the ribbon cable from the board to the Phantom's Zenumuse socket needs to be a couple of centimetres longer. I actually had it fitted very nicely, all connected and stuck in place, but when I came to fit the gimbal, the cable to it from the board wouldn't reach! :evil: So I had to un-stick the board (NOT easy) and turn it the opposite way round. In this orientation, the ribbon cable supplied with the board was very tight, but there was nothing I could do about that (that's why I say that this cable needs to be longer)

These are the plastic things I used as washers. I broke off and threw away the snap-cap bit and used the part with the hole in (upside down)
008236225648lg.jpg


Finally, because of the depth of these 'washers' the screws supplied to fix the H3-3D to the Phantom are too short, I found I needed them to be about 7.5 mm in length otherwise they project into the Phantom battery bay and prevent the battery from being fully inserted. Luckily I had some long prop-guard screws I didn't need and I ground these down to the right length.

So thank you, Damon, for being the guinea-pig! :D
 
Gotcha. I'm on day 7 of a vacation in Turks and Caicos. I've got the quad with me but I burned out my FPV Tx and I'm still learning to fly so not much share-worthy video yet unfortunately.
 
Thanks Damon - your pics were a great help. One difference for me as Peter, I mounted mine without spacing it and it works. Mine is a Vision shell I used for my P1.5 conversion might explain some difference.

Here's first test flight in 15mph winds in backyard - https://www.youtube.com/watch?v=lquy2ngpVgA
 
EMCSQUAR said:
I mounted mine without spacing it and it works. Mine is a Vision shell I used for my P1.5 conversion might explain some difference

Yes, the Vision and the 'H3-3D ready' Phantom 2s seem to be a bit 'fuller in the belly' than the original Phantom 2 at that point.

Your video proves it's working great, Mical!

After all that cutting and soldering and sweating (and cursing that effing interference board!) this weekend, I'm gutted that I can't test mine.

PS
I love the way you can control the speed and the extent of the GoPro's tilt in Phantom 2 Assistant. I've also engaged FPV mode :cool:
 

Recent Posts

Members online

No members online now.

Forum statistics

Threads
143,087
Messages
1,467,528
Members
104,965
Latest member
cokersean20