


Hi guys,
I have decided to post a quick guide on how to fix ongoing issues with the Phantom 2 Vision camera unit, specifically with image softness or lack of focus.
After long hesitation on whether to buy the Phantom 2 Vision, having in mind I’ve seen lots of sample images from it being completely out of focus or soft on one of its sides, I have finally decided to go ahead and risk and buy the quad. I was quite unfortunate to find out my unit was having heavy issues with lack of focus in the center and left side of the image while the right side was very sharp.
While the quad is in warranty it was bought from abroad and would be quite a hassle to send it back so I have decided to check on how and if I can resolve it by myself. And I have achieved… great success.
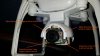
So first of all you need to remove the whole camera/wifi unit from the Phantom 2.
1. Start by removing the small plug on the back of the camera and gently remove the camera from the rubber bumpers.
2. After which you will need to disconnect the servo lead on the bottom of the camera.
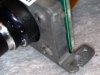
3. When you do so, remove the four little screws holding the bottom cover, you will need 1.5 mm Allen key. Be careful with the shutter button as it may fall off. It’s best to tape it before you start disassembling.
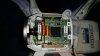
4. Once you remove the bottom cover you will need to unscrew the camera unit inside which is held by two little screws. You can use the screwdriver which comes with the Phantom. Just be careful with the little lens and with the ribbon cable for the camera sensor.
5. Once you remove the unit you will see that the sensor is held to the lens with 4 tiny screws. And that is where the issue lies. It appears DJI do not make quality check and/or adjustments to the camera lens. Therefore it is not aligned to the sensor so the two are perpendicular to each other. In other words you achieve tilt-shift effect as the lens is tilted to a very small degree on one side and therefore the image is soft on one side or completely. In my case it was soft on the left side and center as two of the screws were very over tightened resulting in a tilted sensor.
6. So what needs to be done is to adjust the tension between the sensor and the lens in such way to increase or decrease the distance from the sensor to the lens where the image is soft.
Take into account that the image is flipped vertically (like with a telescope) and is corrected by software in camera to appear normal. Therefore for example if your image is soft on the bottom left you will need to adjust the top right screw on the camera unit.
So after doing all this my image is completely sharp with slight softness on extreme corners which is fine for me.
If you want try it. It saved my whole experience with the Phantom 2 Vision
I have decided to post a quick guide on how to fix ongoing issues with the Phantom 2 Vision camera unit, specifically with image softness or lack of focus.
After long hesitation on whether to buy the Phantom 2 Vision, having in mind I’ve seen lots of sample images from it being completely out of focus or soft on one of its sides, I have finally decided to go ahead and risk and buy the quad. I was quite unfortunate to find out my unit was having heavy issues with lack of focus in the center and left side of the image while the right side was very sharp.
While the quad is in warranty it was bought from abroad and would be quite a hassle to send it back so I have decided to check on how and if I can resolve it by myself. And I have achieved… great success.
So first of all you need to remove the whole camera/wifi unit from the Phantom 2.
1. Start by removing the small plug on the back of the camera and gently remove the camera from the rubber bumpers.
2. After which you will need to disconnect the servo lead on the bottom of the camera.
3. When you do so, remove the four little screws holding the bottom cover, you will need 1.5 mm Allen key. Be careful with the shutter button as it may fall off. It’s best to tape it before you start disassembling.
4. Once you remove the bottom cover you will need to unscrew the camera unit inside which is held by two little screws. You can use the screwdriver which comes with the Phantom. Just be careful with the little lens and with the ribbon cable for the camera sensor.
5. Once you remove the unit you will see that the sensor is held to the lens with 4 tiny screws. And that is where the issue lies. It appears DJI do not make quality check and/or adjustments to the camera lens. Therefore it is not aligned to the sensor so the two are perpendicular to each other. In other words you achieve tilt-shift effect as the lens is tilted to a very small degree on one side and therefore the image is soft on one side or completely. In my case it was soft on the left side and center as two of the screws were very over tightened resulting in a tilted sensor.
6. So what needs to be done is to adjust the tension between the sensor and the lens in such way to increase or decrease the distance from the sensor to the lens where the image is soft.
Take into account that the image is flipped vertically (like with a telescope) and is corrected by software in camera to appear normal. Therefore for example if your image is soft on the bottom left you will need to adjust the top right screw on the camera unit.
So after doing all this my image is completely sharp with slight softness on extreme corners which is fine for me.
If you want try it. It saved my whole experience with the Phantom 2 Vision

")


