Another H3-3D P2 hole mod

Joined
Oct 21, 2013
Messages
304
Reaction score
5
Location
Orange County, CA
So i will try to make it short and show some good pictures.

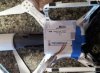
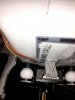
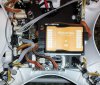
1. Mark out hole by mounting gimbal dampener bracket. I also did not want to take it all apart so i made a little box from cardboard to put in battery slot to catch all the shavings as well as put a vacuum in there.


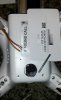
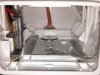
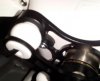
2. Cut hole with dremel tool and clean up the edges by sanding.


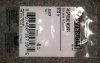
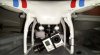
3. Fit the gimbal onto the P2. I used neoprene washers i got from Homedepot. These worked perfect and the are rubber like, so they can help unwanted vibrations.
 

Attachments

  • 1.jpg
    1.jpg
    37.1 KB · Views: 1,349
  • 2.jpg
    2.jpg
    21.3 KB · Views: 1,343
  • 7.jpg
    7.jpg
    48.3 KB · Views: 1,387
Gimbal mounted with washers and i also had to use longer m3x8 screws from Homedepot and used small amount of locktight.


Battery clearence is fine. The yaw motor does not stick very much at all in the case. I also routed the gimbal harness down the middle like i saw ianwood do and made a little slot for the cable to come through.
 

Attachments

  • 4.jpg
    4.jpg
    27.8 KB · Views: 1,366
  • 6.jpg
    6.jpg
    19.1 KB · Views: 1,437
  • 5.jpg
    5.jpg
    481.6 KB · Views: 1,307
4. Mount AI board. Pretty easy, screws right onto main board with 2 main board screws. It is the board at the bottom right next to the Naza. The left plug goes to the zenmuse plug on the main board and the right one goes to the gimbal.


5. Before closing up make sure the gimbal works and turns on. Then close her all back up.


6. Final steps is to hook P2 up to the Assistant and do a stick calibration, basic imu cali, and advance cali (all with P2 perfectly level). Then do the RC assist and calibrate sticks. After all this i noticed my gimbal had little tilt movement when using the tilt control and could not figure it out, so i broke down and updated to the latest firmware. In the gimbal section in the advance menu i noticed that the gimbal movement was set to -30 and -30, so i set both to 0 and all was good. I also set tilt gain to 3 so i can get slow smooth tilt.

Then go outside, calibrate compass and fly and make sure all is working well. I flew for only a few minutes and all seemed good with smooth video and no jello so far. I will fly more tomorrow and post a quick video.
 

Attachments

  • 3.jpg
    3.jpg
    53.7 KB · Views: 1,370
  • 20140516_190939-1.jpg
    20140516_190939-1.jpg
    42.8 KB · Views: 1,279
Great post, thanks. Are these 'neoprene washers' made of the same material as the basic rubber washers that are found in any hardware store's plumbing section?
 
shartlza said:
Yes, it actually said they where for plumbing fittings.
Thanks. I just had a look at my small town hardware store's plumbing section, and they had some rubber washers, but none that were 5/32". I guess I'm going to have to look elsewhere :( Or does the size not matter too much, I wonder?
 
Oh....wait. Is 5/32" the inside diameter, or outside diameter?
 
Wouldn't there be an easier way to mount the AI board inside without cutting a hole inside the shell? Perhaps simply purchasing a longer cable which leads from the AI board mounted inside the shell, which could go out the same hole used for the CAN bus?
 

Recent Posts

Members online

No members online now.

Forum statistics

Threads
143,086
Messages
1,467,528
Members
104,965
Latest member
Fimaj